You can customize options related to Digital First Omnichannel cases![]() An interaction with one contact about one topic that can consist of many inbound and outbound messages.. In Digital First Omnichannel a case can contain many smaller interactions that take place over a period of hours or even days.
An interaction with one contact about one topic that can consist of many inbound and outbound messages.. In Digital First Omnichannel a case can contain many smaller interactions that take place over a period of hours or even days.
Create Tags
You can define tags to categorize and prioritize cases![]() An interaction with one contact about one topic that can consist of many inbound and outbound messages.. Agents can apply tags to cases as they work on them. You can have Digital First Omnichannel automatically tag cases based on conditions you define in workflow automation. When you create filters for routing queues
An interaction with one contact about one topic that can consist of many inbound and outbound messages.. Agents can apply tags to cases as they work on them. You can have Digital First Omnichannel automatically tag cases based on conditions you define in workflow automation. When you create filters for routing queues![]() The system uses routing queues to determine which agents to route cases to. Your system administrator creates routing queues so that certain cases are routed to agents with expertise in that type of case., you can assign tags to have Digital First Omnichannel route cases based on certain tags.
The system uses routing queues to determine which agents to route cases to. Your system administrator creates routing queues so that certain cases are routed to agents with expertise in that type of case., you can assign tags to have Digital First Omnichannel route cases based on certain tags.
- Click the app selector
 and select ACD.
 -
Go to DFO > Tags.
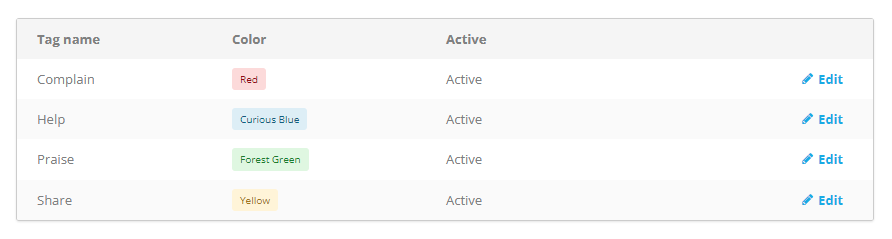
- In the Create new tag... field, enter a name for the tag.
- To assign a color to the tag, click the circle on the right side of the tag field and then click the color you want to use.
- Click the checkmark to add and activate the tag.
Create Auto-Tags
Auto-tags are applied automatically when certain keywords that you define appear in a message or post. They can be used to prioritize and route cases![]() An interaction with one contact about one topic that can consist of many inbound and outbound messages.. You can use tags you've already created, or you can create an auto-tag and a regular tag at the same time.
An interaction with one contact about one topic that can consist of many inbound and outbound messages.. You can use tags you've already created, or you can create an auto-tag and a regular tag at the same time.
This feature will be deprecated in a future release. It is recommended to use Workflow Automation instead, which provides more flexibility.
- In the Digital First Omnichannel portal, click Settings > Tags > Auto-tagging.
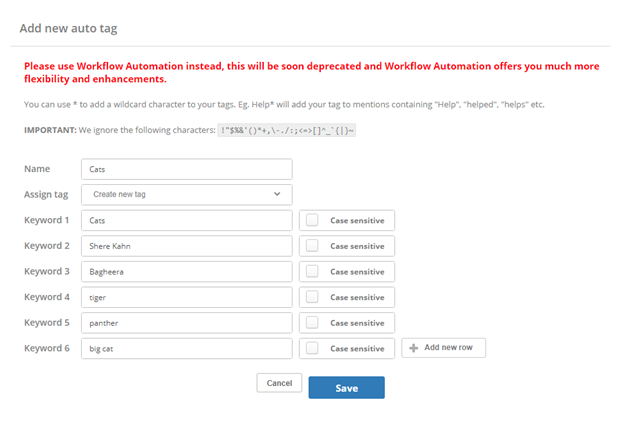
- Click Add new auto tag.
- Enter a Name for the auto-tag.
- If you want to assign an existing tag to this auto-tag, select it from the Assign Tag drop-down. If you want Digital First Omnichannel to create a new tag for this auto-tag, leave Assign Tag set to Create new tag. The new tag will have the same name as the auto-tag.
- Enter a value in Keyword 1. If you want to make the keyword Case sensitive, select that checkbox. The page gives you additional guidance about using wildcards and avoiding unsupported special characters.
- If you want to use additional keywords, click Add new row.
- When you're finished configuring the auto-tag, click Save.
Your new auto-tag is applied to posts and messages received from that point on. However, you can apply an auto-tag to previous posts by clicking Historical Data for that tag, entering a starting date, and clicking Save.

Create Quick Responses for the Knowledge Base
To help agents work cases![]() An interaction with one contact about one topic that can consist of many inbound and outbound messages. more efficiently, you can create a library of quick responses that agents can use to reply to customers. This feature serves a similar purpose as quick replies do for omnichannel
An interaction with one contact about one topic that can consist of many inbound and outbound messages. more efficiently, you can create a library of quick responses that agents can use to reply to customers. This feature serves a similar purpose as quick replies do for omnichannel![]() The ability to work on multiple interactions from different channels at the same time. chat and email channels
The ability to work on multiple interactions from different channels at the same time. chat and email channels![]() A way for contacts and agents to interact, such as voice, email, chat, social media, and so on.. Quick responses can be used with any Digital First Omnichannel channel, including social
A way for contacts and agents to interact, such as voice, email, chat, social media, and so on.. Quick responses can be used with any Digital First Omnichannel channel, including social![]() Public social media interactions, such as on Facebook or Twitter and messaging
Public social media interactions, such as on Facebook or Twitter and messaging![]() Direct interactions using social media like Twitter DM, WhatsApp, or Facebook Messenger channels. Quick responses help ensure consistency and quality in your agents' responses. Agents can find quick responses in the Knowledge Base when they view a post's details.
Direct interactions using social media like Twitter DM, WhatsApp, or Facebook Messenger channels. Quick responses help ensure consistency and quality in your agents' responses. Agents can find quick responses in the Knowledge Base when they view a post's details.
- Click the app selector and select ACD.
-
Go to DFO > Quick Responses.
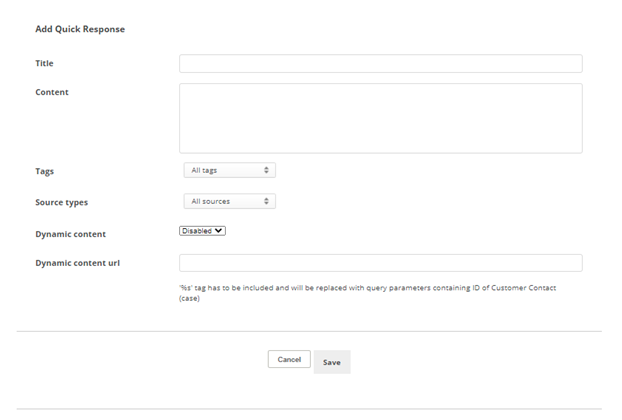
- Click Add quick response.
- Enter a Title for the quick response and the Content of the response.
- Click the Tags drop-down and select those you want this quick response to be available for.
- Click the Source types drop-down and select the channels that you want this quick response to be available for.
- Click Save.
Create Custom Fields for Cases
You can create custom fields that provide information to agents. Custom fields for cases are visible in the case![]() An interaction with one contact about one topic that can consist of many inbound and outbound messages. information that appears in the agent application. You can also create custom fields that agents use to collect information. For example:
An interaction with one contact about one topic that can consist of many inbound and outbound messages. information that appears in the agent application. You can also create custom fields that agents use to collect information. For example:
- If you use Digital First Omnichannel chat channels
 A way for contacts and agents to interact, such as voice, email, chat, social media, and so on., you can customize the pre-chat survey form with custom fields. The pre-chat survey appears before the conversation begins and contains fields for the contact to complete. The information gathered in these fields is then displayed to the agent as part of the case.
 - You can create custom fields and populate them with values. The values can come from the contact entering them in your IVR Automated phone menu that allows callers to interact through voice commands, key inputs, or both, to obtain information, route an inbound voice call, or both. or from a CRM Third-party systems that manage such things as contacts, sales information, support details, and case histories.. The values can also come from some other source using the CC Custom Fields action in your Studio scripts.
- You can create a custom field for agents to use to collect certain information from the customer while handling the case. For example, you might want agents to collect contacts' email addresses, so you would create an custom field that appears in the cas e details that agents can see.
You can also create custom fields for customer cards.
- Click the app selector and select ACD.
-
Go to DFO > Custom Fields.
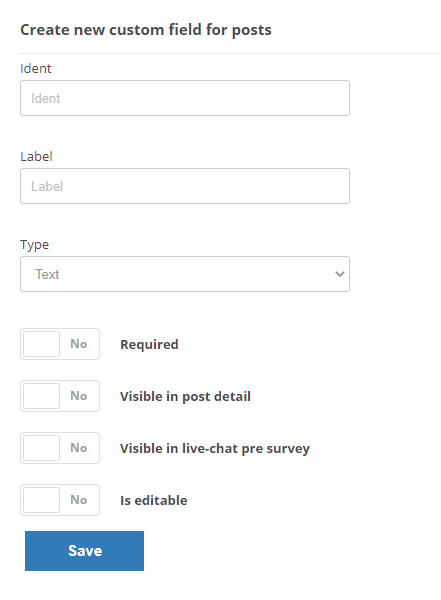
- Click Create New Custom Field for Case.
- Enter an Ident for the field. This is the internal name that's used in the database. It must be all lowercase with no spaces. You can use an underscore character (_) to represent spaces.
- Enter a Label for the field. This is the external name that shows in the case An interaction with one contact about one topic that can consist of many inbound and outbound messages. details or on the pre-chat survey form.
-
From the Type drop-down, select the type of field you want: Text, Email, Drop down list, or Hierarchical.
Learn more about these field types
Field
Details
Text Allows the person completing the field to enter free-form text. E-mail
Requires that the data entered fit the format of an email address. Digital First Omnichannel only validates the formatting. It doesn't validate the email addresses that users enter.
Drop down list Allows you to provide a list of options for the person completing the field to select from. Hierarchical Typically used with pre-chat survey forms, hierarchical fields let the contact zero in on a specific product, problem, and so forth. If you select this type, you will have an additional step to create the hierarchical structure after you save the custom field.
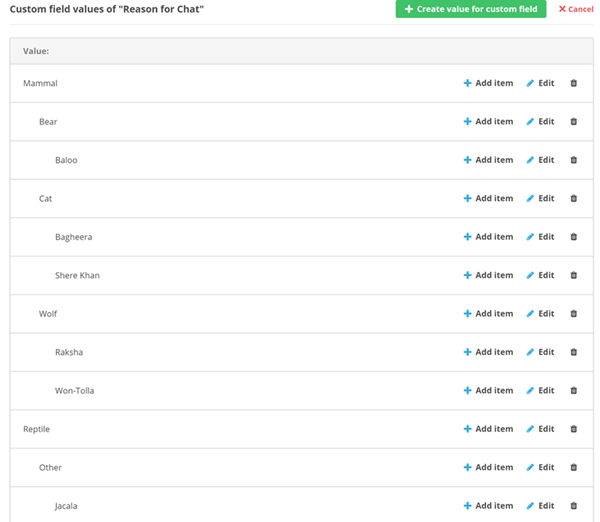
For example, when someone contacts The Jungle, a subsidiary of Classics Inc., they usually need help with one of the animals in the jungle. The contact center administrator, Mowgli Kipling, uses hierarchical fields in the pre-chat form to narrow their choices to Reptiles or Mammals, then within Mammals to Cats, Monkeys, or Bears, and finally within Cats to Shere Khan or Bagheera.
-
You can enable any of the additional parameters for the field by using the sliders.
Learn more about fields in this step
Field Details Required When enabled, this field must be completed for every case. Visible in post detail
When enabled, this field and its values are visible to agents when they view the details of a post
A social media post that can result in multiple threads from various contacts. or message.Visible in live chat pre-survey When enabled, this field and any pre-populated values are visible to contacts completing a pre-chat survey when communicating on a live chat Agents and contacts interact on a real-time basis or chat messaging Asynchronous chat in which contacts send a chat message anytime and wait for a replychannel A way for contacts and agents to interact, such as voice, email, chat, social media, and so on.. Pre-chat survey forms collect information about the contact, such as their name, before an agent handles the case. Is editable When enabled, values in this field can be changed by the contact, an agent, or an automated process. - Click Save.
- If you selected Hierarchical for the Type, set up the hierarchical items:
- Click Edit items.
- Click Create value for custom field.
- For the first item, skip the Parent ID field.
- Enter a Value that will appear to the contact on the pre-chat form.
- Click Save.
- To create another top-level value, repeat the previous 4 steps. To create a child value, click Add item for the field value you just created, enter a Value, and click Save.
- Repeat these steps until you have added all values for the field.