Digital First Omnichannel uses routing queues to determine which agent to route cases![]() An interaction with one contact about one topic that can consist of many inbound and outbound messages. to. You can create routing queues and apply filtering criteria. Filters allow you to define the types of cases that enter each queue. Each routing queue must have at least one filter.
An interaction with one contact about one topic that can consist of many inbound and outbound messages. to. You can create routing queues and apply filtering criteria. Filters allow you to define the types of cases that enter each queue. Each routing queue must have at least one filter.
If you also administer non-Digital First Omnichannel channels (such as voice or Personal Connection SMS, email, or chat), you've probably configured ACD skills![]() Used to automate delivery of interactions based on agent skills, abilities, and knowledge to route interactions on those channels. Routing queues are essentially skills for your digital channels. However, there are some important things to remember:
Used to automate delivery of interactions based on agent skills, abilities, and knowledge to route interactions on those channels. Routing queues are essentially skills for your digital channels. However, there are some important things to remember:
- You create and add filters to routing queues in the Digital First Omnichannel settings. CXone syncs the queues to the ACD Skills list.
- You cannot assign users to a routing queue; instead, find the queue in the ACD Skills list and assign users there, or go to the user profile settings and add the skill to the user.
- Each routing queue must have a unique name. The name you give your routing queue is the same name that will show up in the ACD Skills list, so be sure it is unique from any existing skills, too.
Digital First Omnichannel routing works like this:
- A message enters Digital First Omnichannel from a supported channel.
- Digital First Omnichannel compares the message to the filtering rules for all queues and routes it to the best match.
- If the message matches more than one queue, Digital First Omnichannel routes it based on priority.
- If the case doesn't match any rules for any queues, it's routed to the fallback queue.
- If no fallback queue is configured, the case goes to the backlog.
Mowgli Kipling is the contact center administrator for The Jungle, a subsidiary of Classics, Inc. He needs to set up a routing queue for his Facebook channel. Within that queue, he wants to route his English and Portuguese customers separately. He wants to give cases related to Jungle cats to his more experienced agents, since the cats cause a lot of problems. He also wants to ensure that cases involving social media influencers![]() People on social media with established reputations and large followings who can impact the opinions and actions of their audiences. are given priority.
People on social media with established reputations and large followings who can impact the opinions and actions of their audiences. are given priority.
Mowgli creates two queues called JungleFB-EN and JungleFB-PT, and two sub-queues called JungleCats and Influencers. He adds the appropriate filters to each queue and sub-queue, and then adds both sub-queues to each of the queues. He puts the new queues at the top of the queues list to make sure appropriate cases are routed to it first, even if they fit criteria for other queues.
For JungleFB-EN, the sub-queues are weighted so that cases from influencers take higher priority than those concerning Jungle cats. However, the Jungle cats who live in Brazil generate a lot of cases, so in JungleFB-PT, those cases have higher priority. In both queues, Jungle cat cases are routed to a subset of skilled agents.
If you're setting up routing for the first time, you should perform these tasks in the order they're presented.
Configure General Routing Settings
In the general routing settings, you can configure routing options that apply to all of your digital channels![]() Any non-voice channel, contact, or skill such as email, chat, messaging, work item, or SMS..
Any non-voice channel, contact, or skill such as email, chat, messaging, work item, or SMS..
-
Click the app selector
 and select ACD.
 -
Go to DFO > Routing.
-
Configure the default Digital First Omnichannel routing behavior in the Prioritize routing and Routing fallback fields.
 Learn more about some of the fields in this step
Field
Details
Prioritize routing Select how you want Digital First Omnichannel to prioritize cases when assigning them to agents. You can choose either From oldest to newest or From newest to oldest.
The priority assigned to routing queue filters overrides the global priority that you configure here.
Routing fallback Select the routing queue
Digital First equivalent of a skill; routes each contact to an agent assigned to handle that type of contact that you want cases An interaction with one contact about one topic that can consist of many inbound and outbound messages. routed to when they don't meet any filter rules. If you select No queue, cases that don't match any filters go into the backlog and may not be handled the way you want. If the list contains no routing queues, you need to create one before you can configure this option.
-
Configure how you want Digital First Omnichannel to assign cases to agents in the Preferred agent - Route to preferred agent, and Preferred agent - Fallback time fields.
Learn more about some of the fields in this step
Field
Details
Preferred agent - Route to preferred agent Select Per Case if you want Digital First Omnichannel to route cases to the last agent to handle the case.
Select Per Customer if you want Digital First Omnichannel to route cases to the last agent to interact with the customer.
Select Off if you don't want Digital First Omnichannel to route to preferred agents.
Preferred agent - Fallback time Enter the amount of time you want Digital First Omnichannel to wait before routing a case to another agent if the preferred agent isn't available.
From the drop-down list, select:
- Locked even if agent is offline if you want Digital First Omnichannel to wait the specified amount of time even if the preferred agent is offline.
- Locked only if agent is available if you want Digital First Omnichannel to wait the specified amount of time only if the preferred agent is available.
-
Select the default status you want Digital First Omnichannel to assign to messages when agents send replies to contacts from the Default reply type drop-down list.
- Click Save.
Create Routing Queues
Digital First Omnichannel must have at least one queue![]() Digital First equivalent of a skill; routes each contact to an agent assigned to handle that type of contact with agents assigned to it, or it can't route cases
Digital First equivalent of a skill; routes each contact to an agent assigned to handle that type of contact with agents assigned to it, or it can't route cases![]() An interaction with one contact about one topic that can consist of many inbound and outbound messages.. A queue must have at least one filter. Agents in the queue must have permissions for the channels that route messages to the queue.
An interaction with one contact about one topic that can consist of many inbound and outbound messages.. A queue must have at least one filter. Agents in the queue must have permissions for the channels that route messages to the queue.
When you create a new queue, it's placed as the first queue in the list by default. You can move the queue down in the list if you want to change its priority. Priority determines which queue a message routes to when it meets the criteria for multiple queues. The queue that's closer to the top of the queue list on the Routing Queues page has higher priority.
- Click the app selector and select ACD.
-
Go to DFO > Routing Queues.
- Click Add queue.
- Enter a unique Name for the routing queue.
- Under Present agent with Accept/Reject, you can select the Enabled checkbox. This provides the agent with an option to accept or reject an incoming interaction.
- If you selected the Enabled checkbox, enter the number of seconds the Accept/Reject message should be displayed for the agent in the contact refusal timeout field. Accepted values are between 15 and 300.
- Click Save.
- On the Routing Queues page, use the up and down arrow buttons in the Order column to change the priority of the queue you created. The closer to the top a queue is, the higher its priority.
- Click Save. This triggers automatic synchronization of the queue to the ACD Skills list.
Add Users to a Routing Queue
Each routing queue displays a list of users that are assigned to the routing queue. This list is not editable from this page. Instead, follow the steps to add skills to a user OR add users to a skill. After your changes are saved, they will sync to this page.
Keep in mind that you cannot add sub-queues to a routing queue that has users assigned to it. Instead, you need to add users to the sub-queue.
Configure Filters for Queues and Sub-Queues
Filters provide the rules that tell Digital First Omnichannel how to route cases![]() An interaction with one contact about one topic that can consist of many inbound and outbound messages. to your agents' digital inboxes
An interaction with one contact about one topic that can consist of many inbound and outbound messages. to your agents' digital inboxes![]() Area where cases appear in the digital interaction workspace in an agent application. When cases come in, the system compares them to the rules for each queue
Area where cases appear in the digital interaction workspace in an agent application. When cases come in, the system compares them to the rules for each queue![]() Digital First equivalent of a skill; routes each contact to an agent assigned to handle that type of contact, starting with the first queue in the list. It continues until it finds a match. If a routing queue has sub-queues, Digital First Omnichannel compares cases to each sub-queue's filter rules until it finds a match.
Digital First equivalent of a skill; routes each contact to an agent assigned to handle that type of contact, starting with the first queue in the list. It continues until it finds a match. If a routing queue has sub-queues, Digital First Omnichannel compares cases to each sub-queue's filter rules until it finds a match.
If a case matches the rules of more than one routing queue, Digital First Omnichannel uses the highest-priority queue in the list. For example, Mowgli wants Facebook complaints about jungle cats to go to TheJungleFB queue and not the general complaint queue, so he makes sure TheJungleFB queue is higher in the priority list.
- Click the app selector and select ACD.
-
Go to DFO > Routing Queues.
- Locate the routing queue or sub-queue you want to work on and click the associated Filters link.
- Click Add routing queue filter.
- Enter a Filter name. From the Filtered case priority drop-down, select the priority cases should have if included in this filter. The higher the number, the higher the priority. This overrides the Prioritize routing general routing setting.
- Click Save.
- Select a Condition type from the drop-down. Click Create condition for selected type.
The next page will allow you to configure the criteria for the condition. After configuring a condition, you can add more. Learn more about additional configuration for each condition type
Field Details Included Channels Rule Includes the selected channels in the filter.
The next page displays the list of channels you can choose from. You can search for the one you want. Click Add for each channel you want to include in the filter. Changes are saved automatically.
Included tags rule
Includes the selected tags in the filter.
The next page displays the list of tags you can choose from. You can search for the one you want. Click Add for each channel you want to include in the filter. Changes are saved automatically.
Excluded tags rule Excludes the selected tags from the filter.
The next page displays the list of tags you can choose from. You can search for the one you want. Click Add for each channel you want to exclude from the filter. Changes are saved automatically.
Included sentiments rule Includes the selected sentiments in the filter.
The next page allows you to select checkboxes for which sentiment or sentiments you want to include in the filter. You can choose any combination of Negative, Neutral, or Positive.
Included source values rule Includes the specified source values (where the interaction came from) in the filter.
The next page allows you to enter any URLs you want to include content from. Separate multiple entries with commas.
Customer Card custom fields Includes specific custom fields values from a customer card in the filter.
Depending on the custom field, the next page allows you to enter values in a text field or select values from a drop-down. In text fields, you can separate multiple entries with commas.
Case custom fields Includes specific custom field values from a case in the filter.
Depending on the custom field, the next page allows you to enter values in a text field or select values from a drop-down. In text fields, you can separate multiple entries with commas.
Twitter followers rule Includes cases from Twitter in the filter based on number of followers the author has. For example, you might create a queue with filter rules that gives priority handling to negative mentions of your organization by Twitter users with a large number of followers (influencers).
The next page allows you to configure the criteria for how many followers the Twitter account should have to be pulled into the filter. Select an operator from the drop-down field and enter a number in the text box, then click Save.
Included subjects rule Includes certain topics assigned to cases through natural language processing (NLP).
The next page allows you to enter any subjects you want to include content from. Separate multiple entries with commas. This allows you to automate routing of cases based on subject matter.
Excluded subjects rule Excludes certain topics assigned to cases through natural language processing (NLP).
The next page allows you to enter any subjects you want to exclude. Separate multiple entries with commas. This allows you to automate routing of cases based on subject matter.
Custom rule Includes a URL endpoint to validate data against another source.
The next page allows you enter a URL endpoint. Use the documentation link in the administration portal to create this type of custom rule, or talk to your account manager.
For example, you might configure a custom rule that validates order numbers mentioned in Facebook messages against your order database to help determine whether a negative comment is real or fraudulent.
Date and time rule Routes cases based on date and time settings.
The next page allows you to set the following criteria:
- Include or exclude
- Day of the week or date range
- Up to three time slots
For example, you could set up three queues with the same filter rules except for date and time. This would allow you to route cases for a channel to different agents based on the shift they work.
Include based on Post IDs Includes any cases from the specified Post ID. The Post ID is based on the external platform you are referencing.
The next page allows you to enter any Post IDs you want to include content from. Separate multiple entries with commas.
Exclude based on Post IDs Excludes any cases from the specified Post ID. The Post ID is based on the external platform you are referencing.
The next page allows you to enter any Post IDs you want to exclude content from. Separate multiple entries with commas.
- You can add multiple filters to the queue.
- Use the up and down arrows to order the filters. As with queues, incoming cases are compared to the first to the top filter in the list, then the next, and so on down the list. Therefore, the filter at the top should be the most specific and the filter at the bottom should be the broadest.
Add Sub-Queues to a Routing Queue
You can use sub-queues to create specialized routing within routing queues![]() Digital First equivalent of a skill; routes each contact to an agent assigned to handle that type of contact. Sub-queues can be assigned to more than one queue. For example, if you have different teams that handle specific products or who speak different languages, you could create sub-queues with the agents for each product or language. Then you could assign the sub-queue to each routing queue where you need agents with that specialty. Mowgli creates sub-queues for his JungleFB channels based on source and on subject matter.
Digital First equivalent of a skill; routes each contact to an agent assigned to handle that type of contact. Sub-queues can be assigned to more than one queue. For example, if you have different teams that handle specific products or who speak different languages, you could create sub-queues with the agents for each product or language. Then you could assign the sub-queue to each routing queue where you need agents with that specialty. Mowgli creates sub-queues for his JungleFB channels based on source and on subject matter.
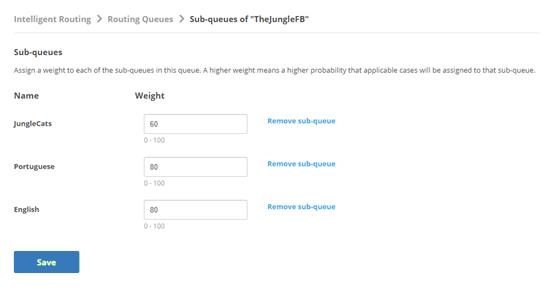
You can assign a weight to each sub-queue. The weight helps Digital First Omnichannel prioritize sending cases to that sub-queue. The larger the number, the more likely it is that cases will be assigned to the sub-queue. If a sub-queue is assigned to more than one routing queue, it can have different weights in each routing queue.
Routing queues cannot have users and sub-queues assigned to them. Remove any assigned users before adding a sub-queue to a routing queue.
- Click the app selector and select ACD.
-
Go to DFO > Routing Queues.
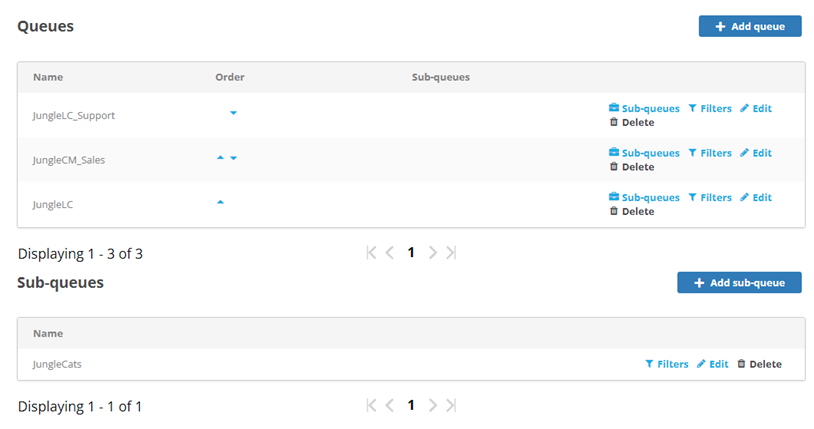
- Under Sub-queues on the Routing Queues page, click Add sub-queue.
- Enter a Name for the sub-queue and click Save.
- Configure filters for the sub-queue.
- Locate the routing queue you want to add a sub-queue to and click its Sub-queues link.
- Click Add sub-queue.
- Select one or more sub-queues from the Sub-queues list and click Save.
-
Assign a weight to each sub-queue to specify how you want to prioritize them within the queue. Sub-queues with a higher weight value will receive more cases than sub-queues with a lower weight value. Mowgli uses weights to prioritize the same sub-queues differently depending on the queue they're in.
- Click Save.