

You can configure many aspects of your chat messaging![]() Asynchronous chat in which contacts send a chat message anytime and wait for a reply or live chat
Asynchronous chat in which contacts send a chat message anytime and wait for a reply or live chat![]() Agents and contacts interact on a real-time basis channels
Agents and contacts interact on a real-time basis channels![]() A way for contacts and agents to interact, such as voice, email, chat, social media, and so on.. If you have more than one channel of either type, you can configure each one separately to meet the needs of your organization.
A way for contacts and agents to interact, such as voice, email, chat, social media, and so on.. If you have more than one channel of either type, you can configure each one separately to meet the needs of your organization.
Customize Chat Widget
The chat widget appears on your website so customers can start either achat messaging![]() Asynchronous chat in which contacts send a chat message anytime and wait for a reply or live chat
Asynchronous chat in which contacts send a chat message anytime and wait for a reply or live chat![]() Agents and contacts interact on a real-time basis session with your organization. If you have more than one chat channel
Agents and contacts interact on a real-time basis session with your organization. If you have more than one chat channel![]() A way for contacts and agents to interact, such as voice, email, chat, social media, and so on., you can have a different widget appearance for each.
A way for contacts and agents to interact, such as voice, email, chat, social media, and so on., you can have a different widget appearance for each.
- Click the app selector
 and select ACD.
 -
Go to DFO > Points of Contact Digital.
- Click Chat.
-
Click Customization for the channel you want to configure.
-
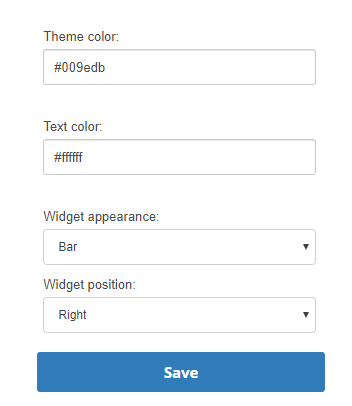
Configure the appearance settings.
 Learn more about fields in this step
Field
Details
Theme color Enter a hexadecimal color code beginning with #. Text color
Enter a hexadecimal color code beginning with #.
Widget appearance Select either a Bubble with a chat image or a Bar with an online status indicator and text. Widget position Select an option to have the widget located on the bottom Right or bottom Left side of the page. -
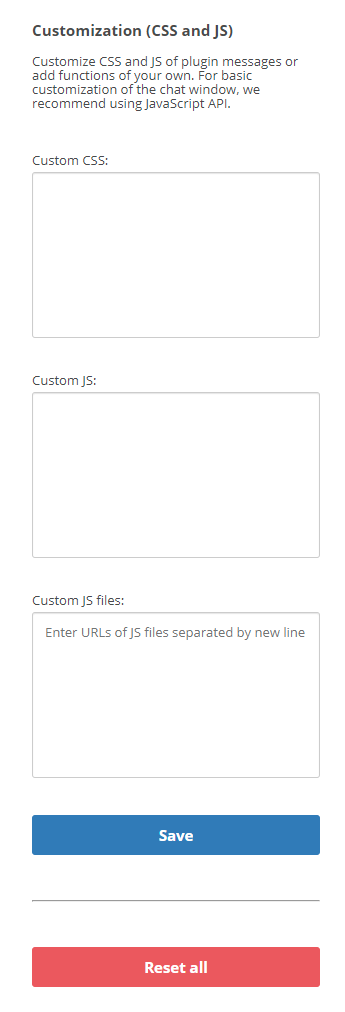
You can add custom content using CSS or Javascript (JS).
-
Click Save.
Configure a Basic Chat Pop-Up
If you'd like to remind visitors to your website that they can chat with your agents, you can configure a pop-up to appear for a chat messaging![]() Asynchronous chat in which contacts send a chat message anytime and wait for a reply or live chat
Asynchronous chat in which contacts send a chat message anytime and wait for a reply or live chat![]() Agents and contacts interact on a real-time basis channel
Agents and contacts interact on a real-time basis channel![]() A way for contacts and agents to interact, such as voice, email, chat, social media, and so on.. You can specify an amount of time a visitor needs to spend on your website before the pop-up appears. You can also configure the pop-up's appearance. This can help drive traffic to digital
A way for contacts and agents to interact, such as voice, email, chat, social media, and so on.. You can specify an amount of time a visitor needs to spend on your website before the pop-up appears. You can also configure the pop-up's appearance. This can help drive traffic to digital![]() Any non-voice channel, contact, or skill such as email, chat, messaging, work item, or SMS. channels instead of voice channels, which are typically more costly and labor-intensive.
Any non-voice channel, contact, or skill such as email, chat, messaging, work item, or SMS. channels instead of voice channels, which are typically more costly and labor-intensive.
If you use a tag![]() A snippet of code placed in the HTML code for a website, which is used by Tag Manager applications. It's different from HTML code tags or tags in social media contexts. manager, such as Google Tag Manager, on your website, you can use it to create highly customizable chat pop-ups in your Digital First Omnichannel chat channels. You can configure pop-ups to appear based on specific behaviors of visitors to your website.
A snippet of code placed in the HTML code for a website, which is used by Tag Manager applications. It's different from HTML code tags or tags in social media contexts. manager, such as Google Tag Manager, on your website, you can use it to create highly customizable chat pop-ups in your Digital First Omnichannel chat channels. You can configure pop-ups to appear based on specific behaviors of visitors to your website.
- Click the app selector and select ACD.
-
Go to DFO > Points of Contact Digital.
- Click Chat.
-
Click Pop ups for the channel you want to configure.
-
Click Add Pop-up in the top right corner of the page.
-
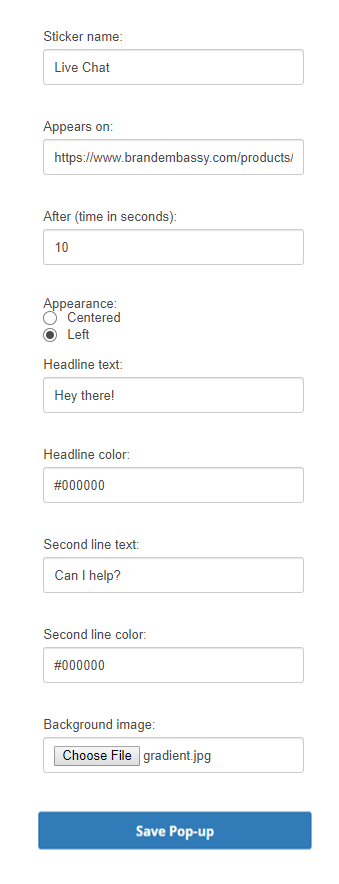
Customize the settings.
Learn more about fields in this step
Field
Details
Sticker name The text that appears in the browser title bar of the pop-up. Appears on
The URL of the page where the pop-up occurs.
After (time in seconds) When the pop-up occurs, specified in seconds after the user loads the page. Appearance Whether the text in the pop-up is centered or left justified. Headline color A hexadecimal code beginning with #. Second line color A hexadecimal code beginning with #. Background image Optional. - Click Save Pop-up.
Customize the Pre-Chat Survey Form
The pre-chat survey form collects information about a contact before starting a chat session. You can configure the fields that appear on the survey form by creating custom fields that are configured to appear on the pre-chat survey. Both live chat![]() Agents and contacts interact on a real-time basis and chat messaging
Agents and contacts interact on a real-time basis and chat messaging![]() Asynchronous chat in which contacts send a chat message anytime and wait for a reply channels have pre-chat survey forms by default. If you don't want the survey form to appear for some chat channels or on certain pages on your website, you can customize the initialization script for those channels or pages using API commands.
Asynchronous chat in which contacts send a chat message anytime and wait for a reply channels have pre-chat survey forms by default. If you don't want the survey form to appear for some chat channels or on certain pages on your website, you can customize the initialization script for those channels or pages using API commands.
- Click the app selector and select ACD.
-
Go to DFO > Custom Fields.
- Click Create New Custom Field for Case.
- Enter an Ident for the field. This is the internal name that's used in the database. It must be all lowercase with no spaces. You can use an underscore character (_) to represent spaces.
- Enter a Label for the field. This is the external name that shows in the case An interaction with one contact about one topic that can consist of many inbound and outbound messages. details or on the pre-chat survey form.
-
From the Type drop-down, select the type of field you want: Text, Email, Drop down list, or Hierarchical.
Learn more about these field types
Field
Details
Text Allows the person completing the field to enter free-form text. E-mail
Requires that the data entered fit the format of an email address. Digital First Omnichannel only validates the formatting. It doesn't validate the email addresses that users enter.
Drop down list Allows you to provide a list of options for the person completing the field to select from. Hierarchical Typically used with pre-chat survey forms, hierarchical fields let the contact zero in on a specific product, problem, and so forth. If you select this type, you will have an additional step to create the hierarchical structure after you save the custom field.
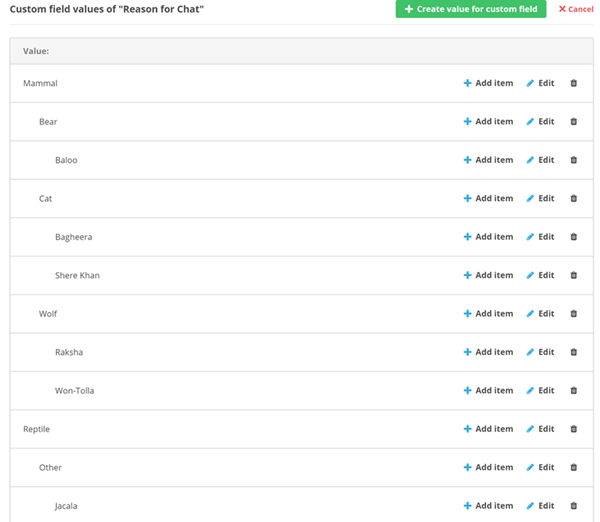
For example, when someone contacts The Jungle, a subsidiary of Classics Inc., they usually need help with one of the animals in the jungle. The contact center administrator, Mowgli Kipling, uses hierarchical fields in the pre-chat form to narrow their choices to Reptiles or Mammals, then within Mammals to Cats, Monkeys, or Bears, and finally within Cats to Shere Khan or Bagheera.
-
You can enable any of the additional parameters for the field by using the sliders.
Learn more about fields in this step
Field Details Required When enabled, this field must be completed for every case. Visible in post detail
When enabled, this field and its values are visible to agents when they view the details of a post
A social media post that can result in multiple threads from various contacts. or message.Visible in live chat pre-survey When enabled, this field and any pre-populated values are visible to contacts completing a pre-chat survey when communicating on a live chat Agents and contacts interact on a real-time basis or chat messaging Asynchronous chat in which contacts send a chat message anytime and wait for a replychannel A way for contacts and agents to interact, such as voice, email, chat, social media, and so on.. Pre-chat survey forms collect information about the contact, such as their name, before an agent handles the case. Is editable When enabled, values in this field can be changed by the contact, an agent, or an automated process. - Click Save.
- If you selected Hierarchical for the Type, set up the hierarchical items:
- Click Edit items.
- Click Create value for custom field.
- For the first item, skip the Parent ID field.
- Enter a Value that will appear to the contact on the pre-chat form.
- Click Save.
- To create another top-level value, repeat the previous 4 steps. To create a child value, click Add item for the field value you just created, enter a Value, and click Save.
- Repeat these steps until you have added all values for the field.
Modify Common and Automated Chat Phrases
Digital First Omnichannel chat channels![]() A way for contacts and agents to interact, such as voice, email, chat, social media, and so on. offer a number of commonly-used phrases and automated messages. Examples include We're offline, You chatted with {name}, and There was a network error. Please try again. You may want to change the wording of these messages to better reflect your organization.
A way for contacts and agents to interact, such as voice, email, chat, social media, and so on. offer a number of commonly-used phrases and automated messages. Examples include We're offline, You chatted with {name}, and There was a network error. Please try again. You may want to change the wording of these messages to better reflect your organization.
If your organization supports multiple languages, you could create separate chat channels for different languages, and provide a chat widget in the appropriate language for each.
This option is available forchat messaging![]() Asynchronous chat in which contacts send a chat message anytime and wait for a reply or live chat
Asynchronous chat in which contacts send a chat message anytime and wait for a reply or live chat![]() Agents and contacts interact on a real-time basis channels.
Agents and contacts interact on a real-time basis channels.
- Click the app selector and select ACD.
-
Go to DFO > Points of Contact Digital.
- Click Chat.
-
Click Translations for the channel you want to modify.
-
For each phrase you want to change, enter your new text in the text box.
-
Click Save.
Configure File Type and Size Restrictions
You can configure restrictions for files that customers can send by chat to agents. Restricting file type requires that you know the MIME type for the file type you want to allow or restrict. This option is available for chat messaging![]() Asynchronous chat in which contacts send a chat message anytime and wait for a reply or live chat
Asynchronous chat in which contacts send a chat message anytime and wait for a reply or live chat![]() Agents and contacts interact on a real-time basis channels.
Agents and contacts interact on a real-time basis channels.
MIME (Multi-purpose Internet Mail Extensions) type is a more secure method of determining file type than file extension. This is a 2-part identifier that specifies the general category and subtype for a file. For example, a PNG file has a MIME type of image/png. Web browsers and other applications can use MIME types to determine how to process a file or URL.
The MIME types for some common file types are listed in the following table. For a complete list, search the internet for IANA MIME types.
|
File Extension |
MIME type |
|---|---|
| AAC | audio/aac |
| AVI | video/x-msvideo |
| BMP | image/bmo |
| DOC | application/msword |
| DOCX | application/vnd.openxmlformats-officedocument.wordprocessingml.document |
| HTM, HTML | text/html |
| JPG, JPEG | image/jpeg |
| MP3 | audio/mpeg |
| MP4 | audio/mp4 |
| application/pdf | |
| PNG | image/png |
| PPT | application/vnd.ms.powerpoint |
| PPTX | application/vnd.openxmlformats-officedocument.presentationml.presentation |
| XLS | application/vnd.ms.excel |
| XLSX | application/vnd.openxmlformats-officedocument.spreadsheetml.sheet |
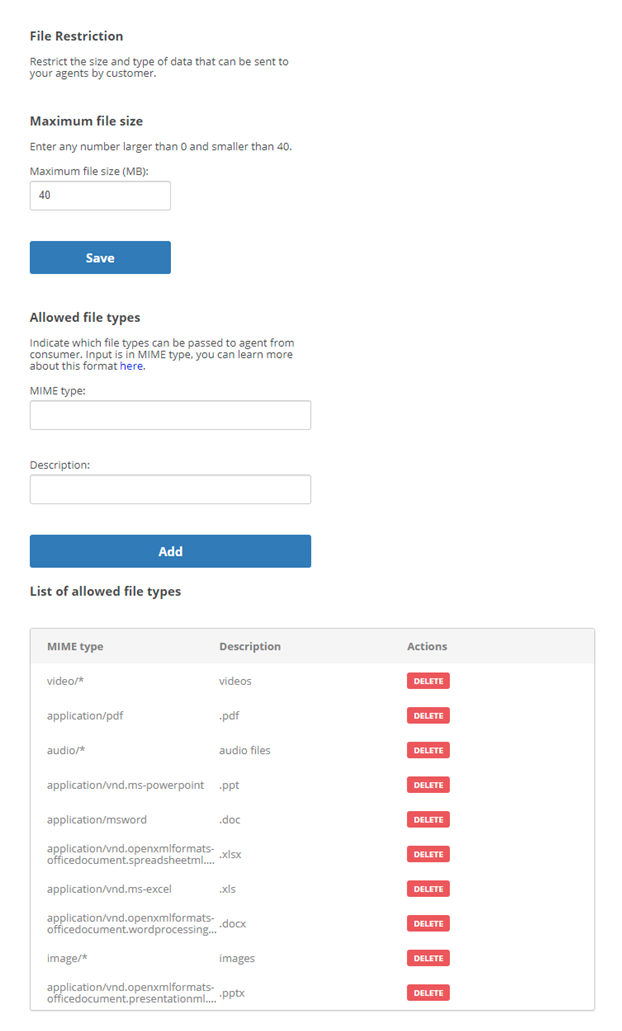
When a customer attempts to send a file that is too large or of a type that isn't allowed, a pop-up message appears. The message describes the allowed file types and size.
- Click the app selector and select ACD.
-
Go to DFO > Points of Contact Digital.
-
Click Chat.
-
Click File Restrictions for the channel you want to configure.
-
Enter the Maximum file size (in MB) that customers can send by chat. The default is 40 MB.
-
Click Save.
-
Under Allowed file types, enter the MIME type and Description for a file type you want to allow.
Learn more about fields in this step
Field
Details
MIME Type Enter the MIME type for the files types you want to allow.
If you want to permit all MIME types, enter an asterisk as a wildcard.
If you want to permit all of a certain category of types, you can include the category with an asterisk. For example, to allow all image types, you would use image/*.
The system default MIME types are:
- application/msword
- video/*
- application/pdf
- application/vnd.ms-powerpoint
- image/*
- audio/*
- application/vnd.ms-excel
Description A description of the file type. This appears in the pop-up message shown to customers who send files that are too large or of types that aren't allowed. The description should be customer-friendly. -
Click Add.
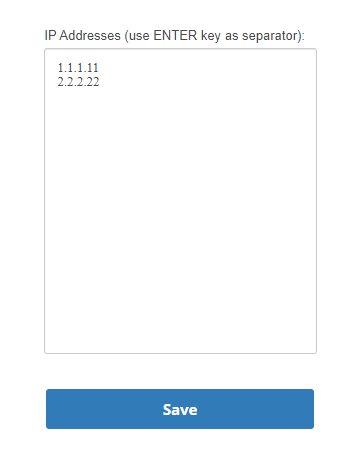
Block IP Addresses
At times you may need to block spammers or other inappropriate users from chatting with your organization. You might also want to prevent internal users from using the chat channel![]() A way for contacts and agents to interact, such as voice, email, chat, social media, and so on. meant for your customers. You can block usage of a chat messaging
A way for contacts and agents to interact, such as voice, email, chat, social media, and so on. meant for your customers. You can block usage of a chat messaging![]() Asynchronous chat in which contacts send a chat message anytime and wait for a reply or live chat
Asynchronous chat in which contacts send a chat message anytime and wait for a reply or live chat![]() Agents and contacts interact on a real-time basis channel by IP address.
Agents and contacts interact on a real-time basis channel by IP address.
- Click the app selector and select ACD.
-
Go to DFO > Points of Contact Digital.
- Click Chat.
-
Click IP Blocking for the channel you want to configure.
-
Enter each IP address on a separate line of the text area
-
Click Save.
Configure Customer Authentication
You can configure enhanced customer authentication for chat messaging![]() Asynchronous chat in which contacts send a chat message anytime and wait for a reply or live chat
Asynchronous chat in which contacts send a chat message anytime and wait for a reply or live chat![]() Agents and contacts interact on a real-time basis channels
Agents and contacts interact on a real-time basis channels![]() A way for contacts and agents to interact, such as voice, email, chat, social media, and so on.. This allows Digital First Omnichannel to authenticate a customer even if they use different devices over the course of a conversation. Customer authentication provides increased security for your organization's chat sessions.
A way for contacts and agents to interact, such as voice, email, chat, social media, and so on.. This allows Digital First Omnichannel to authenticate a customer even if they use different devices over the course of a conversation. Customer authentication provides increased security for your organization's chat sessions.
For your Chat Messaging channels, once the customer is authenticated, Digital First Omnichannel downloads and displays any previous conversations between the agent and the customer. This provides a fully asynchronous chat experience.
Before you can enable customer authentication, you need to set up an OAuth server that has certain endpoints. The endpoints allow OAuth and Digital First Omnichannel communicate. After you configure Digital First Omnichannel with the endpoints, you need to have your organization's website administrator modify the chat initialization script.
- Click the app selector and select ACD.
-
Go to DFO > Points of Contact Digital.
-
Click Chat.
-
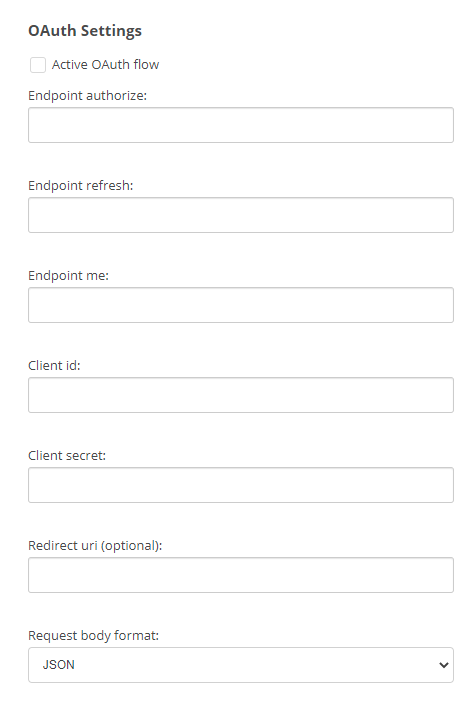
Click the OAuth option for the chat channel you want to configure.
- Select Active OAuth flow and enter the URLs for the 3 required endpoints on the OAuth server you set up.
Learn more about fields in this step
Field Details Endpoint authorize
Enter the URL for the Authorize endpoint. This endpoint exchanges the authorization code for the access and refresh tokens. The code can be used one time only and expires quickly (for example, in 1 minute). Endpoint refresh
Enter the URL for the Refresh Token endpoint. This endpoint generates a new access token. The access token's lifespan is approximately 30 minutes. Endpoint me Enter the URL for the Me endpoint. This endpoint uses the access token to retrieve the customer's information, including past conversation with the agent. - Enter the Client id and Client secret. You can also enter a Redirect uri, if you have one.
- Select the Request body format from the drop-down.
- Click Save at the bottom of the page, or continue on to set up Data Mapping.
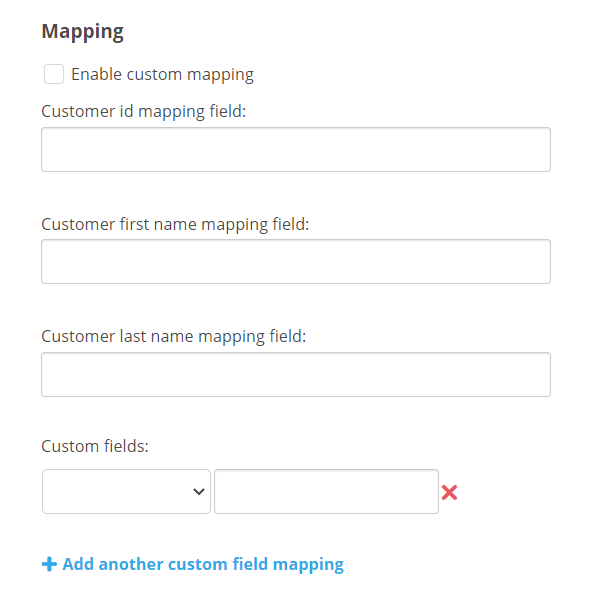
Data Mapping from Third-Party Authenticators
The steps in this section allow you to map the data from your third-party OAuth solution to your custom fields in DFO.
- Click the app selector and select ACD.
-
Go to DFO > Points of Contact Digital.
-
Click Chat.
-
Click the OAuth option for the chat channel you want to configure.
- Scroll to the Mapping section.
- Select Enable custom mapping.
- Enter the Customer id mapping field, Customer first name mapping field, and Customer last name mapping field.
Hierarchical structures are not currently supported. Format your data simply. Use the following example as a guide.
copy{
"customerId":"12345",
"customerFirstName": "John",
"customerLastName": "Doe"
} -
Select a Custom field to use with the mapping from the drop-down, then enter the field from the third-party authorization service that should correspond to the custom field. You can add up to 100 existing custom fields per mapping.
-
Click Save.
Add an API Command to the Webpage
Have the website administrator modify the chat initialization script on the webpage where customers initiate chats with your organization. The website administrator needs to add this command before the chat initialization code. The codes should be in this order:
brandembassy('setAuthorizationCode', 'authorization code');
brandembassy('init', brandId, channelId);