

Digital First Omnichannel gives you the ability to automate various tasks and workflows with workflow automation. To automate a task, you need to create one or more triggers and a job. The job specifies what you want to happen, and the triggers define when the job happens.
The Jungle at Classics works with a number of social media influencers![]() People on social media with established reputations and large followings who can impact the opinions and actions of their audiences.. When a case
People on social media with established reputations and large followings who can impact the opinions and actions of their audiences.. When a case![]() An interaction with one contact about one topic that can consist of many inbound and outbound messages. is opened for one of these influencers, contact center administrator Mowgli Kipling wants to send a thank you message to that influencer.
An interaction with one contact about one topic that can consist of many inbound and outbound messages. is opened for one of these influencers, contact center administrator Mowgli Kipling wants to send a thank you message to that influencer.
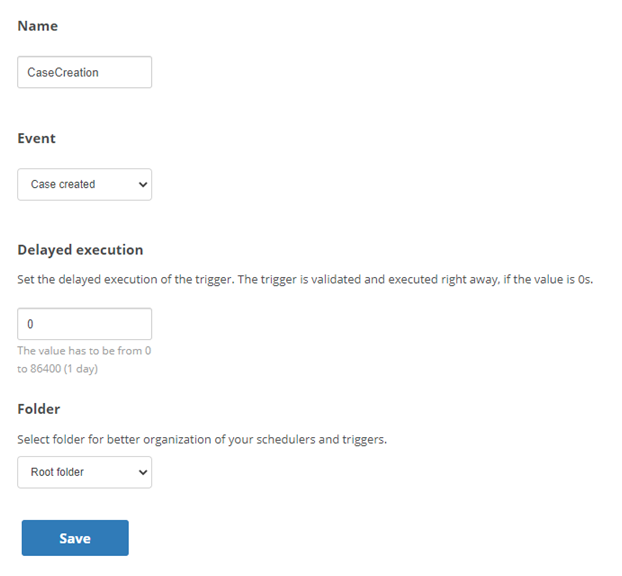
Mowgli creates a trigger with conditions based on case creation in the appropriate queue. Then Mowgli creates an automation job that sends an automated message once the trigger is fired.
Configure Triggers
Triggers consist of an event and one or more conditions. You configure a job with a trigger so that Digital First Omnichannel knows when to execute the job. If you don't set any conditions, Digital First Omnichannel fires the trigger every time the selected event happens.
You can add more than one set of conditions to a trigger. There may be different situations when you want a trigger to fire. If you put the conditions for all of the possible situations in one condition set, then all of those conditions must be met for the trigger to fire. If you put each situation in separate condition sets, then Digital First Omnichannel considers each set of conditions separately.
When a trigger has multiple sets of conditions, Digital First Omnichannel executes the same job for all conditions. If you want different jobs to execute for different conditions, you need to create a separate trigger for each set of conditions.
- In the Digital First Omnichannel portal, click Settings > Automation > Triggers.
- Click Add Trigger.
- Enter a Name for the trigger. Since you can assign multiple jobs to the same trigger, use a name based on the event or conditions rather than an associated job.
-
From the Event drop-down, select the event for this trigger.
 Learn more about the available events
Field Details Case routing queue changed Fires the trigger when a case changes from one queue to another. Case created
Fires the trigger when a new case is created in Digital First Omnichannel.
Case status changed Fires the trigger when the status of a case has changed. Before case closed Fires the trigger before Digital First Omnichannel changes the status of a case to Closed. Before message created Fires the trigger before a message is created. Message created Fires the trigger when a message is created. Case Inbox Assignee changed Fires the trigger when the case's inbox assignee The agent whose inbox a case currently resides in. An agent remains the inbox assignee until they close the case's tab. is changed. Agent focuses on a case tab Fires the trigger when the agent clicks on a case tab. Agent defocuses from a case tab Fires the trigger when the agent clicks away from a case tab. Triggered by API Fires the trigger when an API call is made. When you select this event, you must choose the Data type that the trigger applies to:
- Cases
- Messages
- End User
- Chat Window
Popup clicked Fires the trigger when the customer clicks on a popup. Chat window opened Fires the trigger when a chat window is opened. Visitor page view Fires the trigger when the customer arrives on a specific page. - In the Delayed execution field, enter the number of seconds that Digital First Omnichannel should wait after the selected event occurs before firing the trigger. If you want it to happen immediately, enter 0.
- Click Save.
-
On the Triggers page, locate the trigger you just added and click Conditions.
-
Click Add.
-
Select the Condition type from the drop-down, then click Create condition for selected type. Conditions determine when the trigger fires. If you don't configure any conditions, the trigger fires on every instance of the event.
- Follow the UI directions for configuring each condition.
- Click Save.
- Create a job with the action that you want to happen when this trigger fires, then assign it to the trigger.
- When you want Digital First Omnichannel to start using this trigger, click Activate on the Automation > Triggers page.
Create a Job
Jobs are the action you want Digital First Omnichannel to take when the trigger fires. Most of the actions you can select require you to provide additional information about what you want to happen.
After you create a job, you need to assign it to the trigger that you want to use to start the job.
- In the Digital First Omnichannel portal, click Settings > Automation > Jobs.
- Click Add.
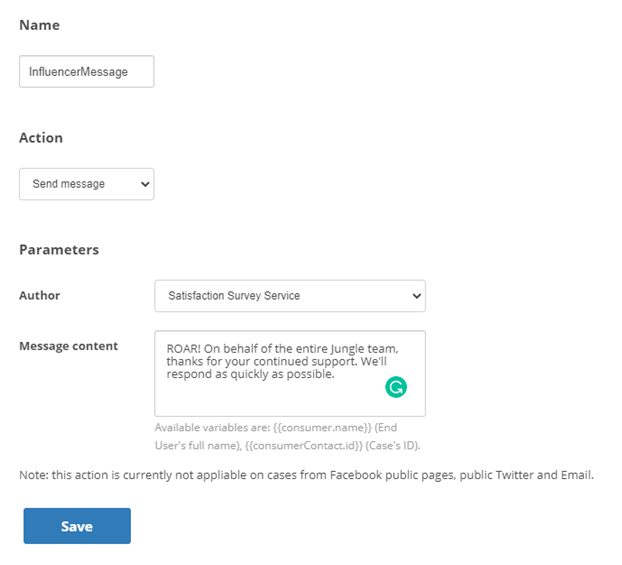
- Enter a Name that describes what the job does.
- From the Action drop-down, select what you want to happen when the trigger fires. Complete any additional fields specific to that action in the Parameters section.Learn more about tasks you can automate
Field
Details
Add tag to case Adds a tag you select to a case An interaction with one contact about one topic that can consist of many inbound and outbound messages. based on source, status, or queue. Add a tag to a message Adds a tag that you select to a message. Select a Tag from the drop-down. Call an URL
Executes an external URL to perform an action. In the Parameters section:
- Enter the URL you want Digital First Omnichannel to call.
- Select if you want to Enable or Disable SSL Verification for the provided URL.
- Enter the Job Identifier for this job. This is an optional setting. You can include it if you want Digital First Omnichannel to include information with the URL call about what job triggered the call.
- Select whether you want to Include the EndUser object.
Call Studio script URL Executes a Studio script. The page displays information about the placeholders you can include in the script you call to have certain data included in the script. For example, you can include the IDs for the case, post, channel, message, outbound author, or inbox assignee
The agent whose inbox a case currently resides in. An agent remains the inbox assignee until they close the case's tab.. In the Parameters section, provide the Script URL.
Change case custom field Changes the value of the Custom Field you select. Provide the new Value for the field. Change case priority in the queue Automatically change the priority of a case. Select value from the Priority drop-down. Change case status Updates the status of the case. Select the new Status. Chat Popup Box Provides a customizable template to design a chat popup box. Chat Popup Box HTML Provides fields to enter custom HTML and JS design for the chat popup box. Chat Welcome Message Creates a personalized message to welcome a contact who initiates a chat. Enter a Welcome Message name, Main body text, and select any Custom Fields using the drop-downs. Delete author's name from a message Removes the name of the author from a message. Select the reason for removing the author's name from the drop-down list.
Select Time to Live if you need to remove the data after a certain amount of time has elapsed. Select GDPR if you need to remove the data for privacy reasons.
Delete content of a message Deletes the content of the message. Select the reason for deleting the message content from the drop-down list.
Select Time to Live if you need to remove the data after a certain amount of time has elapsed. Select GDPR if you need to remove the data for privacy reasons.
Delete end user's name in all identities Deletes the name of the contact. Select the reason for deleting the user's name from the drop-down list.
Select Time to Live if you need to remove the data after a certain amount of time has elapsed. Select GDPR if you need to remove the data for privacy reasons.
Inactivity Popup Displays a pop-up to the user warning them that their session is about to expire due to inactivity. In the Message Content section:
- Enter a Heading and Body text.
- Enter the number of seconds to be displayed to the user as a Countdown. It will be displayed in mm:ss format.
- Enter Call to action text, such as Do you want to continue?.
- Enter whether you want to include a Session refresh button (default Yes) and a Session expire button (default No).
- Select a Tag from the drop-down.
Mask credit card number in message content Hides credit card numbers within messages. Moves first case in queue to other queue Reroutes only the first case in a specified queue Digital First equivalent of a skill; routes each contact to an agent assigned to handle that type of contact to another queue. Select the target queue from the Routing queue drop-down.Reroute case to a different queue Reroutes all cases that match the criteria to another queue. Select the target queue from the Routing queue drop-down. Reset routing Forces the case to enter the routing process again. Select the checkboxes for any queues you want to exclude from the routing. Send message Automates message sending to customers. For example, you can send a message when a case is escalated or when a case is received after-hours. Select an Author from the drop-down and enter the Message content. Send notification email Automates sending a notification email. Enter the Receiver, Subject, and Body of the email message. For the subject and body, use the provided placeholder variables to include data particular to the case in the message. Send satisfaction survey Automatically sends a survey to customers. This action is typically used for third-party provider surveys, not a satisfaction survey created in Digital First Omnichannel. Select the Satisfaction survey type from the drop-down. For all survey types, enter the Message text.
If you selected 3rd party provider, enter the 3rd party provider URL.
If you selected Custom integration, enter the custom URL endpoint in the Custom integration field.
Set Customer Contact (Case) Proficiency Defines a range for case proficiency. In the Parameters section, select a number from 1-20 in the From and To drop-downs. Unassign case from inbox No additional action required. - Click Save.
Assign Jobs to Triggers
Triggers can fire multiple jobs. When the conditions of a trigger are met, all jobs that you've assigned to it will run. You can also assign a job to more than one trigger.
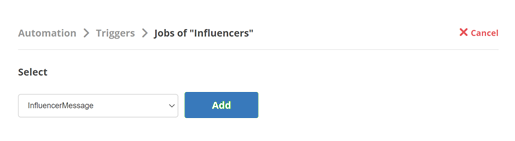
- In the Digital First Omnichannel portal, click Settings > Automation > Triggers.
- Locate the trigger you want to use and click Jobs.
- Select the job you want to assign to the trigger from the drop-down and then click Add.