

Digital First Omnichannel live chat![]() Agents and contacts interact on a real-time basis and chat messaging
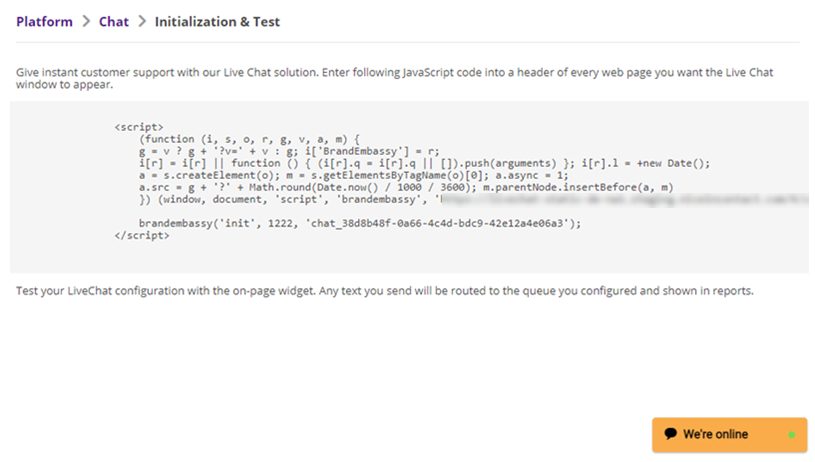
Agents and contacts interact on a real-time basis and chat messaging![]() Asynchronous chat in which contacts send a chat message anytime and wait for a reply are powered by JavaScript code that you add to the pages on your website where you want chat to be available. You can customize Digital First Omnichannel chat by adding API calls to this JavaScript code.
Asynchronous chat in which contacts send a chat message anytime and wait for a reply are powered by JavaScript code that you add to the pages on your website where you want chat to be available. You can customize Digital First Omnichannel chat by adding API calls to this JavaScript code.
The Jungle, a subsidiary of Classics, Inc., runs a gift store as part of its website. The administrator, Mowgli Kipling, has set up the following API calls to help his chat agents work with gift store customers:
- Custom visitor variables collect information about the colors of items the contact views while on the gift store pages. This information is then available to the agent when the contact initiates a chat.
- Custom visitor events are recorded for each product a contact clicks on. After five product clicks and no clicks of the Buy button, a proactive "Having Trouble Deciding?" pop-up offers the contact a chat.
You can use APIs to customize these aspects of your chat channels![]() A way for contacts and agents to interact, such as voice, email, chat, social media, and so on.:
A way for contacts and agents to interact, such as voice, email, chat, social media, and so on.:
- Chat behavior—Customize how the chat window behaves. This includes opening and closing the chat window or enabling game mode. Game mode lets customers play the game Snake while waiting for an agent.
- Chat information—Customize the information displayed in the chat window. This includes things like the customer's name, agent image, or activity status.
- Custom fields, labels, and phrases—Define custom fields or customize field labels. You can also configure alternate text for the automated messages shown to contacts.
- Chat window appearance—Customize the appearance of the chat window. You can change things like the size and position of the window on the webpage.
- Custom CSS—Define custom CSS for the chat window.
- Other functions—Other things you can configure include:
- Having the host environment listen for certain events.
- Integrating Digital First Omnichannel chat channels into iOS or Android apps.
- Enabling OAuth authentication.
If you haven't yet done so, set up a live chat or chat messaging channel. Test the channel to ensure that it works with the default settings before you add customizations.
Set up chat customizations in a test environment before releasing them into your production environment. This will help minimize disruptions to your website visitors. It will also help ensure that your customizations work as intended.
Add API Calls to a Chat Channel
Copy the script and API calls exactly as shown. Any unexpected changes could cause your channel to malfunction.
- Click the app selector
 and select ACD.
 -
Go to DFO > Points of Contact Digital.
- Click Chat.
-
Locate the chat channel you want to customize and click Initialization & Test.
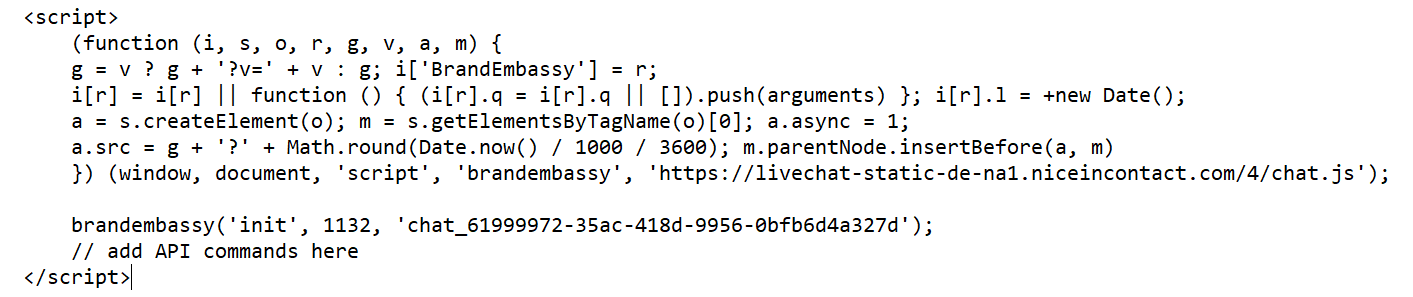
- Copy the JavaScript code from the Initialization & Test page and paste it into a text editing program like Notepad.
-
In Notepad, just above the closing </script> tag of the code you pasted in, add the API calls you want to use. In the example image below, the comment indicates where to add calls. The supported calls you can use are described in the rest of this topic.
-
Copy the entire script, including the API calls you added, into the header of a page of your website.
-
Visit the modified page on your website to and use the chat window to send test messages to verify that the customizations you made work as intended.
-
Copy the final script into the header of each page that should have the chat widget when it is fully tested and functions as expected.
Chat Behavior API Calls
The calls in this section allow you to change how chat windows behave.
Open Chat Window
Opens a chat window automatically. The default behavior is for chat windows to open when a contact clicks on the chat icon.
brandembassy('openChatWindow');Close Chat Window
brandembassy('closeWindow');Auto-Start a New Chat Session
Creates a new chat messaging![]() Asynchronous chat in which contacts send a chat message anytime and wait for a reply or live chat
Asynchronous chat in which contacts send a chat message anytime and wait for a reply or live chat![]() Agents and contacts interact on a real-time basis session if one is not currently in progress. Use this call on lower-traffic pages of your website to avoid overwhelming your agents with contacts.
Agents and contacts interact on a real-time basis session if one is not currently in progress. Use this call on lower-traffic pages of your website to avoid overwhelming your agents with contacts.
Digital First Omnichannel creates a new case and adds it to the queue when the first message of the chat session is sent. A hidden, automated message is sent on the customer's behalf when the chat session starts. This decreases the amount of time contacts wait for an agent by starting the process sooner. Chat sessions start when a contact clicks the chat icon to begin a conversation or when the chat window opens for auto-started chat sessions. Although the initial message is hidden from the customer, the agent can see it.
You can customize the text of the initial, hidden message.Auto-starting a chat session skips the pre-chat survey form. Because of this, you need to use other methods to collect information about contacts. For example, you can have agents enter the information manually into the customer card. You can also configure customer authentication using an OAuth integration.
Routing for auto-started cases occurs according to the routing queues![]() The system uses routing queues to determine which agents to route cases to. Your system administrator creates routing queues so that certain cases are routed to agents with expertise in that type of case. configured in Digital First Omnichannel. For live chat sessions, if no agents are available, the chat window displays a "waiting for available agent" message.
The system uses routing queues to determine which agents to route cases to. Your system administrator creates routing queues so that certain cases are routed to agents with expertise in that type of case. configured in Digital First Omnichannel. For live chat sessions, if no agents are available, the chat window displays a "waiting for available agent" message.
To auto-start a chat session, use these calls in the order shown:
brandembassy('openChatWindow');

brandembassy('autoStartSession');
If you add additional calls to the script, autoStartSession must always be the last call in the script. For example:
// set customer name (as this is required field)
brandembassy('setCustomerName', 'Elizabeth');

// open chat window so user can start to chat
brandembassy('openChatWindow');

// and finally start the new chat session (without the pre-chat form)
brandembassy('autoStartSession');
Customize the Initial Automated Contact Message
Digital First Omnichannel creates a new case and adds it to the queue when the first message of the chat session is sent. A hidden, automated message is sent on the customer's behalf when the chat session starts. This decreases the amount of time contacts wait for an agent by starting the process sooner. Chat sessions start when a contact clicks the chat icon to begin a conversation or when the chat window opens for auto-started chat sessions. Although the initial message is hidden from the customer, the agent can see it.
The default message is the text on the button that the customer clicks to start the conversation. You can customize the text of the initial, automated message in three ways:
- Override the default button text.
copybrandembassy('sendFirstMessageAutomatically', 'Hello');
copybrandembassy('setFirstAutomatedMessageContent', 'Hello, I have a question');
- Change the message text on the Translations page.
Make the Initial Automated Message Visible to Contacts
If you want the contact to be able to see the initial automated message, add this call to your script:
brandembassy('hideFirstSentMessage', false);
Delay Case Creation
Digital First Omnichannel creates a new case and adds it to the queue when the first message of the chat session is sent. A hidden, automated message is sent on the customer's behalf when the chat session starts. This decreases the amount of time contacts wait for an agent by starting the process sooner. Chat sessions start when a contact clicks the chat icon to begin a conversation or when the chat window opens for auto-started chat sessions. Although the initial message is hidden from the customer, the agent can see it.
You can configure Digital First Omnichannel to wait for the contact's actual first message before creating a case using this call:
brandembassy('sendFirstMessageAutomatically', false);
Enable Game Mode
Allows contacts to play the game Snake while waiting for an agent.
brandembassy('allowGameMode');Chat Information API Calls
These calls allow you to customize the information that's available to contacts during a chat session.
Set Agent's Image
Dynamically changes the agent image displayed in the chat window. By default, Digital First Omnichannel uses the image in the agent's profile. When you include this call in your script, it uses the image specified by the URL in the code snippet. Replace the example URL with the URL of the image you want the chat to use.
brandembassy('setAgentImage', 'http://classics.com/images/agents/elizabeth_bennet.png');Set Customer Name
Customer Name is a field on the pre-chat survey form, which contacts are required to fill in prior to chatting with an agent on a chat messaging![]() Asynchronous chat in which contacts send a chat message anytime and wait for a reply channel. This API call dynamically fills the field.
Asynchronous chat in which contacts send a chat message anytime and wait for a reply channel. This API call dynamically fills the field.
brandembassy('setCustomerName', 'Elizabeth');Set Activity Status
Changes the message in the activity bar. For example, you could use it to communicate your response time for a chat messaging session. This could be helpful because chat messaging is an asynchronous form of chat, so contacts could have to wait to hear from an agent.
brandembassy('setStatusMessage', 'We typically reply within 3 hours.');Hide Pre-Chat Survey Form
The pre-chat survey form appears at the start of a chat messaging![]() Asynchronous chat in which contacts send a chat message anytime and wait for a reply session. It collects information about the contact, such as their name. If you want, you can hide the pre-chat survey form and have the chat window appear as soon as a contact starts a chat messaging session.
Asynchronous chat in which contacts send a chat message anytime and wait for a reply session. It collects information about the contact, such as their name. If you want, you can hide the pre-chat survey form and have the chat window appear as soon as a contact starts a chat messaging session.
brandembassy('hidePreSurvey');Show Case Information
Only for chat messaging![]() Asynchronous chat in which contacts send a chat message anytime and wait for a reply channels. Shows case information to the contact.
Asynchronous chat in which contacts send a chat message anytime and wait for a reply channels. Shows case information to the contact.
brandembassy('showCaseInfo');Terms of Use
You can make a terms of use document available to contacts from within the chat window. This function adds a button to the window. You can customize the button's label and style, and what happens when contacts click it. The on-click action can show the terms of use as:
- An internal modal window
- An external link
// Internal Modal Window
brandembassy('showTermsOfUse', 'Show terms of Use', 'modal' , 'Our terms of use are ...');

// External Link
brandembassy('showTermsOfUse', 'Show terms of Use', 'externalLink' , 'http://yourdomain.com/terms-of-use');

// If you want to explicitely disable this feature, you can use
brandembassy('hideTermsOfUse');
To customize the appearance of the button or the internal modal window, use the CSS API calls described in this topic.
Show/Hide the Send Transcript Button
If you make the Send Transcript button visible, the chat channel must be configured to allow contacts to send the chat transcript to themselves (configure this option for chat messaging or live chat).
brandembassy('hideSendTranscript');
brandembassy('showSendTranscript');
Custom Fields, Labels, and Phrases
Create and Populate Custom Fields
The custom fields you can use with this call are the same as the ones you can use in customer cards.
brandembassy('setCustomField', 'name_of_custom_field', 'value_of_custom_field');
Customize Chat Labels and Phrases
You can customize many of the labels and phrases that Digital First Omnichannel chat channels use, as well as define the customizations. If you need to dynamically change the phrases or screen labels, use these API calls.
To change a single message or label:
brandembassy('setTranslation', 'key', 'your translation');
To change multiple messages or labels:
brandembassy('setTranslations', {
   key1: 'your custom label',
   key2: 'your custom message'
});
Text surrounded by curly braces are variables that the system replaces with the indicated data. For example, {caseNumber} is replaced with the case number of the contact's chat session.
| Key | Default label/Message |
|---|---|
| allAgentsForQueueAreBusy | All our agents dedicated to your queue are currently busy. There {queue, plural, one {is} other {are}} <strong>{queue, number}</strong> {queue, plural, one {person} other {people}} ahead of you in the queue. |
|
beginButton |
Begin chat! |
| cancel | Cancel |
| caseNumber | Case #{caseNumber} |
| change | Change |
| chattedWith | You just had a chat with |
| commonErrorText | There was an unexpected error. Please try again later. |
| done | Done |
| dragAndDropDropzone | Drag & drop files here, to send them |
| dragAndDropDropzoneRejected | Impossible to upload file :( |
| EmailLabel | |
| endChat | End chat |
| endChatTitle | Are you sure you want to end this conversation? |
| endGame | End game |
| ending | Ending chat... |
| fileSendingFailed | File sending failed |
| getTranscriptDescription | Send transcript of this conversation to the following email address: |
| getTranscriptLink | Get chat transcript |
| invalidToken | Invalid token |
| ipAddressBlocked | IP address is blocked |
| loading | Loading ... |
| loadPreviousButton | Load previous conversations |
| messageLabel | Message |
| networkErrorText | There was an network error. Please try again. |
| newCase | New case |
| noAgentOnlineForQueue | No agent is available for your queue at the moment. |
| offline | Offline |
| offlineFormDesc | We are not available at the moment |
| offlineFormSuccessMsgHead | Thank you! |
| offlineFormSuccessMsgSub | Your email was successfully sent. We'll get back to you soon. |
| online | Online |
| onlineFormText | To start a chat, please tell us your name. One of our agents will start helping you immediately. |
| pleaseSelect | Please select... |
| poweredBy | Powered by |
| preparingSession | Preparing session... |
| replyBoxPlaceholder | Write here, press<enter> to send |
| retry | Retry |
| sendFileTextSize | Please upload files smaller than {filesize} |
| sendFileTextSupportedFormat | supported formats. |
| sendFileTextSupportedFormatDesc | Images, Videos, {fileFormats} |
| sendMessageButton | Send message |
| sendNewEmail | Send new email |
| sendTranscript | Send transcript |
| snakeWaiting | You're {queue} in queue. |
| startChatInPopup | Ask us! |
| startNewChat | Start a new chat |
| statusReconnecting | Trying to connect… |
| surveySuccesfullySent | Thanks for your feedback! |
| systemChattingWith | You are now chatting with {name} |
| topic | Topic |
| transciptSentFailed | Send failed. |
| transciptSuccesfullySent | Transcript successfully sent! |
| tryAgainButton | Try again |
| unexpectedError | Unexpected error. |
| validationInvalidEmail | E-mail address is not valid |
| validationMandatory | This field is mandatory |
| validationShorterName | Please use shorter name |
| validationShortMessage | Your message is too short |
| waiting | Waiting... |
| waitingDescription | One of our agents will talk to you shortly. |
| waitingFooter | Hit <spacebar> to shorten the waiting. |
| waitingForAgent | Waiting for agent... |
| waitingInQueue | Waiting for agent. You're {queue} in queue. |
| weAreOffline | We're currently offline. |
| weAreOnline | We're online |
| yourNameLabel | Your name |
Chat Window Appearance API Calls
You can modify the appearance of the chat window.
Hide Header
brandembassy('hideHeader');
Hide Pop-Ups
brandembassy('hidePopups');
Show the Send Button
brandembassy('showSendButton');Size
Customizes the width and height of the chat window. You can use absolute or relative units supported by CSS specification.
brandembassy('setWindowWidth', '100%');
brandembassy('setWindowHeight', '100%');
Full Display Mode
brandembassy('setFullDisplay');
// OR
brandembassy('setWindowWidth', '100%');
brandembassy('setWindowHeight', '100%');
Position and Offset
The setPositionX call defines the left or right side of the screen as the starting position. The setOffsetX and setOffsetY calls define how many pixels the chat window is offset horizontally and vertically from the starting point, respectively.
// set horizontal starting position
brandembassy('setPositionX', 'right');

// set horizontal and vertical offset
brandembassy('setOffsetX', '40'); // default = 20
brandembassy('setOffsetY', '40'); // default = 20
Set Character Limit for Reply Box
brandembassy('setReplyBoxLimit', '280'); // default = null
Custom CSS with Data Selectors
You can customize the appearance of chat windows with custom CSS using data selectors in your API calls. Data selectors allow you to specify the part of the chat window you want to apply the custom CSS to. Define the data selector using the data-selector attribute. Set it equal to the name of the chat window component you want to modify.
To add custom CSS with data selectors, use this API call as a reference:
brandembassy('setCustomCss', '[data-selector="CUSTOMER_MESSAGE_BUBBLE"] {color: white !important; background: black !important};');- MESSENGER
- WINDOW
- WIDGET
- HEADER
- DROPDOWN_MENU
- CONTENT
- CUSTOMER_MESSAGE
- CUSTOMER_MESSAGE_BUBBLE
- AGENT_MESSAGE
- AGENT_MESSAGE_BUBBLE
- REPLY_BOX
- INPUT
- TEXTAREA
- TEXT_BUTTON
- PRIMARY_BUTTON
- SECONDARY_BUTTON
- POPUP
- SEND_BUTTON
- ACTIVITY_BAR
- DELIMITER
- AVATAR
- IS_TYPING
Apply custom CSS components using the data-selector attribute only. Don't apply it to class selectors or other parts of the JavaScript code.
brandembassy('setCustomCss', '[data-selector="CUSTOMER_MESSAGE_BUBBLE"] {color: white !important; background: black !important};');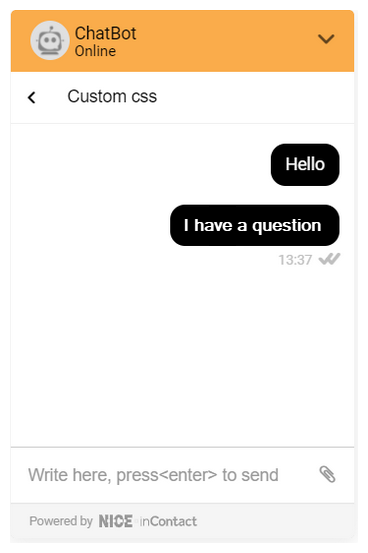
Window components can consist of multiple nested blocks. The component selectors listed in this section name the root of each component. If you want the apply CSS to one of the nested blocks of a component, use the developer's console to inspect the component so you can select the correct block.
Integrate with Third-Party Applications
The calls in this section allow you to receive push notifications when certain chat events occur.
Recognize Active Threads in the Chat Window
brandembassy('getOngoingThreads');Recognize Ongoing Contact in the Chat Window
brandembassy('getOngoingContact')
Receive Push Notification for Specific Chat Events
Use any of the following inputs to replace 'event' in the examples below.
-
CaseToRoutingQueueAssignmentChanged
-
PageViewCreated
-
MessageCreated
-
MessageDeliveredToUser
-
MessageDeliveredToEndUser
-
MessageSeenByUser
-
MessageSeenByEndUser
-
MessageReadChanged
-
MessageAddedIntoCase
-
CaseInboxAssigneeChanged
-
CaseCreated
-
CaseStatusChanged
-
SenderTypingStarted
-
SenderTypingEnded
-
MessageNoteCreated
-
ContactRecipientsChanged
To receive a notification for one chat event:
brandembassy('onPushUpdate', 'event', callback);To receive a notification for more than one chat event:
brandembassy('onPushUpdate', ['event', 'event', 'event'], callback);To receive a notification for all chat events:
brandembassy('onAnyPushUpdate', callback);Integrate to Android or iOS Applications
You can integrate Digital First Omnichannel chat into Android or iOS apps. The native application must use WebView where the JavaScript initialization code is added. This example code uses API calls from this topic to modify the look and behavior of the chat function:
<script async type=”text/javascript”>
  (function(i,s,o,r,g,v,a,m){g=v?g+'?v='+v:g;i['BrandEmbassy']=r;
    i[r]=i[r]||function(){(i[r].q=i[r].q||[]).push(arguments)};i[r].l=+new Date();
    a=s.createElement(o);m=s.getElementsByTagName(o)[0];a.async=1;
    a.src=g+'?'+Math.round(Date.now()/1000/3600);m.parentNode.insertBefore(a,m)
  })(window,document,'script','brandembassy','https://livechat-static.brandembassy.com/3/chat.js');

  //init of Livechat
  brandembassy(‘init’, BRAND_HASH);

  // hiding unwanted UI elements
  brandembassy('hideHeader');
  brandembassy('hidePopups');

  // stretching livechat to full width and height
  brandembassy('setFullDisplay');

  // Customer's name
  brandembassy('setCustomerName', 'CUSTOMER_NAME');

  // Other optional Custom Fields
  brandembassy('setCustomField', 'CUSTOM_FIELD_IDENT', 'CUSTOM_FIELD_VALUE');

  // Start Chat
  brandembassy('openChatWindow');
  brandembassy('autoStartSession');

</script>