Satisfaction surveys let you gather data on how your agents are doing in resolving cases![]() An interaction with one contact about one topic that can consist of many inbound and outbound messages.. Digital First Omnichannel offers 3 options for satisfaction surveys:
An interaction with one contact about one topic that can consist of many inbound and outbound messages.. Digital First Omnichannel offers 3 options for satisfaction surveys:
- The standard survey allows you to create a basic survey to use with some or all digital channels
 A way for contacts and agents to interact, such as voice, email, chat, social media, and so on..
 - You can link a third-party survey provider to Digital First Omnichannel.
- You can create a custom survey that can integrate with Digital First Omnichannel through an API.
Digital First Omnichannel supports 1 standard survey. If you want to use more than 1 survey or have more complex surveys, you must use the third-party or custom integration options.
After you create a survey of any type, you must configure Digital First Omnichannel to offer it to customers. To automate the sending of surveys, you create a workflow automation job for each survey. Then, configure the triggers and conditions that prompt Digital First Omnichannel to execute the job.
Digital First Omnichannel sends the survey to cases created after the date when you activate the survey. If you disable a survey, any surveys still in the queue are not sent.
Third-Party or Custom Integration Satisfaction Surveys
Digital First Omnichannel can integrate with third-party survey providers. It also has an API you can use if you want to create a custom survey. These options are helpful if you want to use more than one satisfaction survey or surveys that are more complex than the standard survey.
When your third-party or custom integration surveys are ready, you need to configure Digital First Omnichannel to send them. Automating these surveys is the same as for standard surveys. You'll need to provide the URL for the survey when you create the job. You can have the standard survey and 1 or more third-party or custom surveys. Each survey you use needs to have its own job and trigger.
Create the Standard Satisfaction Survey
When you create the standard survey, you define what it will look like and the questions is asks. You can include your company logo. After you create the survey, you need to configure Digital First Omnichannel to send it to customers.
The standard survey offers 2 metrics you can choose from. The first metric is net promoter score (NPS), which offers the customer a scale of 1 (least likely) to 10 (most likely). The second metric is customer satisfaction (CSAT), which offers customers a scale of 1 (best) to 5 (worst). For either metric, you can add one or more questions for customers to answer. These questions can use the metric you selected or they can be questions with a choice of two answers. For example, you could add some questions with yes or no answers.
- Click the app selector
 and select ACD.
 -
Go to DFO > Satisfaction Surveys.
-
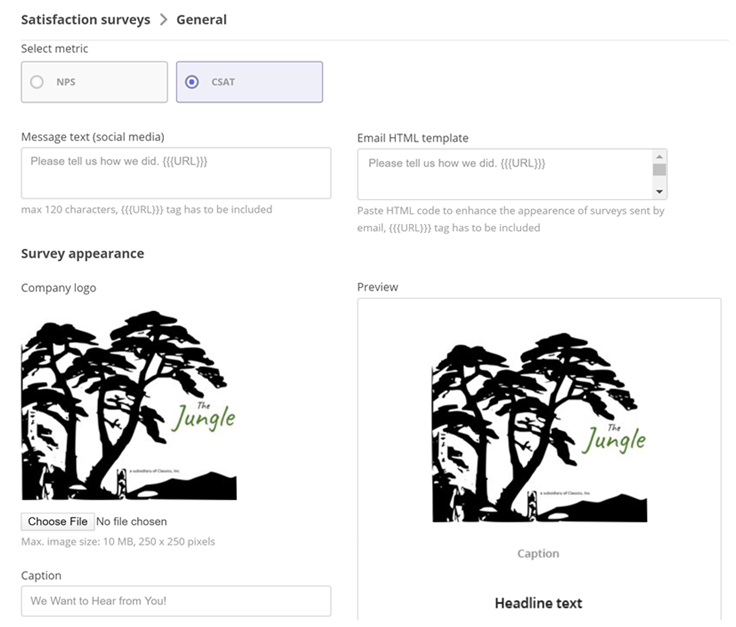
Click the NPS or CSAT box to select the metric you want to measure with your survey. Don't click the radio button; click the box around it.
Learn more about these metrics
Field
Details
Net Promoter Score (NPS) When you select NPS, your survey includes a scale that ranges from 0 (Most unlikely) to 10 (Most likely).
You can organize responses into categories using common NPS rankings. For example, Detractors (0-6), Passives (7-8), and Promoters (9-10). Then you can subtract the percentage of Detractors from the percentage of Promoters to determine your overall NPS.
Customer Satisfaction (CSAT)
When you select CSAT, your survey includes a scale that ranges from 1 (Best) to 5 (Worst).
This allows you to see possible trends in satisfaction for certain agents or channels. You can also combine scores to get a feel for how your organization as a whole is doing in meeting customer needs.
The Message text and Email HTML template fields are no longer used. You will add the message text that the customer sees when you automate this survey.
- To add your organization's logo to the survey, click Choose File and upload your logo. Mowgli has chosen to use The Jungle at Classics logo on his survey.
- Enter a Caption and Headline text. If you don't enter your own values, the survey will display the default content shown in those fields.
- If you want to customize the labels that show on the rating scale, enter your label text in the Scale fields.
- Enter the Button text. This is the label that appears on the button that the customer clicks to submit their response.
- Click Save.
- If you want to include more questions in your survey, click Add.
- Enter the Question text.
- If you want this question to have 2 answers customers can choose from, select This is a closed question. For example, you could make it a yes or no question. Enter the text for Answer 1 and Answer 2.
- Click Save.
- When the survey is complete, click Save on the Satisfaction surveys > General page.
Automate a Survey
Automating a survey involves creating a workflow automation job for the survey. Then you can create a trigger and configure conditions that tell Digital First Omnichannel when to execute the survey job. The trigger defines the event that causes Digital First Omnichannel to test the conditions to decide if it should execute the job.
Create a Job
The plug-in message text that you provide when you create a job will replace any message text added to the standard survey.
-
Click Settings > Workflow Automation > Jobs.
-
Click Add.
-
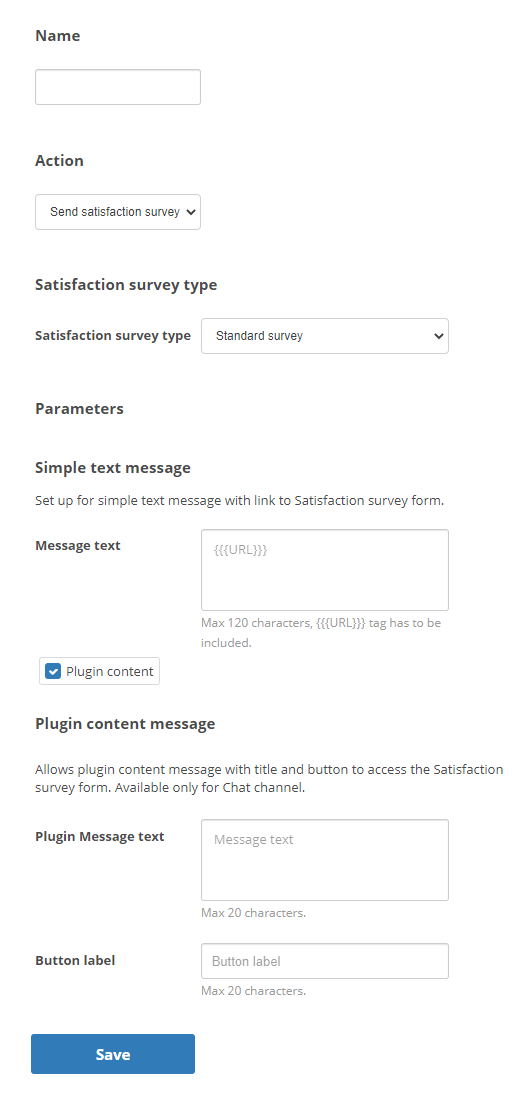
Enter a Name for the job and select Send satisfaction survey from the Action drop-down list.
-
Select the type of survey from the Satisfaction survey type drop-down list.
Learn more about fields in this step
Field
Details
Standard survey Allows you to create a job for the standard survey. You must first create a standard survey. 3rd party provider
Allows you to create a job for a survey you've created using a third-party satisfaction survey provider. You must have the URL to the survey before you can create a job for it.
Custom integration Allows you to create a job for a customer survey when you're integrating with the Digital First Omnichannel API. You must have the URL to the survey endpoint before you can create a job for it.
-
Enter the 3rd party provider URL or the Custom integration URL, if you're using one of those types of surveys. The standard survey doesn't require this kind of URL.
Learn more about fields in this step
Field
Details
3rd party provider URL
Enter the URL for the survey in the provider's platform. You can include these variables in the URL: {{{caseId}}}, {{{postId}}}, {{{ownerAssignee}}}, channelId, and channelName. To use the variables, enter them exactly as shown. Be sure to include the 3 curly braces before and after the text. For example:
https://www.super-survey.com/{{{caseId}}}/{{{ownerAssignee}}}
The variables you use will depend on the contents of the survey URL from your provider.
Custom integration Enter the URL for the custom survey endpoint. Refer to the Digital First Omnichannel API documentation, which you can access from the link beneath the Custom integration field.
-
If this job is for channels that include live chat or chat messaging:
-
Enter {{{URL}}} in the Message text field.
-
Select the Plugin content checkbox.
-
Add the Plugin Message text that invites the customer to complete the survey. For chat channels, the message that the customer sees comes from this field.
-
Enter the Button label for the button that appears in the chat window. When the customer clicks this button, a standard survey expands within the chat window. A third-party or custom integration survey opens in a separate window.
-
-
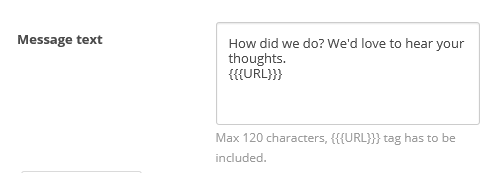
For all other channels, enter the Message text that invites customers to complete the survey. You must include the variable {{{URL}}} in the message. Place the variable where you want the link for the survey to appear. Digital First Omnichannel replaces this with the survey content.
-
Click Save.
Configure a Trigger for a Satisfaction Survey
Your organization may have many scenarios when you want to use satisfaction surveys. The scenarios define the triggers you will use for each survey job.
Mowgli Kipling, the contact center administrator for The Jungle, uses a third-party survey solution. He has created several surveys and jobs for each of them. Now he needs to define the triggering event and conditions for each. He uses the Before case closed event for every survey. He wants all surveys sent after agents have closed the cases.
- One survey is for his social media direct messaging channels. On the Conditions page for that survey, Mowgli:
- Defines the social media channels this survey applies to.
- Sets the Probability of execution to 100%. Reply rates tend to be low for surveys sent to direct messaging customers, so Mowgli wants the survey to go to all customers.
- Adds a Satisfaction Survey Grace Period of 5 days. Mowgli doesn't want customers getting another survey if they direct message The Jungle again within 5 days.
- Does not select a status-based condition. The Before case closed event already has the survey triggering based on the change in status.
- For customers in his email and chat channels, Mowgli wants to sent a survey based on sentiment. Sentiment is an optional Digital First Omnichannel feature. On the Conditions page, Mowgli selects the channels this survey applies to. He also selects the sentiments he wants to send surveys to from Sentiment. Because he gets a lot of responses from these channels, he sets the Probability of execution to 33%.
- For cases routed to his Conflict Resolution routing queue, Mowgli has a third survey. He selects the correct queue from Routing queues. He wants to know how well his conflict resolution agents are doing, so he leaves the Probability of execution set to the default of 100%.
-
Click Settings > Workflow Automation > Triggers.
-
Click Add trigger.
-
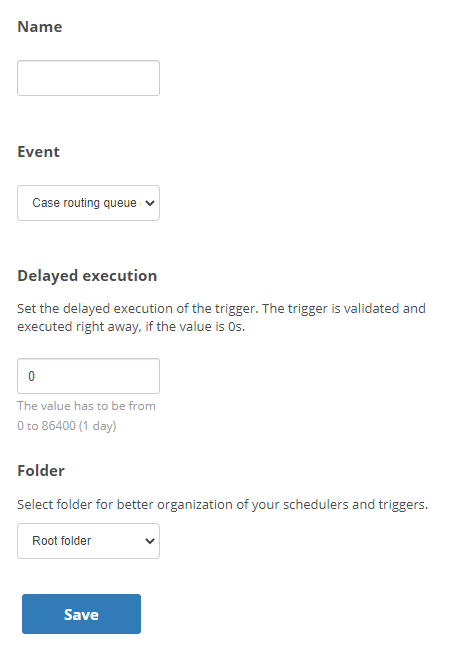
Enter a Name and select Before case closed as the Event that triggers Digital First Omnichannel to send the survey.
-
If you want Digital First Omnichannel to wait before executing the trigger once the conditions are met, enter the number of seconds you want Digital First Omnichannel to wait in Delayed execution. Satisfaction surveys are typically not delayed.
-
If you have created folders to organize your workflow automation triggers, select the Folder you want to store this trigger in.
-
Click Save.
-
-
On the Triggers page, locate the trigger you created for this survey and click Jobs.
-
Select the job for the survey you're configuring triggers for and click Add.
-
On the Triggers page, locate the trigger you created for this survey and click Conditions. If you configured the job with delayed execution, click Delayed Conditions instead.
-
Select the conditions that must be met for Digital First Omnichannel to execute this trigger.
Learn more about fields in this step
Field
Details
Included channels condition The channels you want the triggered event to apply to. Included or Excluded tags condition The case tags that trigger this event, either when they are added to a case (Included) or not added to a case (Excluded). Use this condition if you want Digital First Omnichannel to use tags as a trigger for this event. Routing queues The routing queues that trigger this event. Use this condition if you want the event to apply to cases in certain routing queues, but not others. Routing queue limit A minimum size a routing queue must be to trigger this event. Include this condition if you want this event to trigger based on the size of the routing queue. Case waiting time The amount of time a case spent waiting for an agent to respond. Use this condition if you want this event to trigger based on how long a case spent waiting for a response. Current case assignment The current assignment of the case. Select On if you want this event to trigger only when a case is assigned to an agent inbox, but not when it is still in the queue. Case status The current status of the case. Use this condition if you want this event to trigger based on the status of cases. Probability of execution The percentage of cases that this event triggers for. The default is 100%. If you don't want this job to trigger for all cases, select the percentage of cases you want Digital First Omnichannel to apply this event to. Case direction The direction of the case, either inbound or outbound. Use this condition if you want the event to trigger based on the direction of the case. Count of inbound or outbound messages in the case The number of times the agent or customer sent messages while the case was active. Use either or both of these conditions if you want the event to trigger based on the number of sent messages. You can choose whether you want the number of messages to be Less than, Less than or equal to, Equal to, More than or equal to, or More than the number you specify. Satisfaction Survey Grace Period The number of days after sending a satisfaction survey that Digital First Omnichannel won't send additional surveys, even if conditions are met. Include or Exclude based on Post IDs The IDs of posts from external platforms. Use this if you want to use post IDs as a trigger for this event. For example, if your organization has a marketing campaign on Facebook, you could use the post ID of the campaign's Facebook post as a condition. Case status update time The amount of time since the last case status update. Use this condition if you want the event to trigger based on the amount of time between status updates. You can choose whether you want the amount of time to be Older or Newer than the number of days, hours, or minutes you specify. Case inbox assignee The inbox assignee is the agent whose inbox a case is currently sitting in. If the case is not currently in an inbox, it does not have an inbox assignee. Use this condition if you want the event to trigger for cases in a particular agent's inbox. -
Click Save.
-
-
When the survey is ready, click Activate to enable the survey. Digital First Omnichannel will offer the survey to all interactions created from this point on that meet the conditions you defined.