

This process assumes that you're assigning your employees either to one of the default roles that come with CXone or to custom roles you've already created.
Complete each of these tasks in the order given.
Create a Team
When you create employees, you must assign them to teams. If you haven't already created teams to reflect your contact center organization, do so now. Otherwise, skip this step.
-
Click the app selector
 and select Admin.
 -
Click Teams.
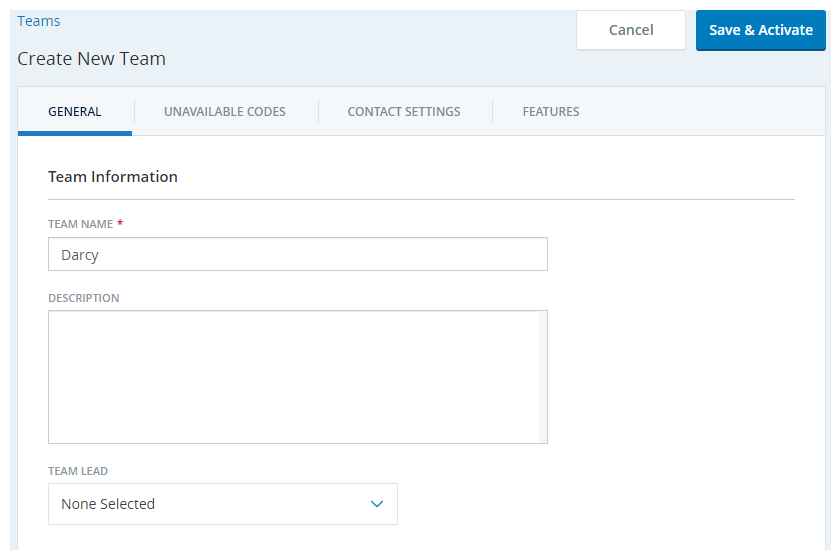
- Click New Team.
- Enter a Team Name and optionally a Description.
-
If you want a record of who the team lead is, select the name of the Team Lead from the drop-down. Any active user can be the team lead. A single user can be the team lead for multiple teams.
- If you want to add unavailable codes to the team, click Unavailable Codes. Click Add Unavailable Codes and select each unavailable code you want agents on this team to see in their agent application. When you're finished selecting codes, click Confirm.
- Click Features.
-
Select the checkboxes for each feature or product you want to enable for the team. You'll be billed for each agent in the team for the feature, whether the agent actually uses the feature or not.
- Click Save and Activate.
- Configure the team contact settings as needed.
Create Employee Accounts
-
Click the app selector
and select Admin. -
Click Employees.
-
Click New Employee.
-
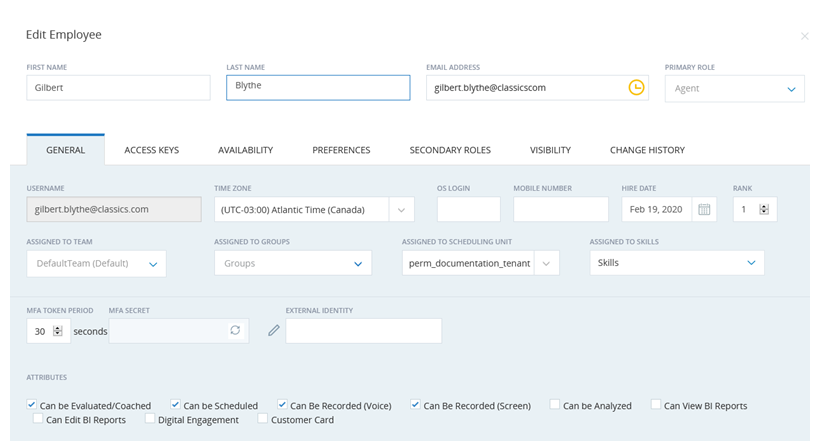
Enter the employee's First Name, Last Name, and a valid, active Email Address.
 Learn more about fields in this step
Field Details Email Address A valid email address associated with the employee. This is where CXone sends activation invitations, password verification codes, and so forth. You can use the same email address for more than one employee. When you edit an employee's email address, a verification email is sent to the new email address. Username
The username associated with the employee.CXone automatically fills in the Username field with the same value as Email Address, but you can change this if you want. While the username must be in the format of an email address, it doesn't have to be an actual email address.
-
Assign the employee a Primary Role.
-
Assign the employee to a team in the Assigned to Team drop-down.
-
If you want to complete additional fields on the General tab, do so now.
Learn more about fields in this step
Field
Details
Email Address A valid email address associated with the employee. This is where CXone sends activation invitations, password verification codes, and so forth. You can use the same email address for more than one employee. When you edit an employee's email address, a verification email is sent to the new email address. Time Zone The employee is automatically assigned to the tenant time zone unless you change it. OS Login The operating system the employee uses. The CXone Recordingapplication requires this information for screen recording. The field accepts free text and may contain a text string related to an operating system such as Windows10. Mobile Number The employee's mobile or cell phone number, for your records only. CXone doesn't use this information. Hire Date The date you hired the employee, for your records only. CXone doesn't use this information. Rank
This field only appears if you have WFM in your environment. It determines priority when creating a schedule.
Assigned to Team Assigns the employee to a team. Assigned To Groups Assigns the employee to a logical group. Assigned To Scheduling Unit This field appears only if your system includes WFM. It specifies the scheduling unit for the employee. Assigned To Skills This field appears only if your system includes WFM, QM, or both. It assigns WEM skills to an employee. Display Name This field auto-populates from the First Name, Middle Name, and Last Name fields, but you can edit the display name if necessary. Users from other teams can view the display name. They cannot view other information about the user unless they have the View Employee permission. Type Use Type to organize an employee outside of their assigned Role and Team. This field makes reporting easier because Type is not tied to permissions or unavailable codes. You can select previously created types from the drop-down. You can also create new types by entering them in the search bar and clicking Create. MFA Secret Pairs the employee account in CXone with an MFA device that employees use to generate a one-time password (OTP). CXone allows you to generate an MFA secret either manually or automatically. For more information, see MFA Secrets. External Identity If you want to authenticate the employee using a SAML-based login authenticator, enter the email ID that is used as the external identity (IDP) of the user in Okta. For more information, see Set Up a Federated Identity Login Authenticator. Can be Evaluated/Coached This attribute appears only if your system includes QM. It enables the employee to be evaluated, and you will be billed for QM for this employee.
The default value is selected for new employees. If you add QM to a system that has existing users, you must manually enable this setting for those users.
Can be Scheduled This attribute appears only if your system includes WFM. It enables the employee to be scheduled, and you will be billed for WFM for this employee.
The default value is selected for new employees. If you add WFM to a system that has existing users, you must manually enable this setting for those users.
Users who don't have this attribute selected won't appear in employee lists when creating weekly rules or shift templates.
Removing this attribute from a user deletes that user from any weekly rules or shift templates to which they are assigned.
Can be Recorded (Voice) This attribute appears only if your system includes CXone Recording/CXone Recording Advanced. It enables the employee's voice to be recorded, and you will be billed for voice recording for this employee.
The default value is selected for new employees. If you add CXone Recording/CXone Recording Advanced to a system that has existing users, you must manually enable this setting for those users.
Can be Recorded (Screen) This attribute appears only if your system includes CXone Recording Advanced. It enables the employee's screen to be recorded, and you will be billed for screen recording for this employee.
The default value is selected for new employees. If you add CXone Recording Advanced to a system that has existing users, you must manually enable this setting for those users.
Can be Analyzed This attribute appears only if your system includes Interaction Analytics. When this attribute is selected, the employee's recorded interactions are analyzed by Interaction Analytics, and you will be billed for Interaction Analytics for this employee.
The default value is cleared for new employees.
Can View BI Reports Employees with this attribute selected will be able to open any of the BI reports in the Reporting application as long as they also have the correct permissions.
BI reports have no usage fee for up to 10% of either your concurrent or configured users, depending on your pricing model. Once the 10% threshold is passed, you will be billed for each additional employee with this checkbox selected.
The default value is cleared for all employees, both existing and new.
Can Edit BI Reports Employees with this attribute selected can edit any of the BI reports in the Reporting application as long as they also have the correct permissions.
The default value is cleared for all employees, both existing and new.
Digital Engagement This attribute appears only if your system includes Digital First Omnichannel. When this attribute is selected, the employee's record is synced to Digital First Omnichannel, the employee can work on digital contacts, and you will be billed for Digital First Omnichannel for this employee.
The default value is cleared for new employees.
Customer Card This attribute allows employees who don't work with digital contacts to access available customer cards for omnichannel-routed voice, chat, email, and CXone Messaging SMS contacts.
The default value is cleared for new employees.
-
Click Create to create the employee profile and continue setting it up. Click Create & Invite if you're ready for the user to activate their account and set up their password.
Configure Employee Access Keys
If you have permissions to create access keys for other employees and you want to configure an access key for this employee, create it now. Otherwise, skip this step.
Access keys replace a username and password for user authentication. Manage your access keys as securely as you do your passwords and advise your employees to do the same. Note that you can also manage your own access keys from this tab of your own employee profile.
- Still in Admin > Employees, click the employee profile you're editing to open it.
-
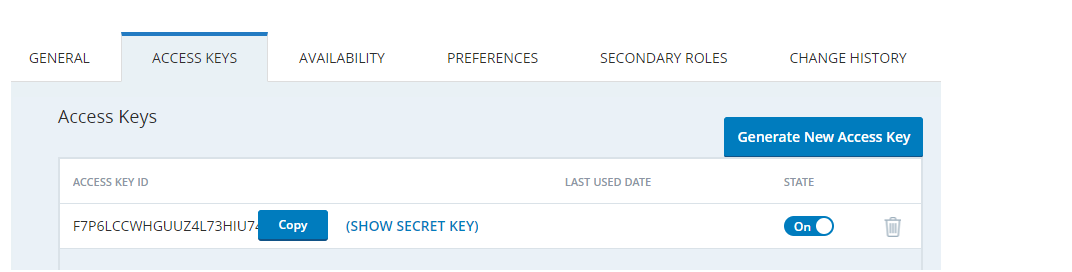
Click Access Keys.
- Click Generate New Access Key.
- Click Show Secret Key and copy the secret key to a secure location.
- Click Save.
Configure Availability and Preferences for WFM
If your organization uses WFM, configure availability and shift and time off preferences for the employee now. Otherwise, skip this step.
- Still in Admin > Employees, click the employee profile you're editing to open it.
-
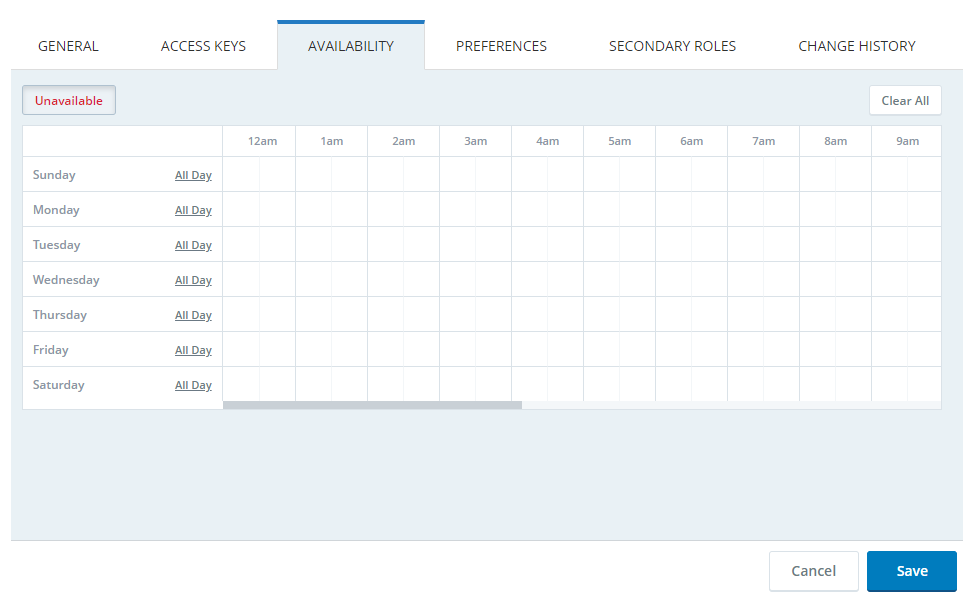
Click Availability.
-
In the day/time grid, click and drag to select the time duration the employee is unavailable. Click All Day to select the whole day as unavailable. Time periods not designated unavailable are considered available for scheduling in WFM.
-
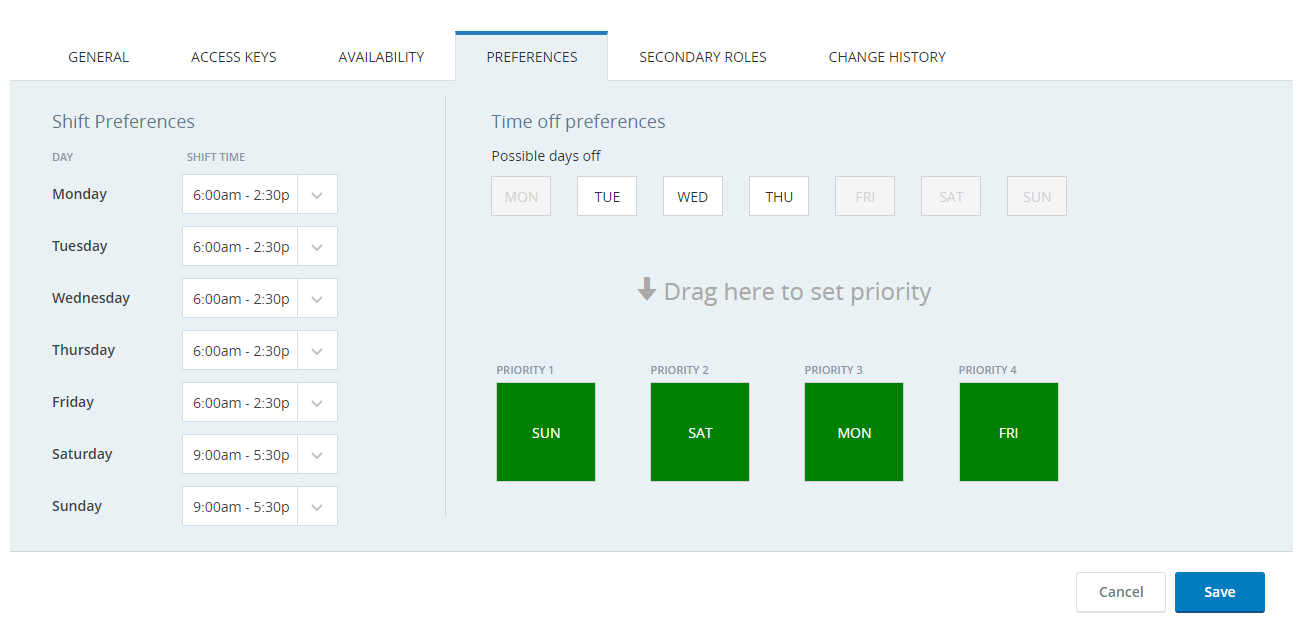
Click Preferences.
More About Preferences when Assigning Shifts
If you want to define time off preferences, first assign the employee to a weekly rule. If the weekly rule allows time off, define the time off preferences.
Sometimes, if multiple agents select the same shift preference, you may not have enough shifts for all agents. In such cases, the Schedule Generator assigns in this way:
- To the agent with the lower rank value (1 is the highest priority). Agents with a rank take priority over agents without a rank.
- If none of the agents have a rank or if they all have the same rank, then the agent with the earlier hire date has priority.
- If none of the agents have a rank or hire date, then the shifts are assigned randomly among the agents.
-
In the Shift Preferences area, from the drop-down list for each day, select the employee's preferred shift.
-
In the Time-Off Preferences area, drag and drop the listed days of the week to the available priority spots.
For example, if the employee's preferred day off is Monday, drag and drop the Mon card to the Priority 1 slot. If the next preference is Wednesday, drag the Wed card to the Priority 2 slot, and so on.
- Click Save.
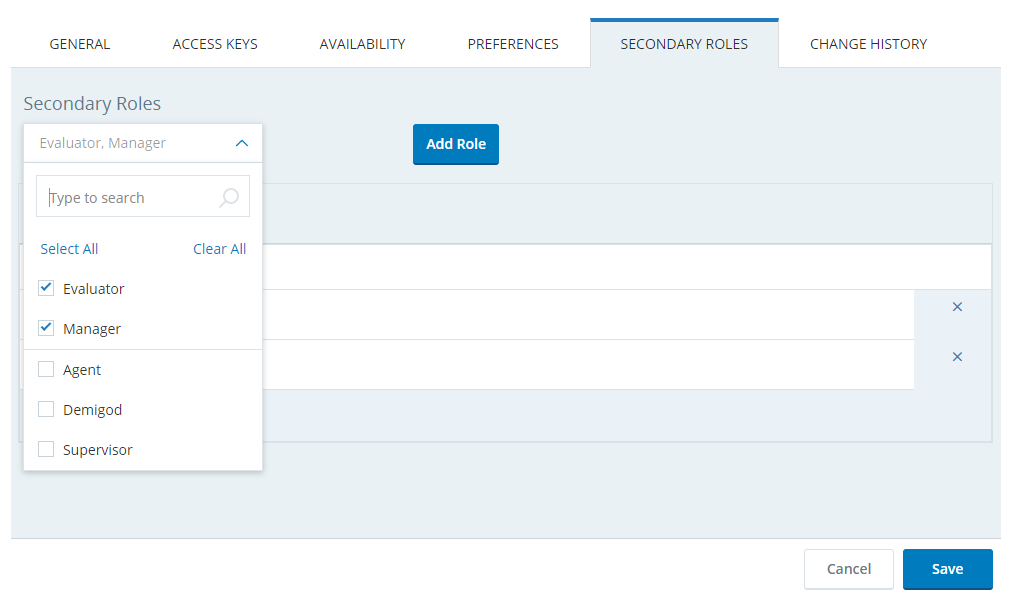
Configure Secondary Roles
If you want to configure secondary roles for your employee, do so now. Otherwise, skip this step.
Some pages in CXone don't support secondary roles. They only restrict visibility and actions as specified in the primary role assigned to the employee profile. Pages that don't support secondary roles include:
- All pages in the ACD application, including DFO pages.
- All pages in the WFI application.
- Most ACD reports and dashboards in the Reporting application.
- Business Intelligence (BI) reports in the Reporting application, designated by "mstr" in the report URL.
- Still in Admin > Employees, click the employee profile you're editing to open it.
- Click Secondary Roles.
- From the Secondary Roles drop-down, select the checkbox for any role you want to add. Users can have up to 10 secondary roles.
- Click Add Role.
- Click Save.
Activate the Employee Account
Inviting an employee sends an email to the email address configured for the employee profile. The user must click the link in the email within 48 hours to activate their account and set up a password. If the user doesn't activate their account within 48 hours, you will need to send another invitation.
- Click the app selector and select Admin.
- Click Employees.
- In the Employees table, scroll to or search for the employee profile for the user you want to activate.
- Click Invite.
Configure Immediate Activation of Users with SSO
You can immediately activate employees that are enabled with single sign-on (SSO). So, employees enabled with SSO don't have to click a link sent to their email to activate their accounts.
- Set up a federated identity login authenticator.
- Click the app selector and select Admin.
- Click Login Authenticator.
- Click New Login Authenticator.
- Enter the Name and Description of the login authenticator.
- Select SAML as the Authentication Type.
- Enter the SAML request Endpoint as the Endpoint URL.
- Click Choose File and select the signing certificate from your identity provider. If you don't have a signing certificate from your identity provider, then follow these instructions or reach out to your identity provider.
- Click the app selector
- Assign roles to the login authenticator.
- While still in the Create New Authenticator window, click Assigned Roles.
- Click Add Roles.
- Select one or more roles from the list and then click Save & Activate.
- Assign one of those roles to employees that you want to immediately activate. Any employee assigned to that role is activated immediately after they sign in with SSO.
- Click the app selector and select Admin.
- Click Employees.
- Click New Employee if you are setting up a new employee account. If you have already created the account, then select an employee from the list of users.
- Click Primary Role.
- Select one of the roles that you assigned to the federated identity login authenticator.
- Click the app selector
Configure Contact Handling Settings
If you're using ACD routing and want to modify the employee's contact handling settings, finish creating the employee account. Then modify the contact settings in ACD Users. Otherwise, skip this step.
Unlock an Employee Account
Locked user accounts can result from too many failed password attempts.
-
In the ACD application, click Employees.
- Set the Show drop-down to Locked.
- In the row of the employee you want to unlock, click the red Locked icon.
- Click Yes.