| Channel | Type | Set Up & Details | What Agents can Do |
|---|---|---|---|
| Apple Business Chat | Messaging |
|
|
Apple Business Chat channels allow your agents to interact with customers who use Apple Business Chat. After you configure the channel, you need to create message templates. Message templates make it easy for agents to send messages to contacts. Your agents may send the same type of message, like appointment confirmations, many times every day. With message templates, you can ensure that your agents all send messages the same way.
Complete each of these tasks in the order given.
Apple Business Chat Channel Requirements
To set up an Apple Business Chat channel, your organization must have:
- An Apple ID account that uses your organization's email address.
- An Apple Business Chat account. This account must be approved by Apple.
- Your organization's logo. The image must be a minimum of 1024 x 1024 pixels.
- An Apple Pay account, if you want to accept Apple Pay payments through your Apple Business Chat channel.
Add an Apple Business Chat Channel
Much of the work to add an Apple Business Chat channel takes place on the Apple website in your Apple Business Chat account. You will need to work with your NICE CXone account representative to add this channel.
During the setup process you will need to define Digital First Omnichannel as the Messaging Service Provider. Refer to the Apple Business Chat documentation on the Apple website for more information about the setup process.
Configure Permissions
You need to add this channel![]() A way for contacts and agents to interact, such as voice, email, chat, social media, and so on. to each role that will use the channel. When you add a channel to a role, you need to configure permissions. This determine what users assigned to the role can do when interacting with the channel.
A way for contacts and agents to interact, such as voice, email, chat, social media, and so on. to each role that will use the channel. When you add a channel to a role, you need to configure permissions. This determine what users assigned to the role can do when interacting with the channel.
You can add this channel to existing roles or create a role in the CXone Admin application specifically for this channel. Digital First Omnichannel users can only have one role.
If you create a new role for this channel, be sure to include any necessary permissions from the Digital Engagement list on the Permissions tab in the CXone Admin application. When you save the new role, it appears in the ACD > DFO > Roles list, where you can add channels and permissions, as well as assign the role to digital agents![]() An agent who handles digital interactions, such as those on email, chat, social, messaging, and SMS channels. .
An agent who handles digital interactions, such as those on email, chat, social, messaging, and SMS channels. .
Be sure to add the Reply permission for all roles that need to interact with customers. Without this permission, users with the role can't reply to interactions.
- Click the app selector
 and select ACD.
 -
Go to DFO > Roles.
- Click the Edit icon for the role you want to use.
- In the Channels section, locate the channel you want to configure permissions for and click Edit permissions.
-
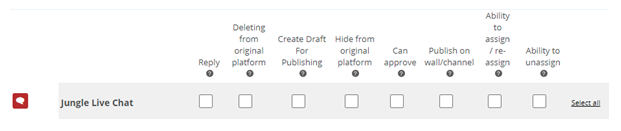
Select the checkboxes in the channel's row for each permission you want to add to the selected role.
 Learn more about channel permissions
Depending on how Digital First Omnichannel is configured, some permissions may not be available.
Permission
Details
Reply
When selected, users can write replies that are published Posting directly to a social media wall, feed, or account. on behalf of the channel. Users without this permission can write drafts of messages. The drafts must be approved before they can be sent or published. Deleting from original platform When selected, users can delete a message or post A social media post that can result in multiple threads from various contacts. from its original platform (for example, from Facebook or Twitter). Hide from original platform When selected, users can hide a message or post on its original platform (for example, Facebook or Twitter). Can approve When selected, users can approve drafts of replies written by other users. Ability to assign/re-assign When selected, users can assign or re-assign any conversation to themselves or other users. Ability to unassign When selected, users can unassign a conversation from themselves or other users. - Click Save. Continue adding permissions for other channels, as needed.
Configure Routing and Queues
You need to define how Digital First Omnichannel routes messages that come in through this channel![]() A way for contacts and agents to interact, such as voice, email, chat, social media, and so on.. You can modify the filters for existing routing queues
A way for contacts and agents to interact, such as voice, email, chat, social media, and so on.. You can modify the filters for existing routing queues![]() The system uses routing queues to determine which agents to route cases to. Your system administrator creates routing queues so that certain cases are routed to agents with expertise in that type of case. to also route for this channel. You can also create new queues for the channel. Routing queues in Digital First Omnichannel are similar to skills
The system uses routing queues to determine which agents to route cases to. Your system administrator creates routing queues so that certain cases are routed to agents with expertise in that type of case. to also route for this channel. You can also create new queues for the channel. Routing queues in Digital First Omnichannel are similar to skills![]() Used to automate delivery of interactions based on agent skills, abilities, and knowledge in CXone.
Used to automate delivery of interactions based on agent skills, abilities, and knowledge in CXone.
- Click the app selector and select ACD.
-
Go to DFO > Routing Queues.
- In the table, locate the routing queue you want to work on and click Filters.
- Locate the filter you want to use and click Edit. You can also add a new filter.
- In the Included channels rule section, select the checkbox for the channel.
- Click Save.

Configure Service Level Agreement (SLA)
SLAs help you track how effective your agents are in managing their cases![]() An interaction with one contact about one topic that can consist of many inbound and outbound messages.. Digital First Omnichannel lets you configure SLAs globally and per channel. The speed of communication can vary widely from channel to channel, so you might want different SLAs for channels with slower communication speed. For example, a live chat
An interaction with one contact about one topic that can consist of many inbound and outbound messages.. Digital First Omnichannel lets you configure SLAs globally and per channel. The speed of communication can vary widely from channel to channel, so you might want different SLAs for channels with slower communication speed. For example, a live chat![]() Agents and contacts interact on a real-time basis takes place in real time, but an email or SMS conversation may take days of back-and-forth between the agent and the customer.
Agents and contacts interact on a real-time basis takes place in real time, but an email or SMS conversation may take days of back-and-forth between the agent and the customer.
SLAs are only calculated during the business hours that you configure in the Digital First Omnichannel admin portal.
Agents can see the current SLAs for a case display when they click in the reply field.
If you want to configure an SLA for this channel, complete this task. Otherwise, you can skip it.
- Click the app selector and select ACD.
-
Go to DFO > SLA.
- Locate the channel you want to configure and click Edit.
-
Use the drop-downs to set the number of days, hours, and minutes to set the First Response Time and Solution Time for this channel.
Learn more about these metrics
Field
Details
First Response Time (FRT) FRT starts counting the second a customer creates a request (for example, sends you a message or comments on a post) and runs until an agent replies. Solution Time (ST)
ST is the total amount of time it takes to resolve a case. It starts at the same time as FRT, and runs until the case is marked Resolved by an agent. In reports, ST is sometimes referred to as RT
Resolution time, sometimes called solution time. - Click Save.
Message Templates
You need to create message templates for agents to use when sending messages to contacts through the Apple Business Chat channel. Message template allow you to set up various types of messages that agents frequently send to contacts, such as payment requests or appointment time selectors. Digital First Omnichannel offers many types of messages templates you can create for the Apple Business Chat channel.
Create a Custom Component
A custom component connects a channel to the message templates you create for it. Message templates allow you to set up various types of messages that agents will send to contacts, such as payment requests or appointment time selectors. All templates that you create for Apple Business Chat will appear in every channel you select for the custom component. You cannot exclude a template from certain channels.
Before you create the custom component, you need to copy the template settings URL from the Apple Business Chat > Message Templates page. You need this URL to create the custom component.

- In the Digital First Omnichannel portal, click Settings > Account > Custom Components.
- Click Add frontend custom component.
- Paste the URL you copied from the channel A way for contacts and agents to interact, such as voice, email, chat, social media, and so on.'s Message Templates page into the Url field. At the end of the URL, add %s.
- Enter the Height for the component. The recommended height is 280 px.
- Under Channels, select the checkbox for the channel you're creating the custom component for.
- Click Save.
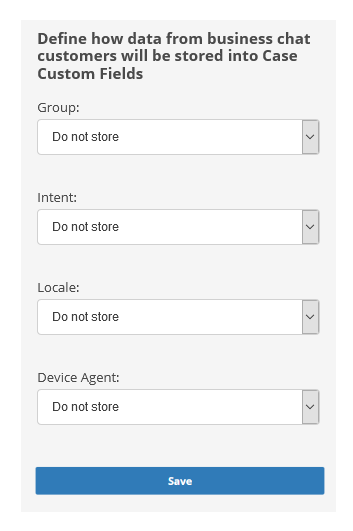
Create Apple Business Chat Custom Fields
After you create a custom component for your Apple Business Chat channel, you can create custom fields. These fields store data from Apple Business Chat customers. The fields are optional and you only need to create them if you want to store the data.
|
Field |
Details |
|---|---|
| Group | The individual or group that should handle the incoming case. If this field is part of the URL the contact uses to initiate an interaction, you can choose to store it. |
| Intent | The purpose of the incoming case. If this field is part of the URL the contact uses to initiate an interaction, you can choose to store it. |
| Locale | The contact's language and country. This information comes from the contact's web browser and is provided by Apple Business Chat. |
| Device Agent | The type of Apple device the contact uses during the interaction. Apple Business Chat provides this information. |
- Click the app selector and select ACD.
-
Go to DFO > Points of Contact Digital.
-
Open Apple Business Chat.
- Click Case Custom Fields next to the Apple Business Chat channel you want to add the fields to.
-
For each field, select if you want data from customers to be stored.
- Click Save.