


|
Adds a menu of choices from which the user can select while also playing a message. This action is typically used to allow the contact to provide information that directs the way in which the interaction is handled. For example, your Asrmenu action might say: To speak to an account manager, say "Sales". For technical assistance, say "Support".. In this case, the Asrmenu action would lead to different branches depending on the information provided by the contact. Asrmenu and Menu are very similar in their purpose and use. Asrmenu allows the caller to verbally respond to menu options in order to direct the call. It also stores the utterance in a script variable which can be used for other purposes. The Asr action can alternatively be used to create a custom, ASR Messages used in an Asrmenu action can be pre-recorded audio files, text-to-speech (TTS) renditions of values provided in the script, or a combination of these. ASR actions appear only if ASR is enabled for your |
Supported Script Types

|
| Phone |
Properties
| Property | Details |
|---|---|
| Sequence |
Determines the order in which audio files (whether pre-recorded or TTS If you enter values in the Sequence property field, you must use the correct formatting for each item. You can specify the exact text that you want the TTS service to say, such as: "%Your account balance is". You can also include variables, such as: "${accountBalance}". If you use variables, ensure that your script passes the variable value to the action containing the prompt. |
| Phrase | Use this to property to document the way the prompt should read. This property is not used by the script. Because some prompts can be complex and contain multiple segments, it can be helpful to include the text written without the formatting required by the Sequence field. |
| MinConfidence |
Defines the minimum acceptable confidence percentage for a recognition match. If the recognition percentage is less than this value, the OnNoConfidence branch is taken. To change it, enter a whole number between 1 and 100. The default value is 40 for a small menu and 50 for a large menu. |
| TimeoutSeconds |
Determines how long the IVR The timer starts only when the prompt is completely finished. However, the system has a built-in limit of two minutes (120 seconds) that includes the duration of the prompt. If this limit is reached during an action, any active prompts are aborted and the OnError branch is taken. For this reason, you should know the duration of your prompts and set a value for this field that ensures the action is active for less than two minutes. |
| ResultVarName | Determines the name of the variable that holds the recognized result of the contact's spoken or manually entered input. For example, if the prompt asked the contact to say or enter their date of birth, the result would be stored in the variable defined by this property. The default value is the name of the action + "Result" (for example, ASRDIGITSResult). If the contact provides spoken input and the ASR engine fails to find a match, this variable is not populated. Note that if the action has an OnDTMF branch, you must use a Capture action to pull a variable value out of the buffer (DTMF values are automatically stored in a buffer). |
| ConfidenceVarName | Determines the name of the variable that holds the confidence percentage returned by the ASR engine. The default value is ASRConf. |
| DetectDTMF |
Allows you to configure an IVR script to handle both spoken and manually-entered DTMF If the value is False, DTMF input is not recognized even if the contact presses a key. Although any DTMF digits pressed during the action are saved in the DTMF buffer, the action takes the NoConfidence branch. Because this action does not have an OnDTMF branch, the DTMF value will be stored in the result variable specified in ResultVarName. |
| ClearDigits | When a contact presses a key on their telephone keypad, the generated DTMF tone is stored in a buffer. When the ClearDigits property is set to True (the default value), that buffer is cleared when the action begins. Otherwise, the action would immediately detect a DTMF tone and invoke the OnDigit or OnDTMF branch even if the key press was associated with an earlier action. |
| InterDigitTimeout | The amount of time the system will wait after a digit being entered to determine if another digit will be entered. |
| ContentType | Specifies how the ASR engine should identify utterances provided by callers during this action. The ASR engine compares the caller's utterance to the values in the specified content type. If a match is detected, the engine returns the match and a percentage value indicating its confidence in the accuracy of the match. Choose one of the following from the drop-down: PhraseList or GrammarFile. The default value is PhraseList. |
| GrammarFile |
Allows you to provide the path to the grammar file |
| TermDigit | Allows you to specify a way for the contact to indicate they are done providing information by entering a terminator digit. The most common value is # (that is, the caller presses the pound key on their phone). By default, the TermDigit is included as one of the digits received and stored in the ASRDIGITSResult variable. To automatically strip this value, append a dash (-) in this field, (for example, to use the pound sign and strip it from the stored results, enter #-). |
| MaxDigits | The maximum number of digits that a user can provide for the action; for example, if the prompt requests the last four digits of a person's social security number, set this value to 4. The default value is 6. When the MaxDigits value is reached, the script continues to execute. Therefore, if the prompt calls for a terminator (such as the pound sign, or #), you must account for it in this value. For example, if the recorded menu message asks for the last 4 digits of the social security number "followed by the pound sign", set the value to 5. |
Branches
Configure Custom Cases
Allows you to set up custom branches for the choices in your action, and optionally establish branch variables for speech recognition, by using the collection editor dialog:
- Drag the next action for each branch you plan to create onto your canvas.
- Connect each new action from the Asrmenu and add a variable branch condition.
- View the Asrmenu properties by right-clicking the action or by left-clicking the action and then clicking the Properties tab.
- Click the Custom Cases ellipsis to open the collection editor.
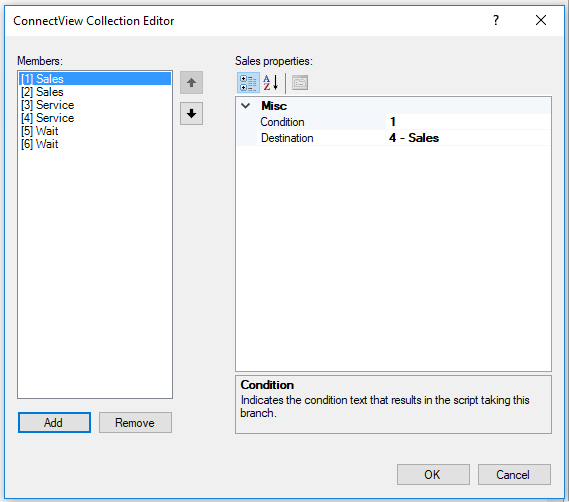
- Select the branch that you want to configure in the Members: column.
For the Condition property, type the DTMF
 Signaling tones that are generated when a user presses or taps a key on their telephone keypad. or spoken value that should trigger the branch. In the script example described later in this topic, your prompt might say, "For customer service, say service". You would therefore type service in the Condition field. If your prompt said, "For customer service, press 2 or say service", you would need to create separate entries for the DTMF value of 2 and the utterance "service".
For Destination, select the next action in the branch from the drop-down of actions in your script.
- Repeat the previous step for each branch you need to create.
- Click OK.
Script Example 1
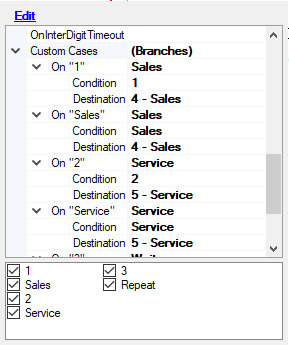
Asrmenu provides an easy way to create an ASR-driven menu system. It uses common branches such as OnNoConfidence and OnTimeout, but allows the user to specify their own branches for specific phrases. For example:
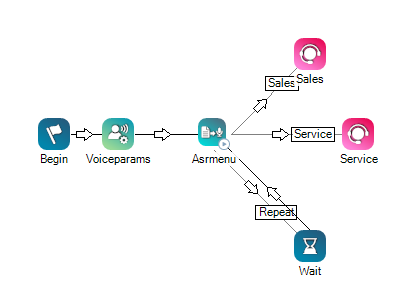
In this script, the Asrmenu action uses the CustomCases branch to route calls based on three different possible utterances by the caller: Sales, Service, or Repeat. These values are defined in the branch and used to recognize the caller's utterance.
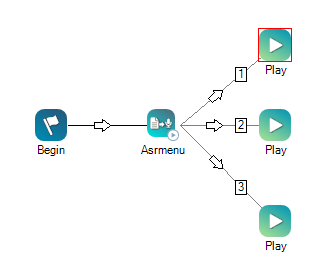
Script Example 2
If DTMF is set to true, it is not necessary to spell out the variable paths on the menu as "one" and "1". The speech engine recognizes the word "one" as the variable value 1. The appropriate script would look like:
Would you like to download this script?
Tips & Tricks
- You can pass the languageLocale variable from the Voiceparams action, which sets the language that the action will detect.
- DTMF tones are stored in a buffer. If the action contains an OnDTMF or OnDigits branch, the DTMF value must be pulled out of the buffer with a Capture action.
- If you want to capture multiple DTMF presses, the action immediately takes the OnDTMF branch when the first DTMF is pressed (including * and #). In this instance, you must capture multiple presses with a Capture action.
- If there are any DMTF present in the buffer and ClearDigits is not set to True, the OnDTMF branch would immediately be taken and require a Capture action.