

This page explains how to set up dashboards by creating, editing, and sharing dashboards. You can create multiple dashboards for different purposes, such as a profile dashboard or a supervisor dashboard.
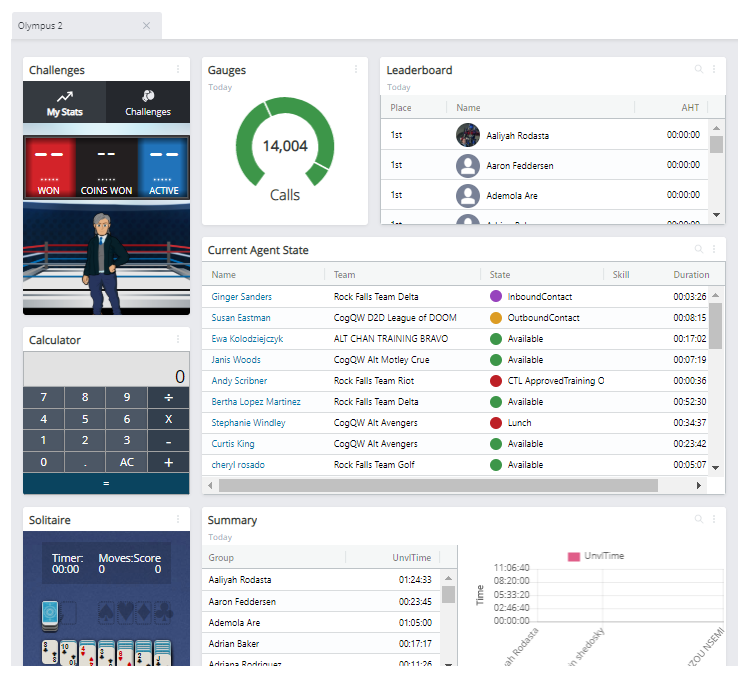
Your home page loads when you open CXone Performance Management, displaying the most recent dashboard tab(s) you had open. You can access dashboards you have created, as well as dashboards shared by others, from the Dashboard Library or Dashboards (Legacy) options in the side-menu, or by opening a new tab in your home page. Available dashboards are separated into different categories, such as My Dashboards, Shared, and so forth.
Create Dashboards
You have multiple options for creating new dashboards, described in the sections below.
Create New Dashboards
- Click Home.
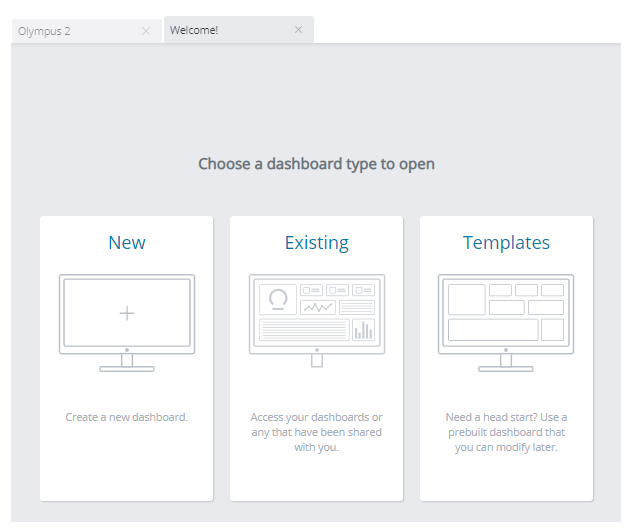
- Click New if you do not have any dashboards already open. If you have dashboards already opened, click the plus icon to open a new dashboard tab.
- Complete the basic information for the new dashboard, including typing a name and selecting a group by which to organize this dashboard - you can view the dashboard organization under the Dashboards side-menu option. You can also add a description of the new dashboard.
- Click Save.
- Click the Add Modules button in the left side-menu to display a list of possible modules to add.
- Click or drag modules to your desired position on the dashboard.
- If necessary, configure the metrics for the data that you want to display.
You can click and hold along the top of the module and drag it to a new location on your dashboard. Existing modules on your dashboard may automatically shift to accommodate a new layout.
Create New Dashboards from a Copy
- Click Dashboard Library and select a dashboard.
- Click Copy to create a replica of the dashboard, which shows up in the list as Copy of <name of dashboard>.
-
 Edit the copy name, description, or both if you don't want to use the default name of copied dashboards ("Copy of <dashboard name>)."
- Select the new copy to display a preview of the dashboard to the right of the dashboards list.
- Click the pencil icon under the dashboard preview.
- Edit the name and/or description
- Click Apply.
- Select a folder under which you want to categorize the copied dashboard.
- Click Save.
Create Dashboards from a Template
You can create a new dashboard from a template created by a supervisor/administrator, or from a system-created template. CXone Performance Management includes generic dashboard templates that include common modules used by typical user types, such as new agents or a gamification supervisor.
- Click Home.
- Click New if you do not have any dashboards already open. If you have dashboards already opened, click the plus icon to open a new dashboard tab.
- Select Template.
- Find the folder titled System Templates and select your desired dashboard to view a preview of the dashboard.
- Click Use. The dashboard will open as a new workspace tab.
- Click Save to Dashboards to save this dashboard in your own folder. Click Exit Template to go back to the dashboards list to select a different dashboard.
Create Dashboard Templates
You can pre-build dashboard layouts to share with other users. Sharing a dashboard as a template allows other users to open the shared template as a starting point to create their own. You can access dashboard templates by selecting Template when creating a new dashboard. To create a dashboard template:
- Create a new dashboard with the modules and metrics you want to use as a template. If the dashboard you want to share as a template is already created, skip this step. Additionally, when configuring module metrics for the template, you can select Use Current <group> when determining the group for which the module will return data, the recipient of the shared template will only see data that applies to them and that they have access to view.
- Click Dashboard Library in the side-menu.
- Select your desired dashboard to activate the action options.
- Click Share.
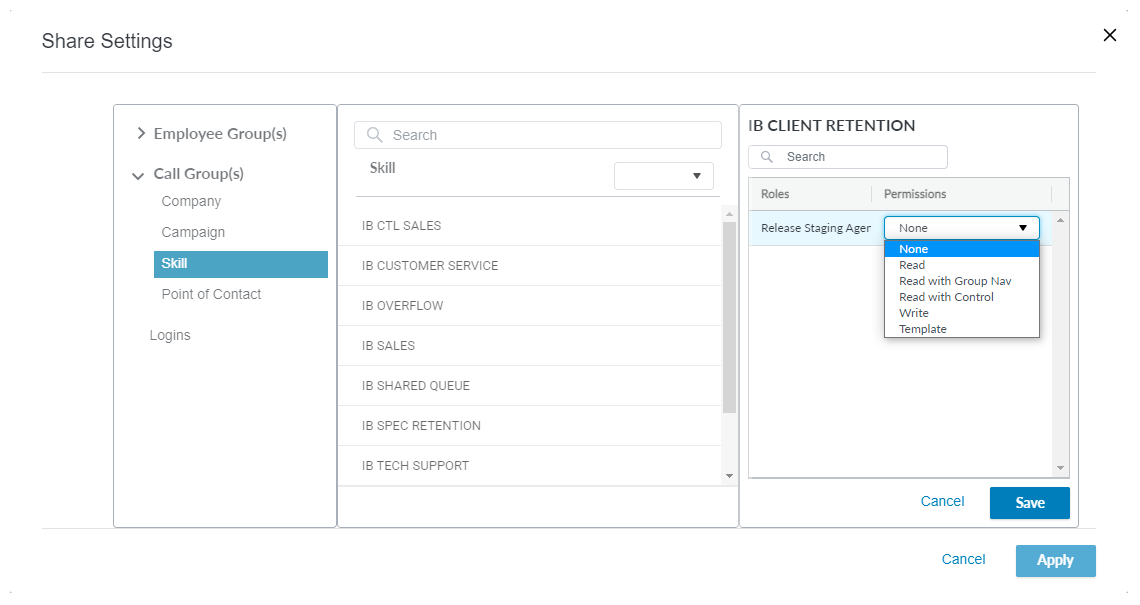
- Select the users or groups with which you want to share the template in the Share Settings window.
- For each Role, use the Permissions drop-down to select Template.
- Click Save, then click Apply.
Share Dashboards
Only a dashboard creator can edit a dashboard. If you want to edit a shared dashboard that you have not created, you can create a copy of the shared dashboard to edit.
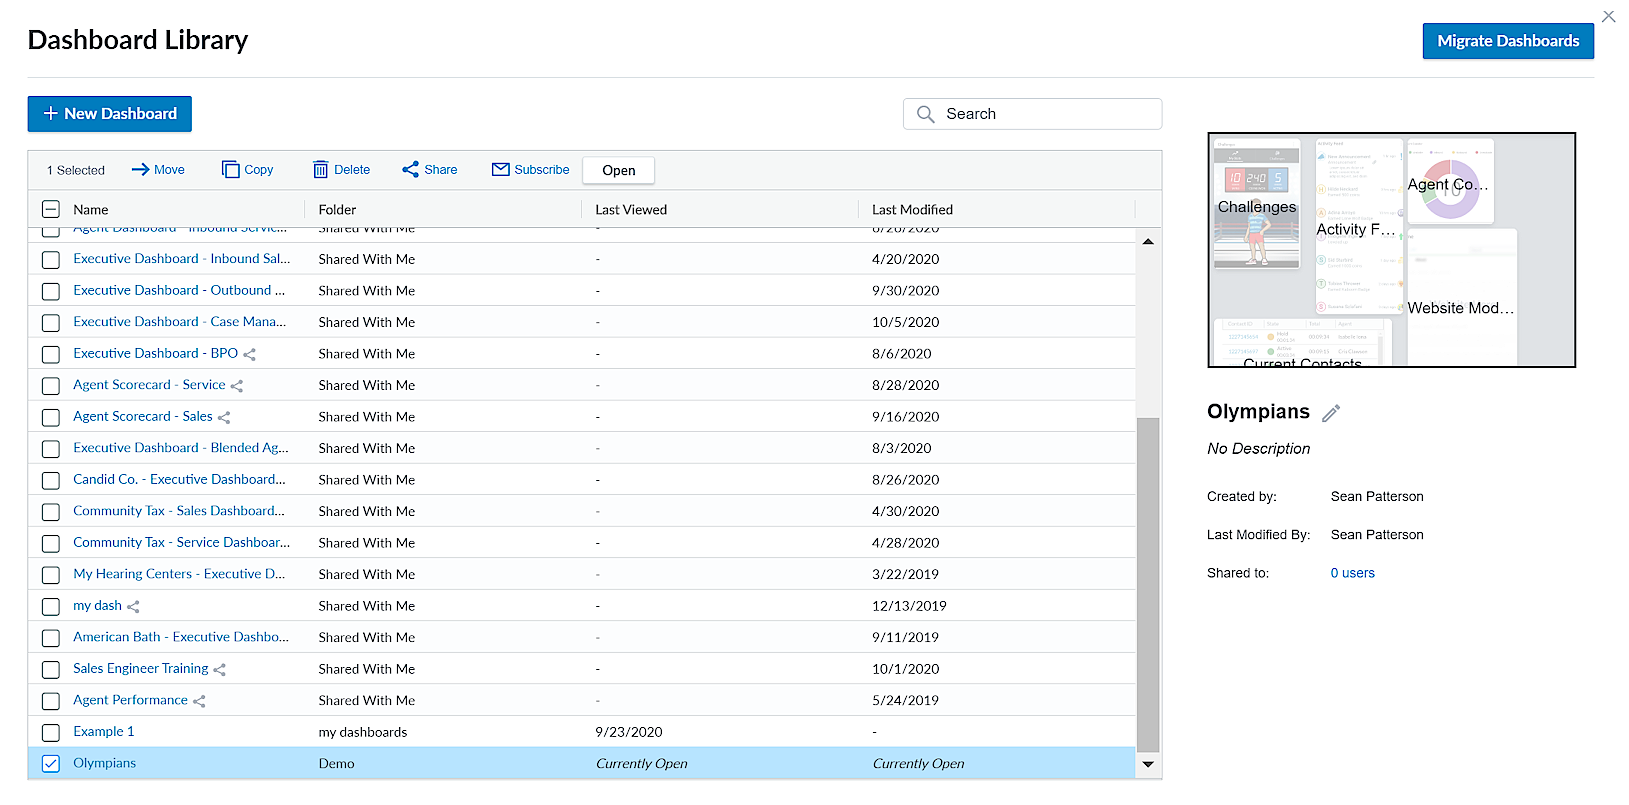
- Click Dashboard Library or Dashboards (Legacy) and select the dashboard you want to share. You can only share dashboards you have created and saved.
- Select the dashboard to share.
- Click Share.
- Filter and select the groups to locate which user (or groups of users) with which you want to share the dashboard.
- Select a user or group by hovering over the entry and clicking the blue plus sign.
- Determine the level of access that you want to give to specific roles with whom you are sharing the dashboard. You can select Read, Read With Group Nav, Read with Control, Write, or Template.
Learn more about fields in this step
Field Details Read This allows users to view the dashboard. Read With Group Nav This allows users of a specific group to view the dashboard. Read with Control
This allows users to make changes to the dashboard, but their changes are not saved or published. Only you (the creator) can publish changes.
Write
This allows users to edit the dashboard. If you allow users to edit a shared dashboard, any changes made to the dashboard will be seen by all who access it. Template This allows users to copy the dashboard and then edit their copy to create their own. - Click Save after determining your desired level of access.
- Click Apply to share the dashboard.
Change Dashboard Ownership
Only the dashboard owner can make changes to a dashboard. An administrator with the proper permissions can change the ownership of a dashboard to a different user.
For example, imagine a gamification administrator created a dashboard, then shared it with each team supervisor. The gamification administrator then moved to a different company. A system administrator could change the ownership to the new replacement administrator. This new administrator could make edits to the shared dashboard, as they assumed ownership.
Administrators can change dashboard ownership in a user's account on the Users page:
- Navigate to the Users page in the side-menu (User Settings > Users).
- Select the user who currently owns the dashboard.
- Click the Dashboards tab.
- Select the dashboard that you want to re-assign and click Change Ownership.
- In the Assign New Ownership section, search for the new user that you want to own the dashboard.
- Select the user.
- Click Change Ownership.
Migrate Legacy Dashboards
Legacy dashboards are dashboards created in the old format prior to the new dashboards being released in Spring 2019. These dashboards are still temporarily functional, but you must plan to migrate these dashboards into the new, responsive format, as legacy dashboards will be deprecated. You must be the original owner to migrate a dashboard, and shared dashboards will migrate as read-only.You can use the migration tool to convert legacy dashboards into the new format:
- Click Dashboards (Legacy) in the side-menu to open the Dashboards page. If you have dashboards that can be migrated, a Migrate Dashboards button will appear in the top right corner.
- Click the Migrate Dashboards.
- Select the dashboards you want to migrate in the Migrate Dashboards window.
- Click Migrate.
After migrating a dashboard(s), it appears in the Ungrouped folder in your dashboards management page (click Dashboards in the side-menu). You can also populate a list of legacy dashboards that need to be migrated from the Dashboard Library by clicking the Migrate Dashboards button in the top-right. From this populated list you can select a dashboard to begin migrating.
Subscriptions do not migrate.
The following modules do not migrate:
- Agent States Breakdown
- Analytics Correlation
- Analytics Histogram
- Analytics Trending
- Dispositions
- Forms
- Leaderboard (secure)