

With Digital First Omnichannel, you can build forms that agents send as a quick response in an interaction. Forms can be used to securely collect information from your customers.
Create a Form
-
Click the app selector
 and select ACD.
 -
Go to DFO > Forms.
-
Click Add new form.
-
Enter a Name for the form. Click the Type drop-down and select Public Secure Form.
-
You can enter the Public form CSS link, Public form button label, and Public form success message.
 Learn more about fields in this step
Field Details Public form CSS link A link to a CSS stylesheet for controlling the look and feel of the form. Public form button label The text the customer sees on the button to submit the form.
Public form success message The message the customer sees after submitting their form. -
You can select the Send to external source? checkbox. This sends the form data to an external data source, such as a CRM system. Selecting this field requires you to enter the External source URL. If you select the Use SSL verification checkbox, enter the Secret Key.
-
Click Save.
Configure Custom Fields for Forms
You should create all the fields you want to have on your form before moving on. This allows you to add them all at the same time later.
- Click the app selector and select ACD.
-
Go to DFO > Custom Fields.
- Click Create New Custom Field for Case.
- Enter an Ident for the field. This is the internal name that's used in the database. It must be all lowercase with no spaces. You can use an underscore character (_) to represent spaces.
- Enter a Label for the field. This is the external name that shows in the case An interaction with one contact about one topic that can consist of many inbound and outbound messages. details or on the pre-chat survey form.
-
From the Type drop-down, select the type of field you want: Text, Email, Drop down list, or Hierarchical.
Learn more about these field types
Field
Details
Text Allows the person completing the field to enter free-form text. E-mail
Requires that the data entered fit the format of an email address. Digital First Omnichannel only validates the formatting. It doesn't validate the email addresses that users enter.
Drop down list Allows you to provide a list of options for the person completing the field to select from. Hierarchical Typically used with pre-chat survey forms, hierarchical fields let the contact zero in on a specific product, problem, and so forth. If you select this type, you will have an additional step to create the hierarchical structure after you save the custom field.
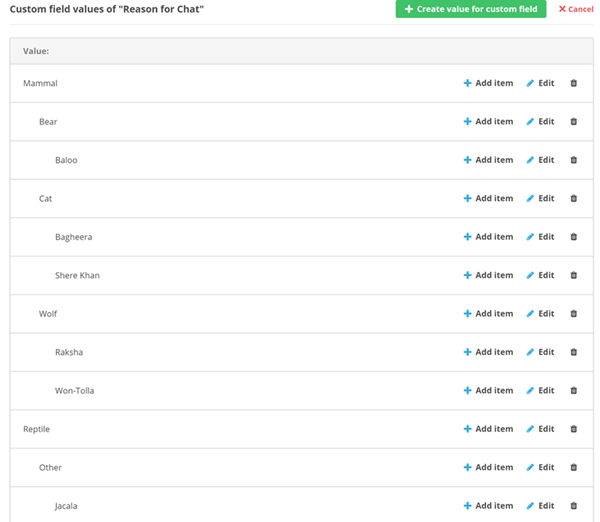
For example, when someone contacts The Jungle, a subsidiary of Classics Inc., they usually need help with one of the animals in the jungle. The contact center administrator, Mowgli Kipling, uses hierarchical fields in the pre-chat form to narrow their choices to Reptiles or Mammals, then within Mammals to Cats, Monkeys, or Bears, and finally within Cats to Shere Khan or Bagheera.
-
You can enable any of the additional parameters for the field by using the sliders.
Learn more about fields in this step
Field Details Required When enabled, this field must be completed for every case. Visible in post detail
When enabled, this field and its values are visible to agents when they view the details of a post
A social media post that can result in multiple threads from various contacts. or message.Visible in live chat pre-survey When enabled, this field and any pre-populated values are visible to contacts completing a pre-chat survey when communicating on a live chat Agents and contacts interact on a real-time basis or chat messaging Asynchronous chat in which contacts send a chat message anytime and wait for a replychannel A way for contacts and agents to interact, such as voice, email, chat, social media, and so on.. Pre-chat survey forms collect information about the contact, such as their name, before an agent handles the case. Is editable When enabled, values in this field can be changed by the contact, an agent, or an automated process. - Click Save.
- If you selected Hierarchical for the Type, set up the hierarchical items:
- Click Edit items.
- Click Create value for custom field.
- For the first item, skip the Parent ID field.
- Enter a Value that will appear to the contact on the pre-chat form.
- Click Save.
- To create another top-level value, repeat the previous 4 steps. To create a child value, click Add item for the field value you just created, enter a Value, and click Save.
- Repeat these steps until you have added all values for the field.
Add Fields to a Form
-
Click the app selector
and select ACD. -
Go to DFO > Forms.
-
Click Custom fields for the form you want to configure.
-
Click the Add field drop-down and select the field you want, then click Add. Repeat this step for as many fields as you want.
-
You can change the order of the fields on the form by clicking the blue up and down arrows in the Order column.
-
You can choose the following for each field on the form: Set as visible to agent, Turn storing data on, and Set as required.
Learn more about fields in this step
Field Details Set as visible to agent When turned on, the text color changes to blue. This means the data filled here on the form will be visible to the agent. You must also click Turn storing data on. If this field will contain sensitive data, consider leaving it off.
Turn storing data on When turned on, the text color changes to blue. This means the data filled here will be stored in the database. If this field will contain sensitive data, consider leaving it off. Set as required When turned on, the text color changes to blue. This means the customer must fill in this field in order to submit the form.
Create a Quick Response
Forms are sent as secure links from quick responses. If you don't complete this section, agents won't have access to use the form.
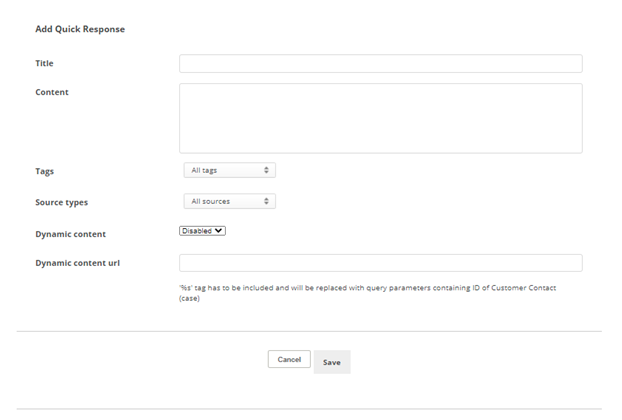
- Click Add quick response.
- Enter a Title for the quick response and the Content of the response.
- Click the Tags drop-down and select those you want this quick response to be available for.
- Click the Source types drop-down and select the channels that you want this quick response to be available for.
- Click the Dynamic content drop-down and select Enabled.
- Enter /iframe/list-of-public-secure-forms%s in the Dynamic content url field. This connects the quick response with the form.
- Click Save.