

Content on this page is for a product or feature in controlled release (CR). If you are not part of the CR group and would like more information, contact your CXone Account Representative.
CXone Bot Builder supports both native and custom API![]() APIs allow you to automate certain functionality by connecting your CXone system with other software your organization uses. integrations. Native integrations use APIs that call to other parts of CXone, like CXone Expert. Custom integrations use APIs that call to your own database or third-party systems.
APIs allow you to automate certain functionality by connecting your CXone system with other software your organization uses. integrations. Native integrations use APIs that call to other parts of CXone, like CXone Expert. Custom integrations use APIs that call to your own database or third-party systems.
Configure a New Native Integration
Currently, CXone Expert is the only native integration available. Using CXone Bot Builder with CXone Expert is called CXone Answers. This allows bots![]() Virtual agent designed to handle specific interactions built in CXone Bot Builder to utilize data from the centralized knowledge system of CXone Expert to answer consumer questions on all digital channels.
Virtual agent designed to handle specific interactions built in CXone Bot Builder to utilize data from the centralized knowledge system of CXone Expert to answer consumer questions on all digital channels.
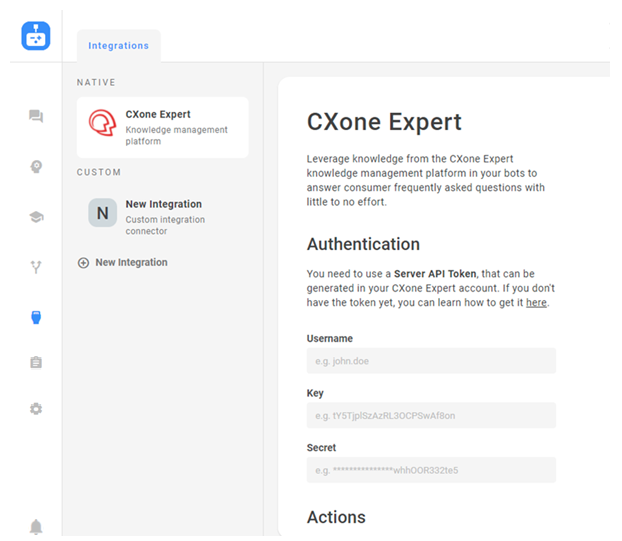
- In the Digital First Omnichannel portal, click Chatbot.
- Click the bot you want to work with.
- Click Integrations
 in the left icon menu.
 - In the Native section, click CXone Expert.
- Under Authentication, fill in the Username, Key, and Secret fields.
 Learn more about fields in this step
Field Details Username This is the username for your CXone Expert account.
Key
You need to generate a Server API Token in your CXone Expert account to obtain the Key.
Secret You need to generate a Server API Token in your CXone Expert account to obtain the Secret.
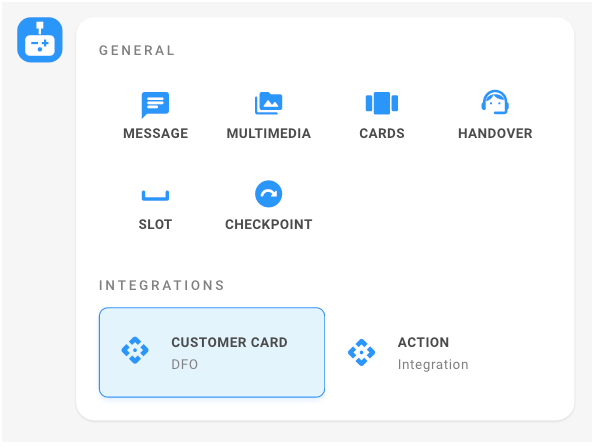
- Under Actions, click New Action.
- Type a name for the action and press Enter.
- Click the action to configure it.
- Write your configuration in the Request JSON window. Slot values can be used as variables in the format {{slot_name}}. You can use the mockSlots parameter for testing purposes.
- Click Test Request at any time to populate the Response window.
- You can use the Error Message field to determine what to show a customer in response to a failed API request.
- You can select the Debug Mode checkbox to add a suffix response to the error message.
- Ensure the action toggle is turned on. If the toggle is off, the action will not be available to use.
- Click Train and Stage to train your bot on the new integration. You can also do more training and testing later.
- Add your action to a story, rule, or fallback.
Configure a New Custom Integration
You can use a custom integration with your own database or third-party systems.
Based on the success of Akela's bot![]() Virtual agent designed to handle specific interactions, contact center supervisor Sherry Khan wants to try it out. Lately, Sherry's agents have experienced multiple calls from customers wanting to update information such as their contact phone number. Sherry decides to use a bot with a custom API
Virtual agent designed to handle specific interactions, contact center supervisor Sherry Khan wants to try it out. Lately, Sherry's agents have experienced multiple calls from customers wanting to update information such as their contact phone number. Sherry decides to use a bot with a custom API![]() APIs allow you to automate certain functionality by connecting your CXone system with other software your organization uses. integration to update customer cards for calls like these. This will give her agents more time to focus on more complicated customer interactions.
APIs allow you to automate certain functionality by connecting your CXone system with other software your organization uses. integration to update customer cards for calls like these. This will give her agents more time to focus on more complicated customer interactions.
Sherry sets up a custom integration in CXone Bot Builder and calls it Customer Card. She creates two new actions inside the integration: one to retrieve the existing data from the customer card, and one for updating the phone number field in the customer card. Then, Sherry creates a story![]() Used to train bot for interaction handling based on intent and context for this situation and adds messages and her new actions into the story.
Used to train bot for interaction handling based on intent and context for this situation and adds messages and her new actions into the story.
As Sherry's agents receive more requests to change other customer details, Sherry can go back and add more actions to the integration so her bot can handle those tasks as well.
- In the Digital First Omnichannel portal, click Chatbot.
- Click the bot you want to work with.
- Click Integrations in the left icon menu.
- In the Custom section, click New Integration.
- Click the title to rename the integration.
- To use OAuth 2.0 with 'Client Credentials' grant type authentication, fill in the Authorization URL, Key, and Secret fields. This information can be found in the account for your API APIs allow you to automate certain functionality by connecting your CXone system with other software your organization uses.. If you are using a different method of authentication or a public API, you can skip this step.
- Under Actions, click New Action.
- Type a name for the action and press Enter.
- Click the action to configure it.
- Write your configuration in the Request JSON window. Slot values can be used as variables in the format {{slot_name}}. You can use the mockSlots parameter for testing purposes.
- To use JSON Web Token, Simple Web Token, or Basic Authentication, enter the appropriate value for Authorization in the Request JSON window. If you are using a different method of authentication or a public API, you can skip this step.
- Click Test Request at any time to populate the Response window.
- You can use the Error Message field to determine what to show a customer in response to a failed API request.
- You can select the Debug Mode checkbox to add a suffix response to the error message.
- Ensure the action toggle is turned on. If the toggle is off, the action will not be available to use.
- Click Train and Stage to train your bot on the new integration. You can also do more training and testing later.
- Add your action to a story, rule, or fallback.