Content on this page is for a product or feature in controlled release (CR). If you are not part of the CR group and would like more information, contact your CXone Account Representative.
Create Intents
Required permission: Chatbot (ACD > DFO > Roles > [choose one] > Core Modules)
Intents are the core meaning behind the contact's words; the actual result or goal the contact wants to communicate or achieve. Follow these best practices when creating intents:
- Use real data. Don't use tools that auto-generate data and claim to train your bot
 Virtual agent designed to handle specific interactions faster. They often produce examples that don't reflect what contacts really say. They also can result in a bot that loses its ability to generalize. Over time, the bot reaches a point where it only recognizes phrases it's seen before.
 - Don't use the same training examples for more than one intent. This may sound simple, but intents aren’t always so clear cut. Two user goals might seem different but start to gather similar examples over time. When this happens, see if you can merge similar intents into a more general category.
- Always include an out-of-scope intent. Out-of-scope intents cover anything the user might say that’s outside of the bot’s domain. They allow you to recover the conversation and often result in improved performance.
Based on her preparation, Akela identifies this happy path:
Contact: Hello.
Bot: Hello. How can I help you?
Contact: I forgot my password.
Bot: I'm sorry to hear that. You can reset it at our website.
Contact: How do I do that?
Bot: Click Forgot Password in the upper right corner of the landing page. Then enter your email address and the system will send you a link to reset your password.
Contact: Thank you!
Bot: You're welcome. Is there anything else I can do for you?
Contact: No. You've been very helpful. Good-bye.
Bot: Thank you for contacting us. Good-bye.
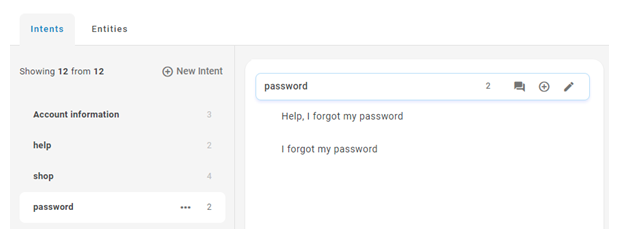
After analyzing the real-life contact messages in this example, Akela decides there are five intents:
- Greeting (Hello)
- Password_reset (I forgot my password)
- Explain (How do I do that?)
- Thanks (You've been very helpful)
- Good-bye (Good-bye)
Create a Single Intent
- In the Digital First Omnichannel portal, click Chatbot.
- Click the bot you want to work with.
- Click NLU
 in the left icon menu.
 - Click New Intent.
- Enter a name for your new intent and press Enter.
- Beneath the new intent, begin entering phrases that the bot should recognize for that intent. Separate phrases by pressing Enter. Entries are saved automatically.
- Click Train and Stage to train your bot on the new intent. You can also do more training and testing later.
- Once the intent is used in a story or rule, you can click View Dialogues
 , then click an item in that list to go to that story or rule.
Create a Multi-Intent
Bots![]() Virtual agent designed to handle specific interactions built with CXone Bot Builder can identify both single and multiple intents
Virtual agent designed to handle specific interactions built with CXone Bot Builder can identify both single and multiple intents![]() What the contact wants to communicate or accomplish in a contact's message
What the contact wants to communicate or accomplish in a contact's message![]() Anything a contact says in a bot interaction, whether question or statement, written or spoken.. In the planning example, the final bot statement requires the bot to recognize two intents in the contact message.
Anything a contact says in a bot interaction, whether question or statement, written or spoken.. In the planning example, the final bot statement requires the bot to recognize two intents in the contact message.
Multi-intents can be as simple as the one in the planning example. They can also be more complicated and specific to your business. For example, a bank might need to create a multi-intent to handle a message like, "Please show me my balance and transfer $200 to my savings account."
If you create a multi-intent from two existing single intents, you don't have to provide many examples. Your bot can recognize the single intents in the message and handle them as a multi-intent.
Only use multi-intents when they are really necessary to the natural flow of conversation. Too many multi-intents can make your bot too complicated to manage easily.
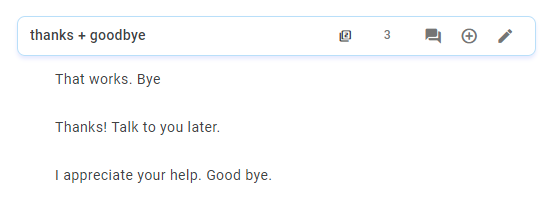
While reviewing her sample conversations, Akela realizes that users often combine thanks and good-bye in the same message. She decides that the conversation will have a better flow if she creates a multi-intent so the bot can respond to these intents together.
- In the Digital First Omnichannel portal, click Chatbot.
- Click the bot you want to work with.
- Click NLU in the left icon menu.
- Click New Intent.
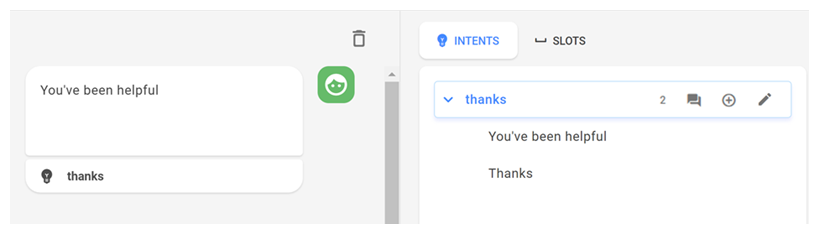
- Enter a name for your new multi-intent and press Enter. The name should contain both intents connected by a + sign. You'll see Akela's multi-intent in the image: thanks + goodbye.
- Beneath the new multi-intent, begin entering phrases that the bot should recognize. Separate phrases by pressing Enter. Entries are saved automatically.
- Click Train and Stage to train your bot on the new multi-intent. You can also do more training and testing later.
- Once the multi-intent is used in a story or rule, you can click View Dialogues, then click an item in that list to go to that story or rule.
Create Rules
Required permission: Chatbot (ACD > DFO > Roles > [choose one] > Core Modules)
Rules tell your bot![]() Virtual agent designed to handle specific interactions how to respond to messages
Virtual agent designed to handle specific interactions how to respond to messages![]() Anything a contact says in a bot interaction, whether question or statement, written or spoken. that are the same in every context. Examples include:
Anything a contact says in a bot interaction, whether question or statement, written or spoken. that are the same in every context. Examples include:
- Single-turn interactions with fixed responses—What are your hours? What is your address?
- Conversation building blocks—Greetings, good-byes, thank-yous and transitions; simple yes/no questions; and acknowledgments. CXone Bot Builder comes with default intents What the contact wants to communicate or accomplish and rules Used to define bot's response to messages that don't change with context. for common building blocks. These include greetings, handover Any contact message that should trigger transfer to a live agent requests, and more.
- FAQs—Questions that customers often ask your bot.
- Insults and classic bot challenges—Are you a real person? Is this a bot?
- Interruptions—Questions or topic changes from the customer while the bot is attempting to fill slots for a form.
Conditions
You can define specific conditions that must be met in order for the rule to be used. You can choose from the following types of conditions:
- Active Form—The rule only runs when the specific form or forms are active.
- Slot Value—The rule only runs when the slot or slots have a specific value.
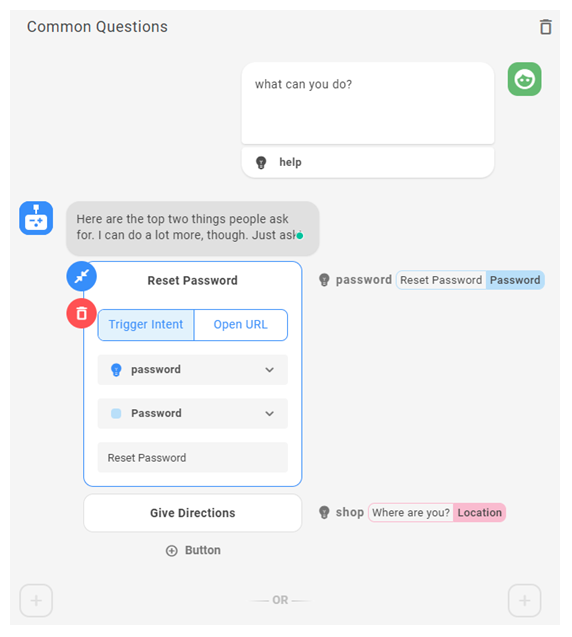
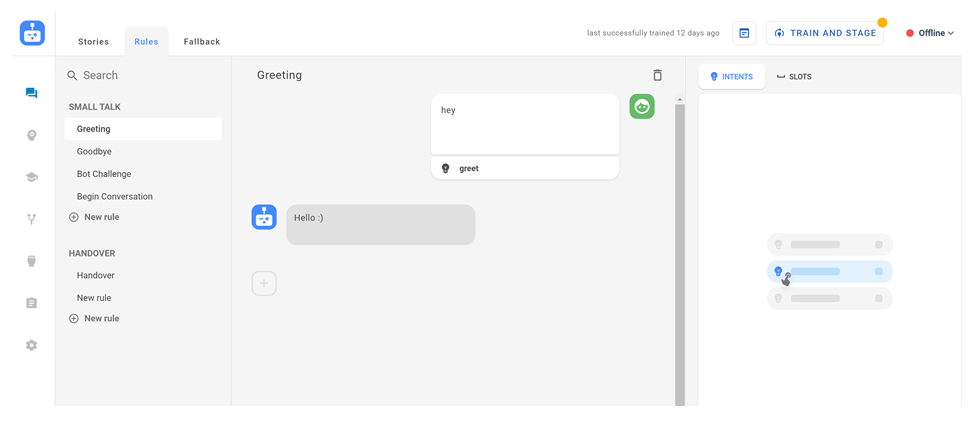
Akela wants to create a rule that provides the same response to any expression of thanks from the contact. She adds the rule to the default Small Talk folder, but she could also create a new folder to house the rule. She also wants to add two more messages to the Greeting rule that are common among her users.
Add a New Rule
Before following these steps, be sure you create an intent for the rule, if you haven't already.
- In the Digital First Omnichannel portal, click Chatbot.
- Click the bot you want to work with.
- Click Dialogues
 in the left icon menu.
 - Click Rules.
- If your rule doesn't fit an existing folder, click New Folder, type a name for the new folder, and then press Enter.
- Under the folder you want to use, click New Rule.
- At the top of the rule section, enter a name for your rule.
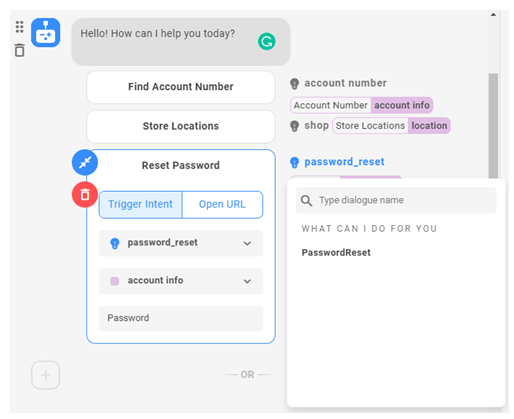
- If your rule should only be used under a certain condition, click Add condition. Choose the condition type and the appropriate form or slot value.
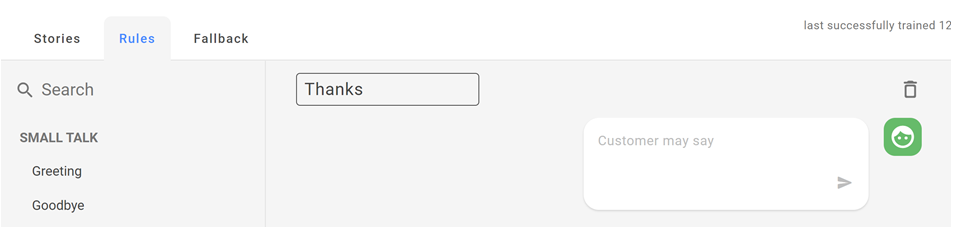
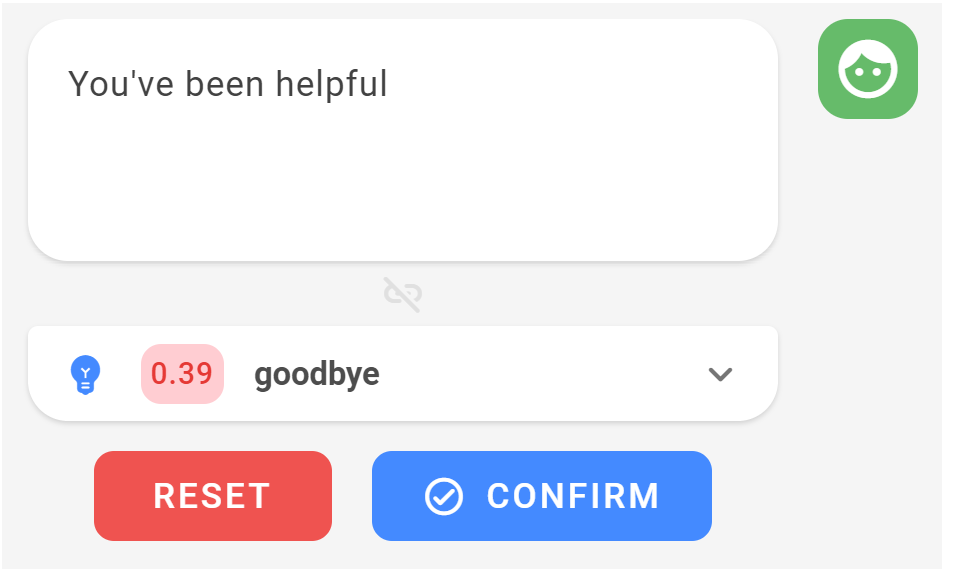
- In the Customer may say box, enter a customer message and then press Enter. CXone Bot Builder analyzes the message and offers a list of intents and confidence level.
- Confirm the correct intent. Since your bot is learning a new intent, it may not display the correct one. You can select the correct intent from the drop-down.
- Hover over the plus sign at the left of the rule builder until it changes to a bot icon, then click the action.
-
Provide the information matching the action type you selected. For example, if you selected Message, enter what the bot should say.
Learn more about all bot action types
Action type Details Message Enter the message for the bot. You can add Buttons or Quick Replies to the message or choose to leave it as regular text. To see a images and consider examples, see below.
Multimedia Upload a supported multimedia file:
- Images in PNG, JPG, GIF, or BMP format that are smaller than 5 MB
- Videos in AVI, MPEG-4, or WEBM format that are smaller than 200 MB
- Audio files in MP3 format that are smaller than 15 MB
- PDF or Microsoft Word, Excel, or Powerpoint files that are smaller than 15 MB
Multimedia is only supported by these channels:
- Chat
- Facebook Messenger
- Apple Business Chat
- Twitter Direct Messaging (images only)
Cards Cards can combine images, structured text, and buttons into one message. This keeps the interface cleaner than sending several responses back to back. You can add up to 10 cards to be sent at a time. The customer will be able to swipe back and forth to view them. You can use variables when configuring a card in the format {slot_name}. Handover Select this option when the customer message should trigger the handover Any contact message that should trigger transfer to a live agent rule.Slot Select from your existing slots. Checkpoint Select this option, then click the + icon and select the stories you want to link to. Checkpoints provide a simple way to connect different stories within the same dialogue. To see an image and consider examples, see below.
Learn more about Buttons and Quick Replies
Buttons—Buttons help a customer communicate their need quickly without having to type. Buttons remain available for the customer to go back to even after they choose one. You can add up to three Buttons to a message. You can use variables when configuring a button in the format {slot_name}. A button can trigger an intent or open a URL.
- Trigger Intent allows you to configure the intent and optionally the entity as well. Once the customer taps the button, the bot will decide which story or rule to follow based on your configuration.
- Open URL opens a web page in a new tab. This can enrich the conversation by, for example, directing to a website to provide more details on a product than what the bot would provide in a conversation.
Quick Replies—Quick Replies are similar to buttons in improving customer experience. Once the customer chooses one, the rest of the options go away. You can add up to 12 quick replies to a message. You can use variables when configuring a quick reply in the format {slot_name}. A quick reply can trigger an intent or send a standard message.
- Trigger Intent allows you to configure the intent and optionally the entity as well. Once the customer chooses a quick reply, the bot will decide which story or rule to follow based on your configuration.
- Send Text takes the text of the quick reply and sends it back to the bot as a standard customer reply.
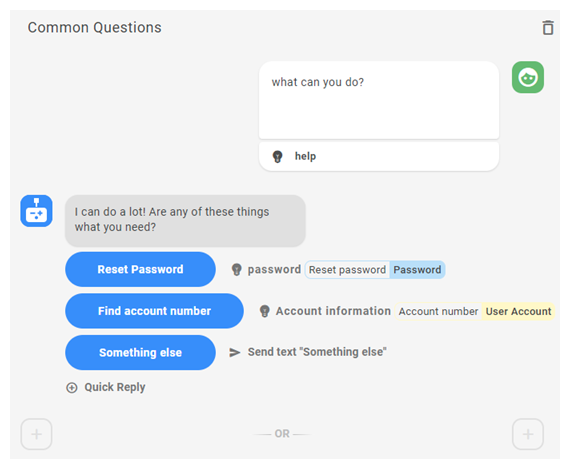
If a message has buttons or quick replies with an intent defined, these show up next to the message. You can click on them to see all stories and rules where they are used.
 Learn more about checkpoints
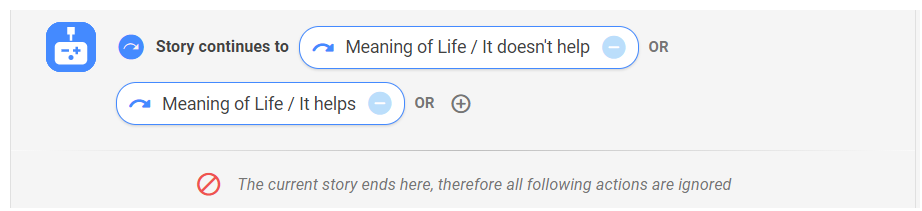
Checkpoints allow you to connect multiple stories based on the contact's message. For example, a customer might ask, "What are your hours and location?". Rather than create separate stories for hours, location, and hours plus location, you could use checkpoints to offer the hours and location stories in sequence.
You can also use checkpoints that are not based on customer messages. For example, your company might want to extend a special offer to all customer for a limited time. You could add the special offer messages and actions to each of your bot stories, and then remove that section from multiple stories when the offer expires. A simpler method would be to create a story just for the special offer, and then add a checkpoint to each story for the duration of the offer.
As shown in the image, a checkpoint always displays a small blue circle with a curved arrow at the beginning. This shows that it connects to one or more other stories. Checkpoints always end the story, even if you add actions after the checkpoint.
While checkpoints can be very useful, don't overuse them. Too many checkpoints can make the logic of your stories very hard to follow.
- Click the typing indicator
 to set or override the length of time a typing indicator displays for the action. If Smart Typing is turned on, the bot automatically determines this for you.
 - You can add more examples to the intent. This helps ensure the rule is triggered for each way a customer may phrase something.
- Click the intent under the contact message to load it in the Intents pane on the right. Then click Add example
 and add new messages.
 - Click the NLU icon , then click Add example for the intent you want add messages to.
- Click the intent under the contact message to load it in the Intents pane on the right. Then click Add example
- Click Train and Stage to train your bot on the new rule. You can also do more training and testing later.

Add New Messages to an Existing Rule
Before following these steps, be sure you create an intent for the rule, if you haven't already.
- In the Digital First Omnichannel portal, click Chatbot.
- Click the bot you want to work with.
- Click Dialogues in the left icon menu.
- Click Rules.
- Click the rule you want to edit.
- Click the intent under the contact message to load it in the Intents pane on the right. Then click Add example and add new messages.
- Click Train and Stage to train your bot on the new rule. You can also do more training and testing later.
Create Stories
Required permission: Chatbot (ACD > DFO > Roles > [choose one] > Core Modules)
Stories teach your bot![]() Virtual agent designed to handle specific interactions how to respond to messages
Virtual agent designed to handle specific interactions how to respond to messages![]() Anything a contact says in a bot interaction, whether question or statement, written or spoken. in the context of an interaction. They are typically expressed as happy and unhappy paths
Anything a contact says in a bot interaction, whether question or statement, written or spoken. in the context of an interaction. They are typically expressed as happy and unhappy paths![]() Story that produces a wrong outcome for the intent. Don't make up stories that you think might happen. Use real interactions to create them instead.
Story that produces a wrong outcome for the intent. Don't make up stories that you think might happen. Use real interactions to create them instead.
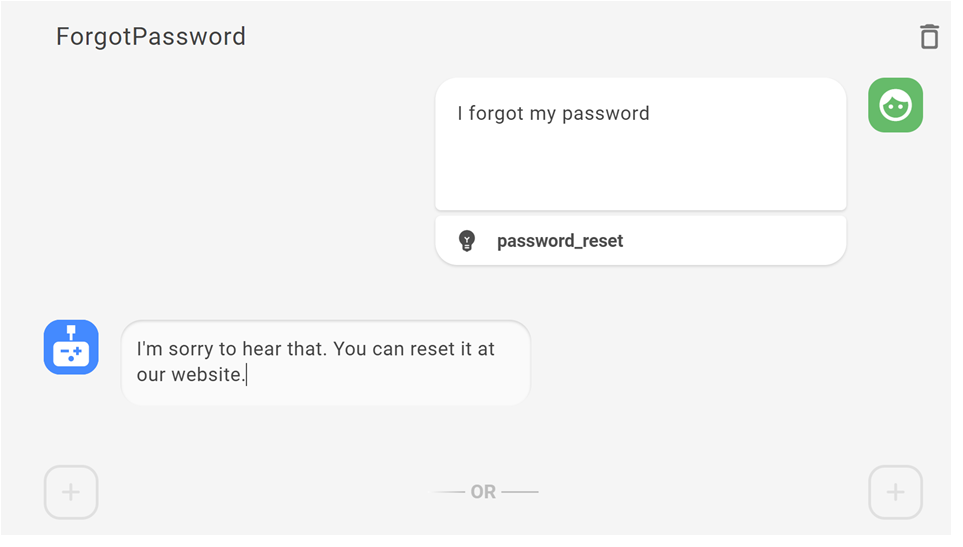
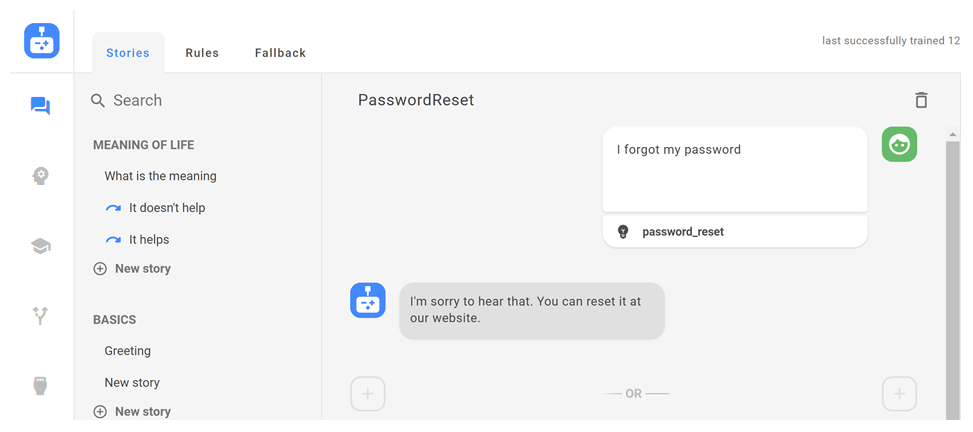
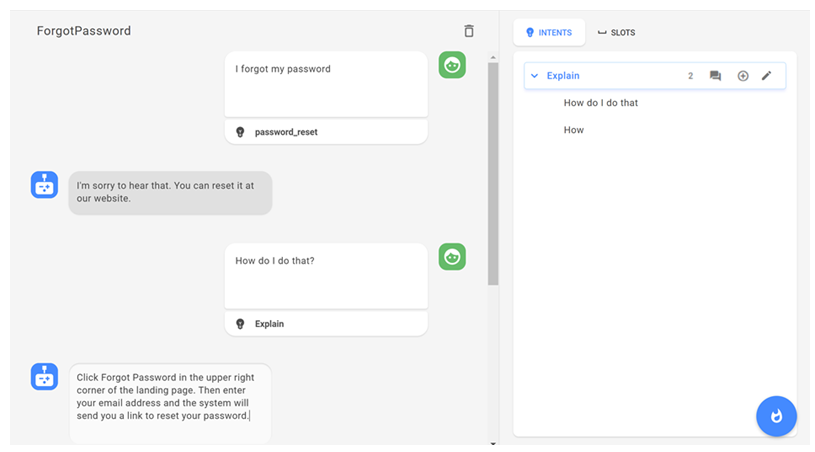
Akela refers to her examples to create the happy path story for a forgotten password. The story includes only the part of the conversation that is relevant to the context of the Password_reset intent:
Customer: I forgot my password.
Bot: I'm sorry to hear that. You can reset it at our website.
- In the Digital First Omnichannel portal, click Chatbot.
- Click the bot you want to work with.
- Click Dialogues in the left icon menu.
- Click Stories.
- If the story doesn't fit in an existing folder, click New Folder, type a name for the new folder, and then press Enter.
- Under the new folder, click New Story.
- At the top of the story section, enter a name for your story.
- In the Customer may say box, enter the customer message and then press Enter. CXone Bot Builder analyzes the message and offers a list of intents What the contact wants to communicate or accomplish and confidence level.
- If CXone Bot Builder identified the correct intent, click Confirm. If not, expand the list of intents and select the correct intent, then click Confirm.
- Hover over the plus sign at the left of the rule builder until it changes to a bot icon, then click the action.
-
Provide the information matching the action type you selected. For example, if you selected Message, enter what the bot should say.
Learn more about all bot action types
Action type Details Message Enter the message for the bot. You can add Buttons or Quick Replies to the message or choose to leave it as regular text. To see a images and consider examples, see below.
Multimedia Upload a supported multimedia file:
- Images in PNG, JPG, GIF, or BMP format that are smaller than 5 MB
- Videos in AVI, MPEG-4, or WEBM format that are smaller than 200 MB
- Audio files in MP3 format that are smaller than 15 MB
- PDF or Microsoft Word, Excel, or Powerpoint files that are smaller than 15 MB
Multimedia is only supported by these channels:
- Chat
- Facebook Messenger
- Apple Business Chat
- Twitter Direct Messaging (images only)
Cards Cards can combine images, structured text, and buttons into one message. This keeps the interface cleaner than sending several responses back to back. You can add up to 10 cards to be sent at a time. The customer will be able to swipe back and forth to view them. You can use variables when configuring a card in the format {slot_name}. Handover Select this option when the customer message should trigger the handover Any contact message that should trigger transfer to a live agent rule.Slot Select from your existing slots. Checkpoint Select this option, then click the + icon and select the stories you want to link to. Checkpoints provide a simple way to connect different stories within the same dialogue. To see an image and consider examples, see below.
Learn more about Buttons and Quick Replies
Buttons—Buttons help a customer communicate their need quickly without having to type. Buttons remain available for the customer to go back to even after they choose one. You can add up to three Buttons to a message. You can use variables when configuring a button in the format {slot_name}. A button can trigger an intent or open a URL.
- Trigger Intent allows you to configure the intent and optionally the entity as well. Once the customer taps the button, the bot will decide which story or rule to follow based on your configuration.
- Open URL opens a web page in a new tab. This can enrich the conversation by, for example, directing to a website to provide more details on a product than what the bot would provide in a conversation.
Quick Replies—Quick Replies are similar to buttons in improving customer experience. Once the customer chooses one, the rest of the options go away. You can add up to 12 quick replies to a message. You can use variables when configuring a quick reply in the format {slot_name}. A quick reply can trigger an intent or send a standard message.
- Trigger Intent allows you to configure the intent and optionally the entity as well. Once the customer chooses a quick reply, the bot will decide which story or rule to follow based on your configuration.
- Send Text takes the text of the quick reply and sends it back to the bot as a standard customer reply.
If a message has buttons or quick replies with an intent defined, these show up next to the message. You can click on them to see all stories and rules where they are used.
Learn more about checkpoints
Checkpoints allow you to connect multiple stories based on the contact's message. For example, a customer might ask, "What are your hours and location?". Rather than create separate stories for hours, location, and hours plus location, you could use checkpoints to offer the hours and location stories in sequence.
You can also use checkpoints that are not based on customer messages. For example, your company might want to extend a special offer to all customer for a limited time. You could add the special offer messages and actions to each of your bot stories, and then remove that section from multiple stories when the offer expires. A simpler method would be to create a story just for the special offer, and then add a checkpoint to each story for the duration of the offer.
As shown in the image, a checkpoint always displays a small blue circle with a curved arrow at the beginning. This shows that it connects to one or more other stories. Checkpoints always end the story, even if you add actions after the checkpoint.
While checkpoints can be very useful, don't overuse them. Too many checkpoints can make the logic of your stories very hard to follow.
- Click the typing indicator to set or override the length of time a typing indicator displays for the action. If Smart Typing is turned on, the bot automatically determines this for you.
- Repeat this process until you have completed the messages and actions for this story. If you need to edit intents or slots, you can do so right in the story builder.
- Click Train and Stage to train your bot on the new story. You can also do more training and testing later.
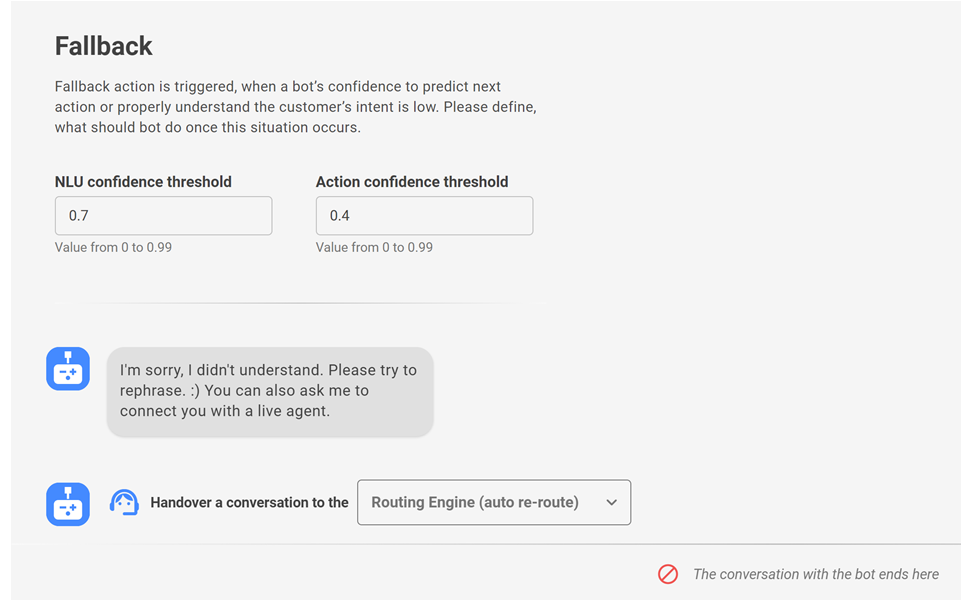
Design Fallback
Required permission: Chatbot (ACD > DFO > Roles > [choose one] > Core Modules)
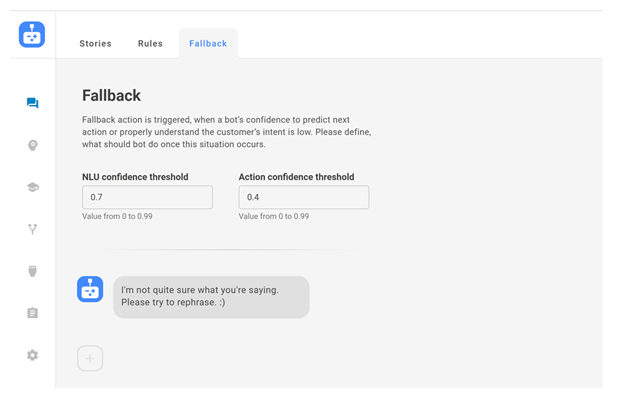
Fallback lets you tell a bot![]() Virtual agent designed to handle specific interactions how to respond when it's not confident how to proceed. CXone Bot Builder includes two confidence thresholds for fallback design:
Virtual agent designed to handle specific interactions how to respond when it's not confident how to proceed. CXone Bot Builder includes two confidence thresholds for fallback design:
- NLU Confidence Threshold—Measures how confident a bot is that it correctly identified a message's intent What the contact wants to communicate or accomplish. The default level is 70%, so fallback is triggered at any level below that.
- Action Confidence Threshold—Measures how confident a bot is about the next action it should take. The default level is 40%.
Akela knows customers can quickly become frustrated if they feel a bot isn't helpful. She wants to design her fallback plan so that customers have a good experience.
- In the Digital First Omnichannel portal, click Chatbot.
- Click the bot you want to work with.
- Click Dialogues in the left icon menu.
- Click Fallback.
- If you want to use a custom value for NLU confidence threshold, enter that value in the field.
- If you want to use a custom value for Action confidence threshold, enter that value in the field.
- If you want to use a custom bot response when either threshold is met, enter your changes in the text field next to the bot icon.
- If you want the bot use the handover Any contact message that should trigger transfer to a live agent rule if it still doesn't understand, click the + icon and select Handover.
- Click Train and Stage to train your bot on the fallback design. You can also do more training and testing later.

Train Your Bot
You can duplicate the real-world interactions you collected earlier to make sure your bot handles them correctly. You can also create new interactions when you collect new training examples. As you're building your bot, the Train and Stage button lets you train your bot on new intents![]() What the contact wants to communicate or accomplish, rules
What the contact wants to communicate or accomplish, rules![]() Used to define bot's response to messages that don't change with context., stories
Used to define bot's response to messages that don't change with context., stories![]() Used to train bot for interaction handling based on intent and context, and so on.
Used to train bot for interaction handling based on intent and context, and so on.
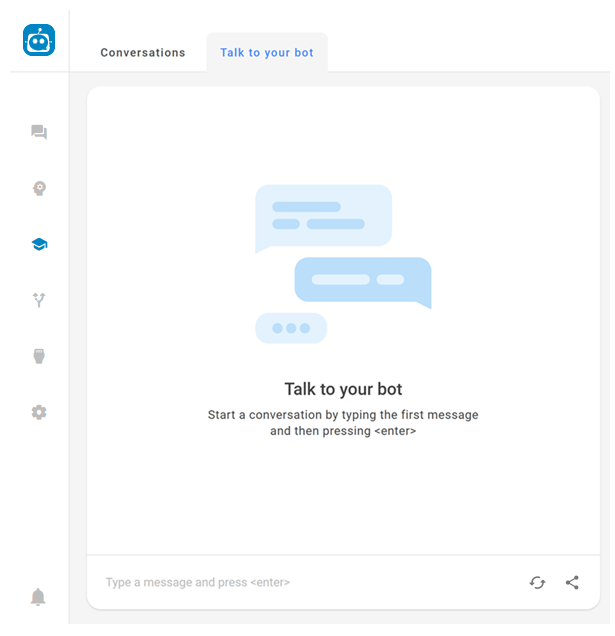
Talk to Your Bot
- In the Digital First Omnichannel portal, click Chatbot.
- Click the bot you want to work with.
- Click Learning
 in the left icon menu.
 - Click Talk to your bot.
- Enter a message Anything a contact says in a bot interaction, whether question or statement, written or spoken. in the field at the bottom of the chat window, just as you would in any chat conversation. Your bot responds as it would in a real interaction.
- Continue to enter messages and review the bot's responses. If at any point the bot responds in an unexpected way, you can stop and correct the issue. For example, you might need to create a new intent What the contact wants to communicate or accomplish or rule Used to define bot's response to messages that don't change with context..
- If you need to restart the interaction after correcting an issue, click Start New Conversation.