

The Agent for Salesforce integration with Salesforce Omni-Channel allows you to enable presence syncing between the available and unavailable states![]() The availability status of an agent. within the NICE CXone platform, and the online and busy states of the Salesforce Omni-Channel product. You can use this integration in both Salesforce Classic and Salesforce Lightning Experience.
The availability status of an agent. within the NICE CXone platform, and the online and busy states of the Salesforce Omni-Channel product. You can use this integration in both Salesforce Classic and Salesforce Lightning Experience.
This integration enables you to designate some channels![]() A way for contacts and agents to interact, such as voice, email, chat, social media, and so on., such as phone or email, to be routed by the NICE CXone platform, while simultaneously using the Salesforce Omni-Channel Live Agent for chat contacts. You can designate either NICE CXone or Salesforce Omni-Channel as the master for availability settings. The master defines the state of availability when an agent’s state changes.
A way for contacts and agents to interact, such as voice, email, chat, social media, and so on., such as phone or email, to be routed by the NICE CXone platform, while simultaneously using the Salesforce Omni-Channel Live Agent for chat contacts. You can designate either NICE CXone or Salesforce Omni-Channel as the master for availability settings. The master defines the state of availability when an agent’s state changes.
This feature is available to users who currently use Salesforce to route incoming work, such as chat contacts, in conjunction with Agent for Salesforce. The Salesforce Omni-Channel product is not the same as Omnichannel Session Handling in the CXone platform.
Enable Omni-Channel
-
Click Setup in the upper right corner.
-
In the Build menu located on the left, click Customize > Omni-Channel > Omni-Channel Settings.
-
Select Enable Omni-Channel.
- Click Save.
Add the Omni-Channel Widget to the Agent for Salesforce Console
-
Click Setup in the upper right corner.
-
In the Build menu located on the left, click Create > Apps.
-
Locate the Salesforce console app to which you want to add the Omni-Channel widget and click Edit.
-
Locate Choose Console Components.
-
In the Available Items field, select Omni-Channel.
-
Click Add > Save.
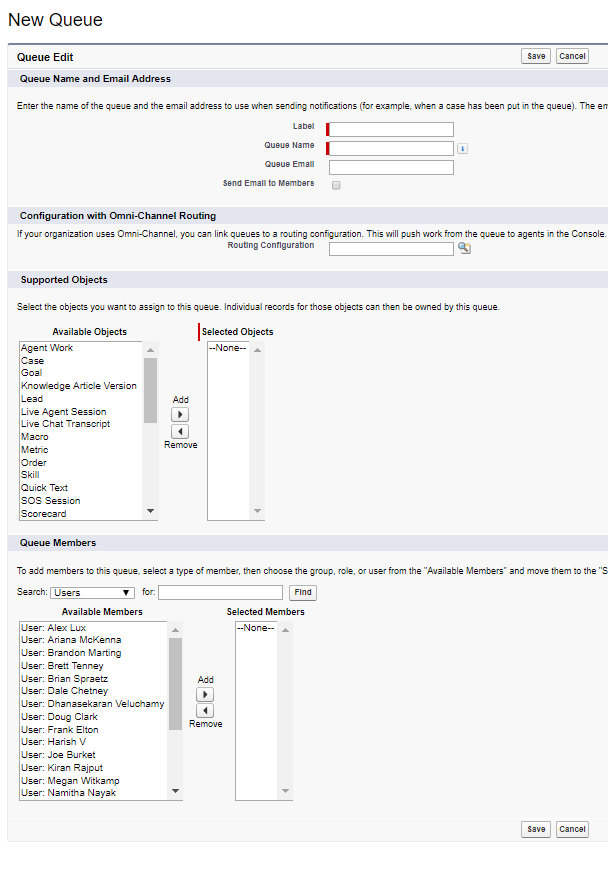
Associate Routing Configurations and Agents with Queues
Queues enable Omni-Channel to route agents work items automatically and in real time. Work items in the queue are assigned priorities based on your routing configuration. You can create multiple queues to handle different work items.
-
Click Setup in the upper right corner.
-
In the Administrator menu located on the left, click Manage Users > Queues.
-
Click New.
-
Specify the settings for your configurations.
- Click Save.
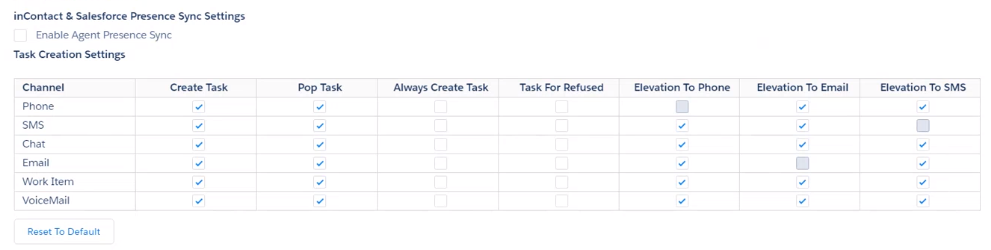
Configure Task Creation Settings
This configuration is only supported by theFully Integrated Lightning Agent for Salesforce.
-
Navigate to Salesforce Agent Settings.
- If you're using the Lightning Experience view, click App Launcher (indicated by a dot grid) and search for Salesforce Agent Settings.
- If you are using the Classic Experience view, click All Tabs (indicated by a gray plus sign).
-
Click Salesforce Agent Settings.
-
Locate Task Creation Settings. You can configure your agents' task creation settings to meet your needs. If you disable Create Task, all other fields for that channel are disabled as well. If you click Reset to Default, your changes revert to the default settings.
- Click Save.
- Map your NICE CXone data. Your agents can now create and elevate multiple Omnichannel Session Handling tasks.