

Complete each of these tasks in the order given.
Create a Campaign
If you have not already done so, create a campaign![]() A grouping of skills used to run reports.. For more information about campaigns, see Campaigns.
A grouping of skills used to run reports.. For more information about campaigns, see Campaigns.
- Click the app selector
 and select ACD.
 - Go to Contact Settings > Campaigns.
- Click Create New.
- Enter a value in the Campaign Name field.
- Click Create Campaign.
Create a Voicemail Skill
-
Click the app selector
and select ACD. -
Go to Contact Settings > ACD Skills.
- Click Create New > Single Skill.
-
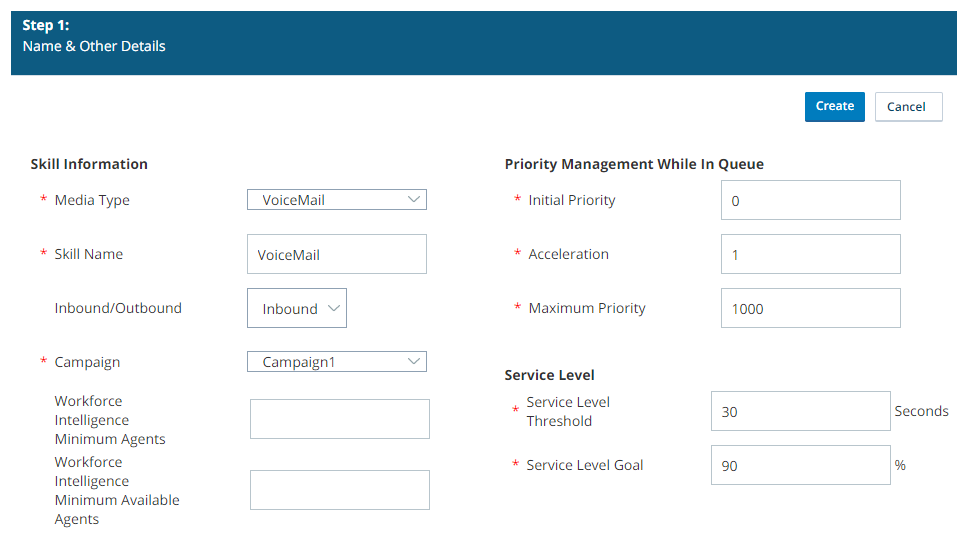
Select Voicemail in the Media Type field. Give the skill a name and select a campaign. Modify any optional Skill Information fields as needed.
 Learn more about the fields in this step
Field Details Media Type Specifies the medium, or channel, by which agents with this skill interact with contacts. Skill Name
Allows you to give the skill a unique, descriptive name. Inbound/Outbound Specifies whether the skill enables the agent to accept inbound or initiate outbound interactions with contacts. Campaign Specifies the campaign to which you want to assign the skill. Workforce Intelligence Minimum Agents
Specifies the minimum number of agents that must belong to this skill. This setting prevents automatic actions associated with Workforce Intelligence rules from removing too many agents from the skill. When the number of agents reaches this number or lower, all skill removal actions, even automatic ones, require approval. Workforce Intelligence Minimum Available Agents Specifies the minimum number of available agents that must be maintained for this skill. This setting prevents automatic actions associated with Workforce Intelligence rules from removing too many agents from the skill. When the number of available agents reaches this number or lower, all skill removal actions, even automatic ones, require approval. -
If you want to configure screen pops
A configurable pop-up window with information about the contact. It appears on an agent's screen after a certain event, usually when the agent connects to a contact., select Use Screen Pops and then customize as needed.Learn more about the fields in this step
Field Details Use Screen Pops When selected, causes the system to launch screen pops with record information when an agent connects to a contact. Use Custom Screen Pops When selected, enables you to configure custom contact center data to appear in the screen pops for this skill. Application/Webpage
When you select Use Custom Screen Pops, you must select whether the custom data you want to provide is available via an application or a webpage. Application If you select Use Custom Screen Pops and Application, you must enter the path of the .exe application that you want to use for your custom screen pops. Webpage If you select Use Custom Screen Pops and Webpage, you must enter the URL of the webpage you want to use for your custom screen pops. -
If you want to change the default priority management settings, modify the Priority Management While In Queue fields.
Learn more about the fields in this step
Field Details Initial Priority Specifies the base level priority Skill-based designation of the importance of contacts that determines delivery order. for all fresh records and retries, but not callbacks Holds a customer's place in queue and automatically calls the customer when they move to the front of the queue., for the skill. The default value is 0.Acceleration Defines how quickly the priority of the skill increases. Maximum Priority
Specifies the maximum priority that a contact using this skill can have. If you choose not to use Acceleration, this value should match the Initial Priority. -
If you want to change the default service level, modify the Service Level fields.
Learn more about the fields in this step
Field Details Service Level Threshold Specifies the number of seconds in which agents must respond to meet either a service level agreement (SLA Commitment between a service provider and a customer with a defined service level threshold, including quality, availability, and responsibilities.) or your own required service level. For example, if your SLA for this skill is to have 80% of contacts responded to in 20 seconds, enter a value of 20.Service Level Goal Specifies the number, expressed as a percentage, of contacts which must be responded to by the Service Level Threshold. For example, if your SLA for this skill is to have 80% of contacts responded to in 20 seconds, enter a value of 80. Enable Short Abandon Threshold
If selected, allows data collection and reporting on contacts that fall within the skill-specified Short Abandon Threshold. Short Abandon Threshold Specifies an Interval A period between points, limits, or events, such as dates or times. measured in seconds. Characterized by queued contacts that end prior to being delivered to an agent and before the time specified in the Short Abandon Threshold. The default value is 15. For example, if the value is set to 10, and a contact ends after seven seconds without being delivered to an agent, the contact would be reported as a short abandon.Short Abandons If selected, short abandons (defined in the previous section) count against the service level. Other Abandons If checked, abandons not meeting the short abandon definition count against the service level. - Click Create.
Add Users to the Voicemail Skill
-
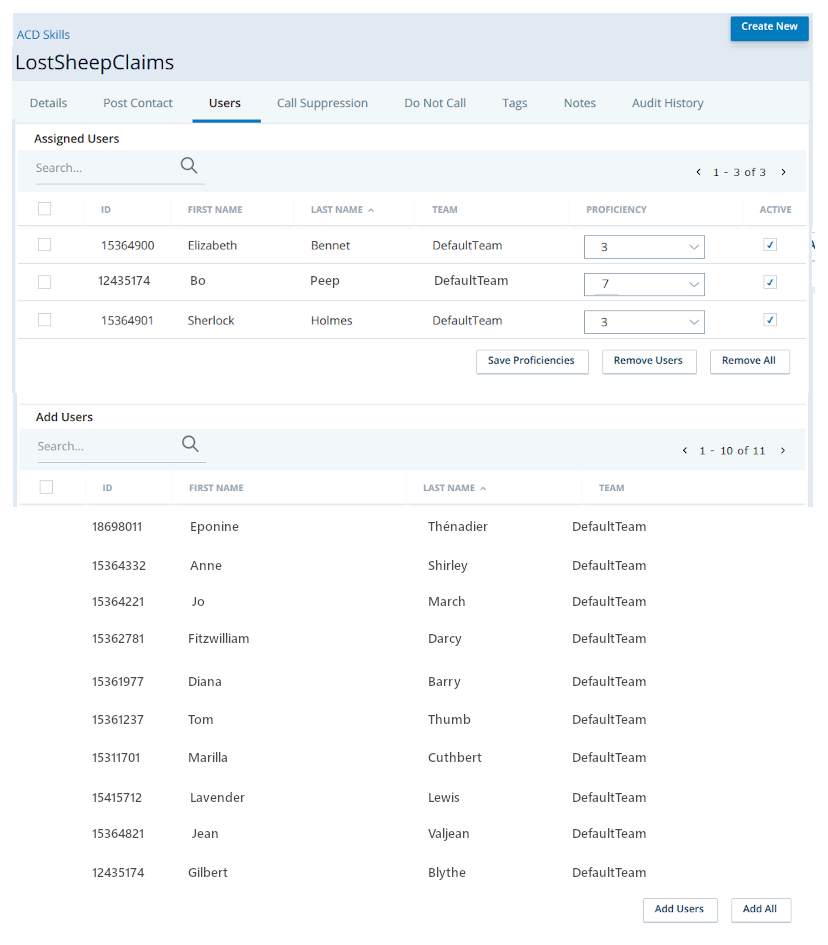
Click the Users tab.
-
In the Add Users table, select the checkboxes in the rows corresponding to the users you want to add, and then click Add Users. To quickly add all users to the skill, click Add All.
-
Set the users' skill proficiency level. To do so, click the drop-down in the Proficiency column and select the level you want to apply to each user. When the proficiency levels for all new users are how you want them, click Save Proficiencies.
If you do not click Save Proficiencies before leaving the page, all users you added to the skill profile will be removed.
Associate the Voicemail with an Inbound Voice Skill
You must associate the voicemail script with an inbound voice point of contact to have it run when an inbound phone call is unanswered.

Create an Inbound Voice Skill
In Central, create an inbound voice skill if you have not already done so. Verify that the skill has users assigned to it.
Create a Voicemail Script
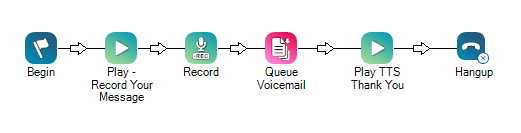
The following documents the minimum requirements for a voicemail script. You can use other Studio actions to customize the script.
- Download the voicemail script template.
- In Studio, click File > Import from File. Locate and select the file you downloaded in the preceding step.
- If you want to customize what the contact hears before leaving a voicemail message, right-click the first Play action, named "Play-Record Your Message". Change the voicemail message in the Properties. The template says "Please leave your message after the tone" by default.
- Right-click the Record action. Customize the recording Properties as needed. It is recommended that you keep the FileName set to Voicemails\VM_{ContactID}.wav so that each contact has a separate voicemail file.
- Right-click the QueueVM action. Set the FileName to the same value you set for the FileName in the Record action in the previous step: Voicemails\VM_{ContactID}.wav. Set the Skill to the voicemail skill you created previously.
- If you want to customize the post-recording message, right-click the second Play action, named "Play TTS Thank You". Change the post-recording message in the Properties. The template says "Thank you" by default.
- Click anywhere in the canvas, outside of the actions. Click View > Properties to open the script properties.
- Verify the BusinessUnit is correct.
- From the Skill drop-down, select the inbound voice skill you created previously.
- Click File > Save.
Create the Point of Contact
-
Click the app selector
and select ACD. -
Go to Contact Settings > Point of Contact.
- Click the point of contact assigned to the inbound skill you want the voicemail skill associated with.
- Click Edit.
- Set the Script to the voicemail script you created in Studio. If you are creating a new point of contact, set the Skill to the inbound voice skill and see Create a Point of Contact for more information about filling in the remaining fields.
- Click Done or Create Point of Contact.
Depending on how voicemail is used in your organization, consider whether to perform these optional tasks: