

Call suppression enables you to temporarily suspend outbound calls and SMS messages to contacts in the contact list that meet certain criteria. It utilizes a script to suppress the calls and messages in real time. The script matches the record that's currently being attempted to the suppression list based on the phone number or other identifiable criteria in the record. The script can also check external sources for permission to continue. If the script detects a match for a record, it doesn't attempt the record. Instead, it sets a disposition![]() Result that the agent or system assigns to the contact when the interaction ends. on the record before moving on to the next. For instance, if you created a collections campaign to contact customers with overdue accounts, and 1 customer calls in to make a payment before their account was reached in the calling list, you could add this phone number as a single call suppression record. After setting the necessary time duration, the call suppression record would prevent outbound calls to this account's phone number.
Result that the agent or system assigns to the contact when the interaction ends. on the record before moving on to the next. For instance, if you created a collections campaign to contact customers with overdue accounts, and 1 customer calls in to make a payment before their account was reached in the calling list, you could add this phone number as a single call suppression record. After setting the necessary time duration, the call suppression record would prevent outbound calls to this account's phone number.
Holmes Enterprises is creating a new campaign. Customers interested in cases Sherlock Holmes has recently solved are contacted with the fun facts. The calling list used for the campaign contains a column entitled Intriguing Mysteries. If the value of this column is True, the customer wants to receive information. If the value of the column is False, the customer does not want to receive information.
After the campaign starts, the manager realizes he made a mistake in the selection criteria. He doesn't want to restart the campaign. He creates a call suppression record to suspend contact to entries in the list with the Intriguing Mysteries value set to False. The record includes an expiration date for the next day, allowing time to build a new list overnight.
Call suppression, do not call (DNC), and calling list filtering are similar tools that should be used for different situations:
- Use call suppression to suppress calls to calling list entries based on unique criteria, but not specifically a phone number. You can set a unique disposition for a call suppression record to indicate the purpose of the temporary call suppression. Call suppression records include a start and end date for suppressing calls and is intended to restrict dialing for the duration of a campaign, or even longer. For example, if Holmes Enterprises lost licensing for the state of New York, it could suppress calls to New York until it re-establishes its license. Holmes could disposition these suppressed calls with a new "NYLicenseLapse" disposition.
- Use calling list filtering to restrict contacting calling list entries within the scope of a campaign. For example, if Holmes Enterprises wanted to hit a monthly quota early in a campaign, it could temporarily filter out low-probability prospects. Holmes intends to contact the low-probability prospects later. Calling list filtering is also useful for restricting dialing for severe weather impacts, such as tornadoes or hurricanes.
- Use DNC to permanently stop outbound
Each call suppression profile has an audit history tab that displays information about the creation and last modification of the call suppression profile. You can see what was modified, when it was modified, and who did the modification. Audit history tables can become very large, so you can use search and filter tools to limit the display.
Complete each of these tasks in the order given.
Create Call Suppression Script
The script instructs CXone to check a specific column in the calling list to determine whether the interaction should be suppressed or not. You specify the value you want suppressed in the call suppression record in the next step. You can create a basic call suppression script in CXone or a more complex one in Studio.

- If you want a customized or complex call suppression script, create one in Studio. For help, see the Studio documentation or contact your CXone Account Representative.
-
Click the app selector
 and select ACD.
 -
Go to Contact Settings > ACD Skills.
- Click Call Suppression. Click Edit.
- If you created a script in Studio, select it from the Script drop-down.
- If you're using the basic CXone script, click Create a new script. Type a descriptive name for the script in Script Name.
- Enter the exact name of the calling list column you want to use for suppression in Field Name.
- Click Create.
-
Click Save.
Create Call Suppression Record
If you want to bulk-upload multiple call suppression records at one time, you can skip this step.
-
Click the app selector
and select ACD. -
Go to Lists > Call Suppression.
-
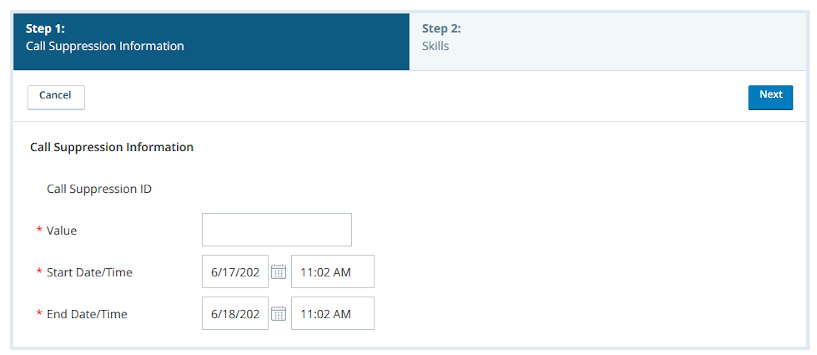
Click Create New > Single Record.
-
In the Value field, enter the value you want records to match in the column you specified for your call suppression script.
-
Specify the range of time that you want calls to be suppressed in the Start Date/Time and End Date/Time fields.
-
Click Next.
- If you want to suppress calls from all
 Used to automate delivery of interactions based on agent skills, abilities, and knowledge in the tenant High-level organizational grouping used to manage technical support, billing, and global settings for your CXone environment, don't add any
 -
If you want only certain skills to suppress calls or messages to the chosen records, select those skills in the Add Skills table. Click Add Skills.
-
Click Create.
Bulk Upload Call Suppression Records
If you created your call suppression records individually, you can skip this step.
-
Click the app selector
and select ACD. -
Go to Lists > Call Suppression.
-
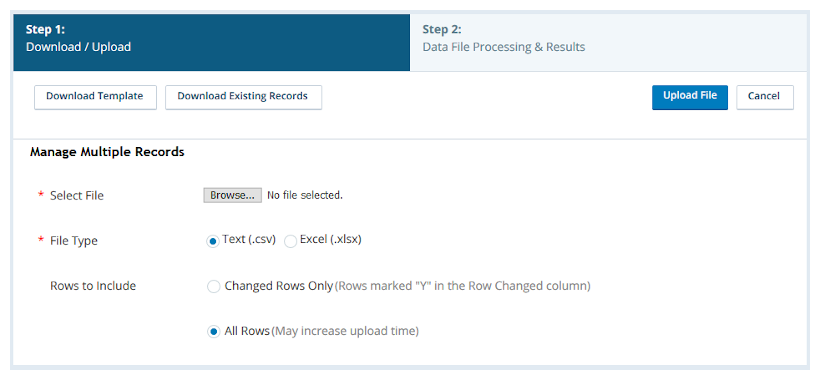
Click Create New > Manage Multiple Records.
-
Click Download Template. Leave this page open to use again later.
-
Open the template in a spreadsheet or text editor.
-
Below the header and explanation rows, enter the information about each new call suppression record in its own row.
Learn more about fields in this step
Field
Details
Call Suppression ID Skip this column. CXone generates the ID of new call suppression records as you create them, and you cannot modify the ID of an existing record. Value
For the calling list column you specified in the call suppression script, the value a calling list record must match to trigger call suppression.
Start Date/Time The date and time you want to start suppressing calls or messages to matching records in the selected Used to automate delivery of interactions based on agent skills, abilities, and knowledge.End Date/Time The date and time you want to stop suppressing calls or messages to matching records in the selected Skill ID The numeric IDs of the -
Save the file to your machine as CSV or XLSX.
-
Return to the Manage Multiple Records page in CXone. Click Choose File. Find and select the file you just created.
-
Select the File Type corresponding with the file extension you used to save the file.
-
Select All Rows for Rows to Include.
-
Click Upload File.
-
If you see errors on the Data File Results page, resolve them. For example, the
- If no errors appear, click Close.