

The following instructions explain how to set up the Personal Connection (PC) agentless![]() Contacts made without a live agent for tasks such as one-way delivery of information or messages.. dialing mode, which dials calls without an agent present. Agentless dialing
Contacts made without a live agent for tasks such as one-way delivery of information or messages.. dialing mode, which dials calls without an agent present. Agentless dialing ![]() Used to automate delivery of interactions based on agent skills, abilities, and knowledge require you to create a script to play a message or menu or to provide some kind of experience for the contact. These instructions assume that you already have your
Used to automate delivery of interactions based on agent skills, abilities, and knowledge require you to create a script to play a message or menu or to provide some kind of experience for the contact. These instructions assume that you already have your
Complete each of these tasks in the order given.
Create an Agentless Dialing Script in Studio
- Open Studio and create a new Phone script.
- Add an OnAnswer action to the canvas.
- Use the necessary Studio actions to configure the actions you want to occur when a call is answered. For example, you can have the script detect whether the call has been answered by a live contact or by an answering machine, play a message corresponding to that determination, and apply a disposition to the interaction. If you need help creating your script, see the Studio documentation or contact your NICE CXone account representative.
- Connect the final action of your script to a HangUp action.
- Save the script and close Studio.
Create a Campaign
If you already created a campaign![]() A grouping of skills used to run reports. that you want to use for PC agentless dialing, you can skip this step. For example, you may have a campaign that you intend to use across several channels.
A grouping of skills used to run reports. that you want to use for PC agentless dialing, you can skip this step. For example, you may have a campaign that you intend to use across several channels.
- Click the app selector
 and select ACD.
 - Go to Contact Settings > Campaigns.
- Click Create New.
- Enter a value in the Campaign Name field.
- Click Create Campaign.
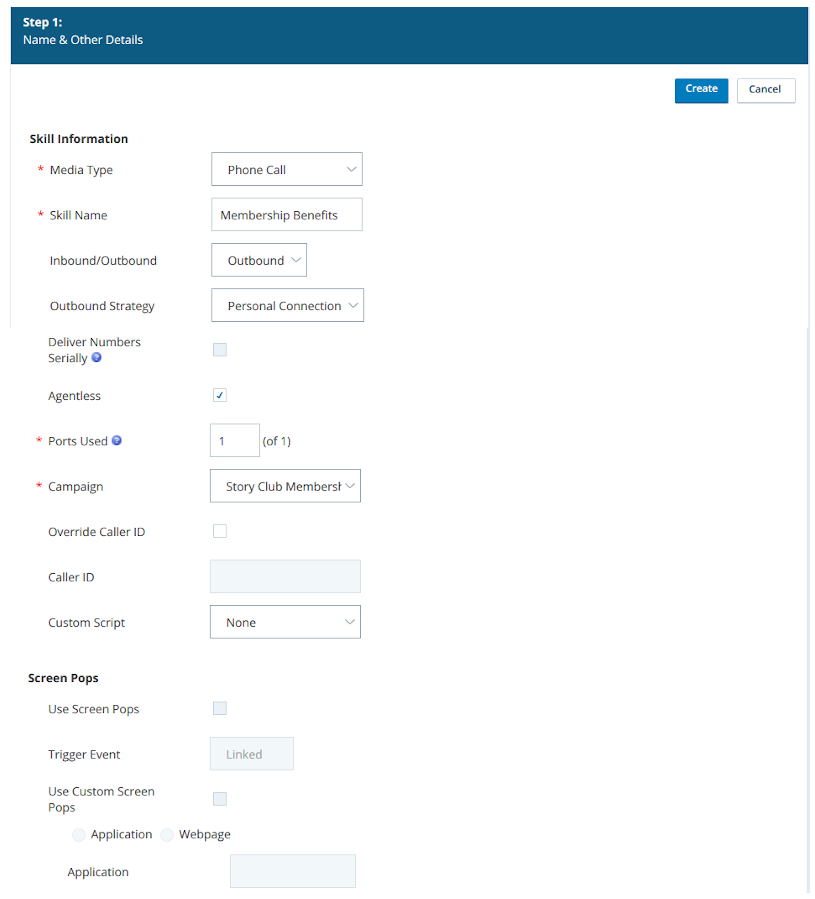
Create a Personal Connection ACD Skill
-
Click the app selector
and select ACD. -
Go to Contact Settings > ACD Skills.
- Click Create New and select Single Skill.
- Set the Media Type to Phone Call, give the
- Select the Agentless checkbox. Specify the number of Ports Used for this
- Select the Custom Script you created in Studio.
-
Fill in any of the optional fields that you want.
 Learn more about fields in this step
Field
Details
Deliver Numbers Serially This setting doesn't affect agentless
Override Caller ID Enables you to override the default tenant High-level organizational grouping used to manage technical support, billing, and global settings for your CXone environment Caller ID setting for this Caller ID
The phone number contacts see when PC calls with this SMS Transport Code Don't use this field for voice dialing. It applies to PC SMS Message Template Don't use this field for voice dialing. It applies to PC SMS Telecom Route Override Select the telecom route you want to use for outbound traffic from this
Workforce Intelligence Minimum Agents This setting doesn't affect agentless Workforce Intelligence Minimum Available Agents This setting doesn't affect agentless - Click Create.
Create a Do Not Call (DNC) Group
You can skip this step if you already have a do not call (DNC) group you want the ![]() High-level organizational grouping used to manage technical support, billing, and global settings for your CXone environmenttenant
High-level organizational grouping used to manage technical support, billing, and global settings for your CXone environmenttenant![]() High-level organizational grouping used to manage technical support, billing, and global settings for your CXone environment DNC group.
High-level organizational grouping used to manage technical support, billing, and global settings for your CXone environment DNC group.
-
Click the app selector
and select ACD. -
Go to Lists > DNC.
-
Click Create New.
-
Give the group a DNC Group Name and, if you want, a Description.
-
Click Save.
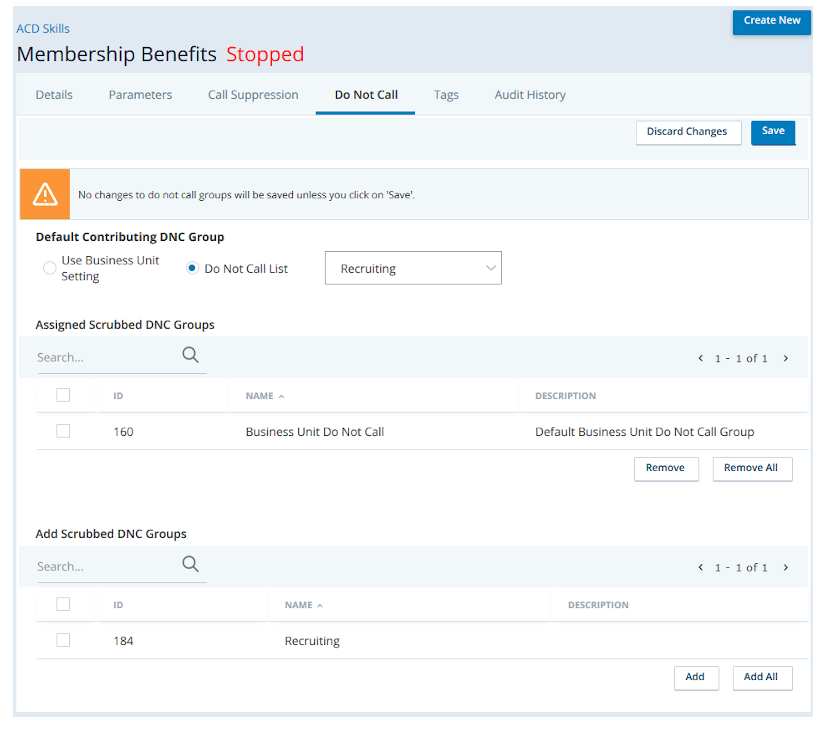
Assign the ACD Skill to Do Not Call Groups
You can skip this step if you want the ![]() Skills listed under the Scrubbed tab of a DNC group honor the DNC list of that group. Before you or Personal Connection place a call for that skill, CXone checks that DNC group for conflicts and does not dial records that are on that list. or contributing
Skills listed under the Scrubbed tab of a DNC group honor the DNC list of that group. Before you or Personal Connection place a call for that skill, CXone checks that DNC group for conflicts and does not dial records that are on that list. or contributing![]() Skills listed under the Contributing tab of a DNC group help to generate the DNC list of that group. When the dialer places a call for that skill and the contact requests to be added to the DNC list, the record is added to that DNC group. Any skills in the Scrubbed tab of that DNC group cannot place calls to that record.. This allows you to have the
Skills listed under the Contributing tab of a DNC group help to generate the DNC list of that group. When the dialer places a call for that skill and the contact requests to be added to the DNC list, the record is added to that DNC group. Any skills in the Scrubbed tab of that DNC group cannot place calls to that record.. This allows you to have the
-
Click the app selector
and select ACD. -
Go to Contact Settings > ACD Skills.
- Click the
- Click the Do Not Call tab.
- For Default Contributing DNC Group, select Select Do Not Call Group. From the drop-down, select the DNC group you want this
- In the Add Scrubbed DNC Groups table, select the DNC groups you want the
- Click Save.
Start the ACD Skill
If you are creating an automatic dialing schedule, you can skip this step. If you want to manually turn your PC
-
Click the app selector
and select ACD. -
Go to Contact Settings > ACD Skills.
-
Select the
-
Click Start.
- When you're done using the skill, click Stop.
Customization Tasks
Depending on how your organization uses PC, you might also want to: