

Setting up an email channel for your organization entails several required steps and smaller customization options. This page describes the larger steps as part of the ACD setup and provides links to the user/team customization options.
Complete each of these tasks in the order given.
Create a Campaign
If you've already created a campaign![]() A grouping of skills used to run reports. that you plan to use for email, you can skip this step. For example, you may have a campaign that you intend to use across several channels.
A grouping of skills used to run reports. that you plan to use for email, you can skip this step. For example, you may have a campaign that you intend to use across several channels.
-
Click the app selector
 and select ACD.
 -
Go to Contact Settings > Campaigns.
- Click Create New to display the new campaign wizard.
- Enter a Campaign Name.
- Click Create Campaign.
- Click the Skills tab.
- In the Add Skills section, select the checkboxes next to the skills
 Used to automate delivery of interactions based on agent skills, abilities, and knowledge you want to assign to the campaign. If you haven't created an email skill yet, complete that task and then assign it to the campaign.
 - Click Add Skills. The skills you selected move to the Assigned Skills section.
Create an Email Skill
-
Click the app selector
and select ACD. -
Go to Contact Settings > ACD Skills.
-
Click Create New and select Single Skill.
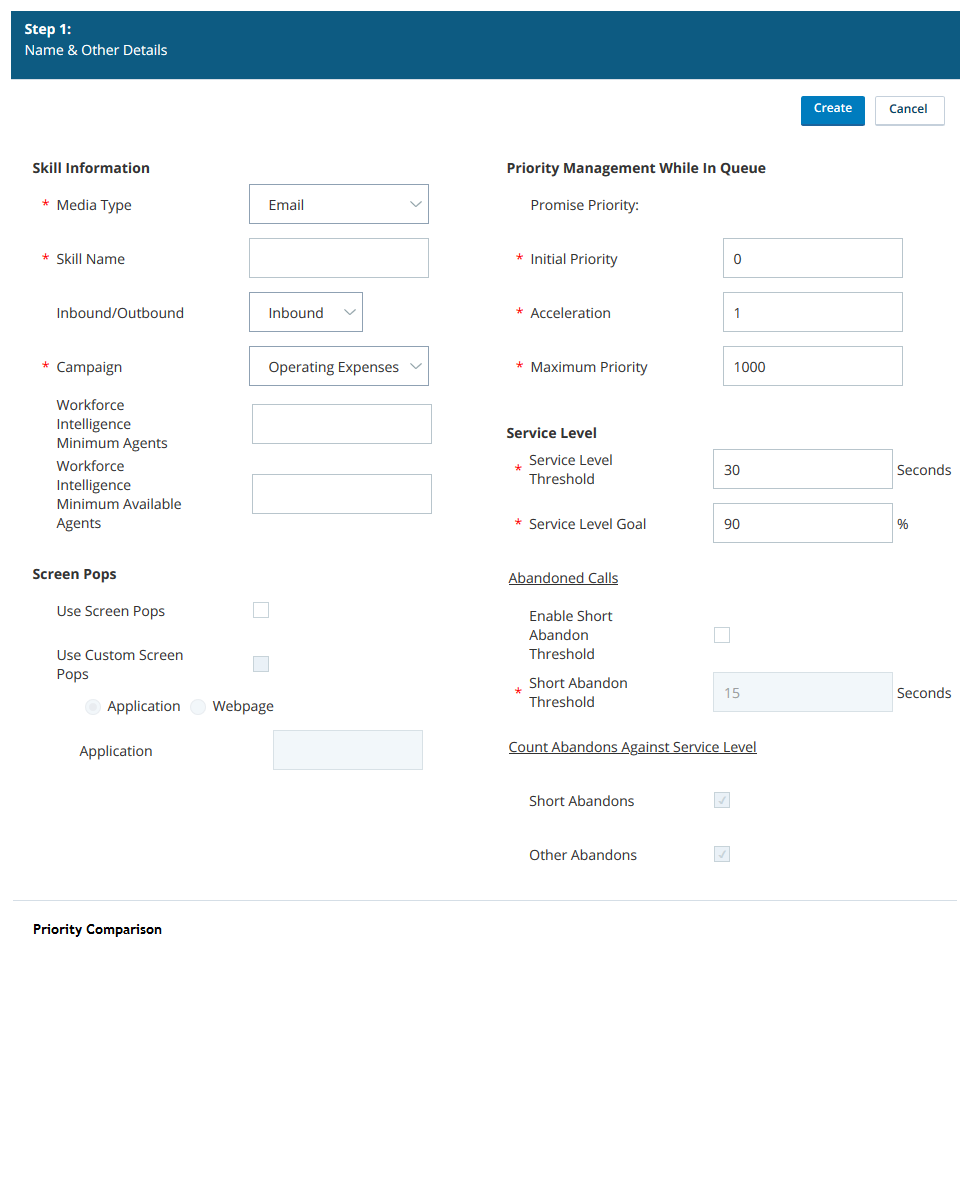
- Select Email as your Media Type.
Learn more about fields in this and the next several steps
Field
Details
Media Type Specifies the medium, or channel, by which agents with this skill Used to automate delivery of interactions based on agent skills, abilities, and knowledge interact with contacts. The options are Chat, Email, Phone Call, Voice Mail, and Work Item. Inbound/Outbound
Specifies whether the skill enables the agent to accept inbound or initiate outbound interactions with contacts.
Outbound Strategy (Outbound Email)
Specifies how an outbound interaction is initiated. You must choose one of the following:
- Manual — Enables agents to manually dial numbers of customers or use the address book to contact other agents or skills.
- Personal Connection — Specifies that outbound interactions will use Personal Connection (see Personal Connection). When you select Personal Connection with a Media Type of Email, the Agentless field is automatically selected and you cannot modify it. Personal Connection email is always agentless.
Campaign
Specifies the campaign
A grouping of skills used to run reports. to which you want to assign the skill.Email From-Address
Specifies the email address the contact sees as the sent-from address, or the email address of the agent. You must verify the email domain of the email address specified in this field.
Is Address Editable (Outbound Email)
When selected, gives agents the ability to change the Email From-Address as they write emails to contacts.
Email-BCC-Address
Allows you to enter an email address to which you want a blind carbon copy of the email sent, or a copy of the email to a second address that the contact does not know about.
Re-Skill Hours of Operation Profile
Allows you to select an hours of operation profile that controls when agents can transfer a contact to the skill. For example, if your accounting department closes at 4:00 PM, you could set this value for the Accounting skill to an hours of operation profile with closed times of 4:00 PM. Agents would receive a warning message when attempting to transfer a contact to Accounting after 4:00 PM, informing them that this skill is not open. If the agent selects Proceed, the contact stays in queue until an agent with that skill becomes available, or you could add a branch to the script to facilitate after-hours scenarios (such as playing an after-hours message).
Custom Script (Outbound Email)
Specifies a custom Studio script that runs when communication occurs via this skill. Your Studio script controls things like answering machine laydown, agent script sessions, custom abandon messages, and custom screen pops.
When selected, an inbound phone call to a skill with a higher priority
Skill-based designation of the importance of contacts that determines delivery order. than this email skill can interrupt an email. Email is the only interruptible media type.Minimum Working Time
Specifies the minimum number of seconds an agent must be able to attend to an email before a phone call can interrupt it. For example, if this value is set to 30, a higher priority call received at 20 seconds would not interrupt the email, but a call at 35 seconds would. This field is disabled if the Interruptible checkbox is not selected.
Email Parking
When selected, allows agents to park an email to handle another contact, to consult with an expert, or wait for information from another source. This setting must also be enabled if you plan to use auto-parking for the skill.
Workforce Intelligence Minimum Agents
Specifies the minimum number of agents that must belong to this skill. This setting prevents automatic actions associated with Workforce Intelligence rules from removing too many agents from the skill. When the number of agents reaches this number or lower, all skill removal actions, even automatic ones, require approval.
Workforce Intelligence Minimum Available Agents
Specifies the minimum number of available agents that must be maintained for this skill. This setting prevents automatic actions associated with Workforce Intelligence rules from removing too many agents from the skill. When the number of available agents reaches this number or lower, all skill removal actions, even automatic ones, require approval.
- Enter a skill name.
- Determine if the skill handles inbound or outbound emails in the Inbound/Outbound field.
- Select a campaign A grouping of skills used to run reports. from the Campaign drop-down.
- Enter Email From-Address.
- Select the Email Parking checkbox, the Interruptible checkbox, or both if you want to enable their functionality.
- Configure screen pops if you use them.
Learn more about screen pops fields
Field
Details
Use Screen Pops When selected, causes the system to launch screen pops with record information when an agent connects to a contact. Trigger Event Specifies the time at which the screen pop appears. You can choose from three options: - Linked—Opens the screen pop when the dialer links the call to an agent, before the contact answers.
- Connect—Opens the screen pop when the contact answers the call, before call progress analysis (CPA) begins.
- Active—Opens the screen pop after CPA determines the call is live.
Use Custom Screen Pops When selected, enables you to configure custom contact center data to appear in the screen pops for this skill.
Application/Webpage When you select Use Custom Screen Pops, you must select whether the custom data you want to provide is available via an application or a webpage.
Application If you select Use Custom Screen Pops and Application, you must enter the path of the .exe application that you want to use for your custom screen pops.
Webpage If you select Use Custom Screen Pops and Webpage, you must enter the URL of the webpage you want to use for your custom screen pops.
-
Skip this step to use the default priority while in queue, or configure a custom priority.
If you enabled email parking for this skill, the priority of an email interaction accelerates +1 each time an agent unparks it, even if Acceleration and Maximum Priority are each set to 0.
Learn more about priority management while in queue fields
Field Details Initial Priority Specifies the base level priority Skill-based designation of the importance of contacts that determines delivery order. for all fresh records and retries, but not callbacks Holds a customer's place in queue and automatically calls the customer when they move to the front of the queue., for the skill Used to automate delivery of interactions based on agent skills, abilities, and knowledge. The default value is 0.Acceleration Defines how quickly the priority of the skill increases. For Personal Connection, the best practice is to set this value to 0 because there is no queue for people waiting to be answered.
Maximum Priority Specifies the maximum priority that a contact using this skill can have. If you choose not to use Acceleration, this value should match the Initial Priority.
- Skip this step to use the default service level threshold and goal values, or configure custom values.Learn more about service level fields
Field
Details
Service Level Threshold Specifies the number of seconds in which agents must respond to meet either an SLA Commitment between a service provider and a customer with a defined service level threshold, including quality, availability, and responsibilities. or your own required service level. For example, if your SLA for this skill is to have 80% of contacts responded to in 20 seconds, enter a value of 20.Service Level Goal Specifies the number, expressed as a percentage, of contacts which must be responded to by the Service Level Threshold. For example, if your SLA for this skill is to have 80% of contacts responded to in 20 seconds, enter a value of 80.
- You can compare this skill with other skills to help you make decisions about your settings.Learn more about priority comparison fields
Priority Comparison
Skills to Compare
Field
Details
Skills Specifies the skills Used to automate delivery of interactions based on agent skills, abilities, and knowledge you want to compare with the one you are creating or modifying. Comparison Options
Field
Details
Elapsed Time (sec) Specifies the time span in seconds over which you want to view the changing priorities of the skills. The priority Skill-based designation of the importance of contacts that determines delivery order. comparison graph displays the priority changes of all the selected skills, from the time a contact enters the queue via the skill, over this span of time.Time Interval (sec)
Specifies the time interval
A period between points, limits, or events, such as dates or times. in seconds for which you want to view exact priority values in the graph. For example, if you enter 30, the graph creates a dot for each skill at every 30-second interval to indicate the priority of the skill after 30 seconds in queue, 60 seconds in queue, and so forth. -
Click Create.
Add Users to an Email Skill
You have 2 methods of associating a user with a skill. You can add users to a skill in the Users tab of the skill or in the Skills tab of a user's account.
Email Skill Users Tab
-
Click the app selector
and select ACD. -
Go to Contact Settings > ACD Skills.
-
Click the skill for which you want to add users.
-
Click the Users tab.
-
If you want all users in your environment to have the skill, click Add All and skip the next step.
-
To add individual users to the skill, use the search feature or navigation arrows at the top of the table to locate the applicable users. Click the checkbox to the left of each user you want to have the skill, then click Add Users.
-
Select a proficiency level for each agent, relative to other agents, in the Proficiency drop-down. The field accepts values from 1 (highest or most proficient) to 20 (lowest or least proficient). The default value is 3.
- Click Save Proficiencies.
User Account Skills Tab
-
Click the app selector
and select ACD. -
Click
-
Click the user you want to add to a skill.
-
Click the Skills tab.
-
If you want to add all skills to the user, click Add All and skip the next step.
-
To add individual skills to the user, use the search feature or navigation arrows at the top of the Add Skills table to locate the applicable skill. Click the checkbox to the left of each skill you want to add, then click Add Skills. The selected skills will move up to the Assigned Skills table.
-
Select a proficiency level for each skill, relative to other agents, in the Proficiency drop-down. The field accepts values from 1 (highest or most proficient) to 20 (lowest or least proficient). The default value is 3.
- Click Save Proficiencies.
Create an Email Script
- In Studio, click File > New.
- In the Create New Script window, select the Email icon. Verify that the correct
-
Add Begin and Reqagent actions to the canvas and connect them. Emails automatically route to the email skill
Used to automate delivery of interactions based on agent skills, abilities, and knowledge specified in the point of contact associated with this script. If you want to route the email to a different email skill, change the value in the Skill property of the Reqagent action. -
You can customize the script with additional actions you want to occur during chat events, such as when the chat begins, is transferred, or ends.
- If you configured screen pops A configurable pop-up window with information about the contact. It appears on an agent's screen after a certain event, usually when the agent connects to a contact. in the skill, configure the screen pop content.
- Click File > Save.
- In the Save Script As... window, enter a name for the script, and click Save.
Create an Email Point of Contact
|
Field |
Details |
|---|---|
|
Point of Contact |
Allows you to specify the email address for this point of contact. The field system appends @[domain].com to the value you enter. |
|
Skill |
Lets you associate a skill |
|
Script |
Allows you to specify the Studio script for this point of contact to use. The field presents a drop-down list of the email scripts in your system. |
|
IVR Reporting Enabled |
When you select this checkbox, interactions that come through this point of contact are included in IVR |
-
Click the app selector
and select ACD. -
Go to Contact Settings > Point of Contact.
- Click Create New and select Single Point of Contact.
- Select Email as the Media Type.
- Name the point of contact (POC).
- Enter a value in the Point of Contact field.
- Select a Skill .
- Select a Script .
- Select the IVR Reporting Enabled checkbox if you want to use that functionality.
- Click Create Point of Contact.
Verify an Email Domain in Amazon SES
To use your organization’s email domain with CXone hosted email, you must verify it by adding a TXT record to your Domain Name Server (DNS) settings. If you have multiple email domains, you must do this for all domains that you use with CXone. Emails from non-verified domains will continue to be sent with the legacy infrastructure. To avoid future disruptions with your email delivery, promptly review your email domains and begin the verification process. NICE CXone will provide future notification of the official migration to the new Amazon SES infrastructure to ensure any disruption.
- Click the app selector and select ACD.
-
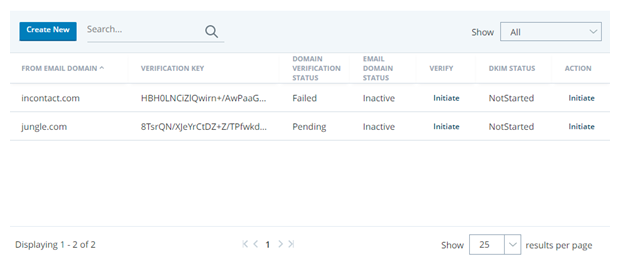
Go to Contact Settings > Email Domains.
-
Locate the domain you want to verify. If the Verification Key column is empty, click Initiate in the Verify column to populate it.
- Copy and paste the verification key into a word processing file.
- Save the file as a TXT format with the following naming convention: _amazonses.<email domain>. An example of a TXT name would be _amazonses.ragnarok.com. Because some DNS providers automatically append the domain name to the end of DNS records, add a "." to the end of the domain name to indicate that it is fully qualified. Additionally, if your DNS provider prohibits underscores in TXT records, remove the _amazonses. from the domain name. You can also add amazonses: before the verification key to improve maintainability.
- Log in to your domain name server administrator application and navigate to the TXT records page.
- Add the TXT record.
-
Save your changes. It can take up to 48 hours for your updates to apply.
- If your verification status is Failed, check your TXT record and verify that the correct file is in your DNS entry, then re-initiate the verification process.
You can find additional details about the Amazon SES verification process by going to the Amazon AWS documentation and searching for "Amazon SES Domain Verification TXT Records".
Generate and Verify DomainKeys Identified Mail (DKIM) Keys
DomainKeys Identified Mail (DKIM) is an email authentication technique that ensures an email is authorized by using a digital signature. CNAME keys are used to map one domain to another.
- Click the app selector and select ACD.
-
Go to Contact Settings > Email Domains.
-
Locate the domain you want DKIM keys for. In the Action column, click Initiate.
-
In the Dkim Tokens (CNAME) window, click Download.
-
Open the CSV file you just downloaded and copy the keys to the DNS.
-
Save your changes. It can take up to 48 hours for your updates to apply.
- If the DKIM status column is Failed, check your CNAME keys and verify that the correct keys are in your DNS entry, then re-initiate the verification process.
Additional Tasks
Customization options include: