

The sections of this page explain how to run an existing report and how to create and activate data download report schedules.
Run Data Download Reports
- Click the app selector
 and select Reporting.
 - Go to Data Download > Data Download.
- Click the report that you want to run.
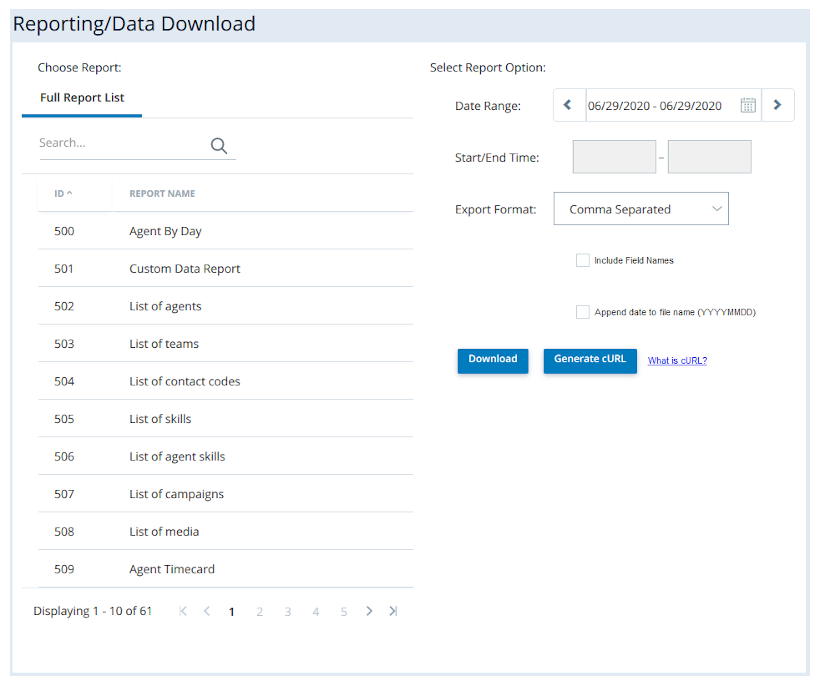
- Configure the report options in the Select Report Options column:
 Learn more about fields in this step
Field Details Date Range The default date and time range is from 12:00 AM today to 12:00 AM tomorrow. When you select the arrows to the left or right of the date range, the range moves up or back 24 hours. When you select the down arrow to the right of the date range, you can choose from several options.
- Today — Default. Outputs data from midnight this morning to now.
- Yesterday — Outputs data from midnight yesterday to 11:59 PM last night.
- Last 7 Days — Outputs data from midnight seven days ago now.
- Last 30 Days — Outputs data from midnight 30 days ago to midnight tonight.
- Previous Week — Outputs data from the last full week, Sunday through Saturday. It gathers data from midnight last Sunday morning to 11:59 PM last Saturday night.
- Previous Month — Outputs data from midnight on the first of last month to 11:59 PM the last day of last month.
- Month to Date — Outputs data from midnight on the first of this month to now.
- Specific Date — Opens a date selector and lets you choose a specific day from which to pull data. By default, it pulls data from midnight that morning to 11:59 PM that night.
- Date Range — Opens two date selectors that enable you to select a start date for the range and an end date for the range. By default, the range goes from midnight the morning of the selected start date to 11:59 PM the night of the selected end date.
Start/End Time
When you select a Specific Date or a Date Range from the Date Range drop-down, you can specify the time range you want data to cover. When you click inside the start or end text box, a drop-down enables you to select a time 12:00 AM to 11:45 PM in 15-minute increments.
Export Format The Export Format drop-down enables you to select the format you want the report to be in when you download it. You can select from the following:
- Comma Separated — Downloads the report as a comma-separated list in a .csv file.
- Tab Delimited File — Downloads the report as a tab-separated list in a .txt file.
- XML — Downloads the report as an XML-formated .txt file.
Include Field Names Enable if you want the first row of the report to be field names. Append date to file name (YYYYMMDD) Enable if you want the report file name to also include the current date. The format is year, month, then day. - Click Download to download the report or Generate cURL to generate code to send the report with a command line.
Schedule Data Download Reports
Create a Data Download Report Schedule
- Click the app selector and select Reporting.
-
Go to Data Download > Report Schedules.
- When the list of available schedules appears, click Create New.
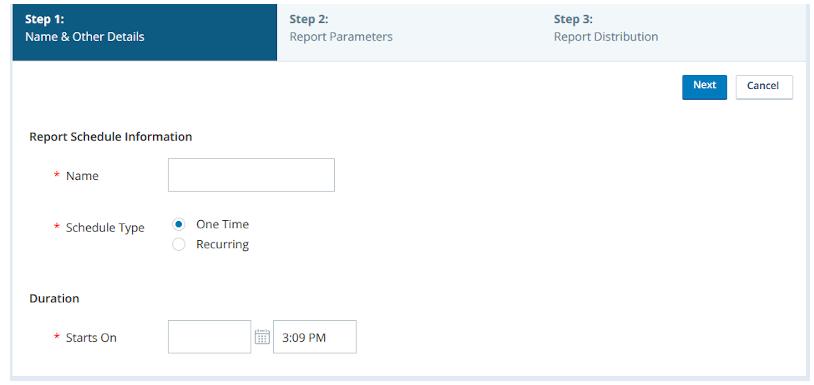
- Fill in the required information.
The Duration fields vary depending on whether you have selected One Time or Recurring.
Learn more about fields in this stepField Details Name The unique name of the report. Schedule Type Whether the schedule occurs One Time, or one time at a specified date and time, or the schedule is Recurring, or runs repeatedly on a regular schedule. Starts On The date and time when the report begins to generate. The first text box contains the date. You can either use the calendar icon to open a date picker or you can specify the date by typing it in the format (M)M/(D)D/YYYY. The second text box contains the time, which you can specify in the format (H)H:MM <AM|PM>. When you click inside the text box, a drop-down allows you to scroll to select a time instead. It contains all 15-minute intervals in a day. Recurs Available only for report schedules with a RecurringSchedule Type. It specifies that the schedule recurs on one of the following bases:
- Daily — Runs the report daily or every few days. When you select Daily, the following field appears:
- Every __ Day(s) — Specifies the number of days between each time the report runs.
- Weekly — Runs the report weekly or every few weeks. When you select Weekly, the following fields appear:
- Every __ Week(s) on — Specifies the number of weeks between each time the report runs.
- Monday, Tuesday, Wednesday, Thursday, Friday, Saturday, Sunday — Indicate which days of the week the report runs.
- Monthly – Runs the report monthly or every few months. When you select Monthly, the following options appear. You must select and configure one.
- Day __ of Every __ Month(s) – Specifies the day of the month the report runs and the number of months between each time the report runs. For example, the report might run on the 20th every other month.
- The __ __ of every __ Month(s) – Specifies the day of the month the report runs in terms of the day of the week and the week of the month. It also specifies the number of months between each time the report runs. For example, the report might run on the second Tuesday of each month.
Ends Specifies when the schedule ends. It becomes available when you choose a RecurringSchedule Type. Choose one of the following options:
- Never – The schedule never ends unless you manually deactivate or change it.
- On – The schedule ends on a specific date at a specific time. Select a date and time in the fields on the right.
- After – The schedule ends after a specific number of occurrences. Type the number of occurrences in the field to the right.
- Click Next.
- Configure your desired report parameters:Learn more about fields in this step
Field Details Report The data download report that you want the schedule to run. Report Format
The format of the report output. You must choose one of the following:
- Comma Separated — Rows separate with line breaks and columns separate with commas.
- Tab Delimited File — Rows separate with line breaks and columns separate with [TAB] spaces.
- XML — The report is formatted in XML.
Folder The location of the report after it runs. You can access it after it generates by clicking Manage > Files & Folder > Browse Files and navigating to the path displayed here. File Name The name of the file that will contain the report. Date Range The default date and time range is from 12:00 AM today to 12:00 AM tomorrow. When you select the arrows to the left or right of the date range, the range moves up or back 24 hours. When you select the down arrow to the right of the date range, you can choose from several options.
- Today — Default. Outputs data from midnight this morning to now.
- Yesterday — Outputs data from midnight yesterday to 11:59 PM last night.
- Last 7 Days — Outputs data from midnight seven days ago now.
- Last 30 Days — Outputs data from midnight 30 days ago to midnight tonight.
- Previous Week — Outputs data from the last full week, Sunday through Saturday. It gathers data from midnight last Sunday morning to 11:59 PM last Saturday night.
- Previous Month — Outputs data from midnight on the first of last month to 11:59 PM the last day of last month.
- Month to Date — Outputs data from midnight on the first of this month to now.
- Specific Date — Opens a date selector and lets you choose a specific day from which to pull data. By default, it pulls data from midnight that morning to 11:59 PM that night.
- Date Range — Opens two date selectors that enable you to select a start date for the range and an end date for the range. By default, the range goes from midnight the morning of the selected start date to 11:59 PM the night of the selected end date.
Date Range Selected Displays the pre-defined Date Range option you selected, including Today, Yesterday, Last 7 days, Last 30 Days, Previous Week, Previous Month, and Month to Date. If you configure the Specific Date or Date Range option, Date Range Selected displays Custom. Start/End Time When you select a Specific Date or a Date Range from the Date Range drop-down, you can specify the time range you want data to cover. When you click inside the start or end text box, a drop-down enables you to select a time 12:00 AM to 11:45 PM in 15-minute increments.
Delete After Specifies the number of days you want the report to be available after it generates. After the specified number of days, NICE CXone purges the report. Include Field Names Enable if you want the first row of the report to be field names. Append date to file name (YYYMMDD) Enable if you want the report file name to also include the current date. The format is year, month, then day. - Determine the users who will receive the report. You can select CXone users from the Email Recipients list, or enter email addresses of personnel without a CXone user account. If you enter external addresses, you must delimit each email address with a comma or semicolon.
- Click Save.
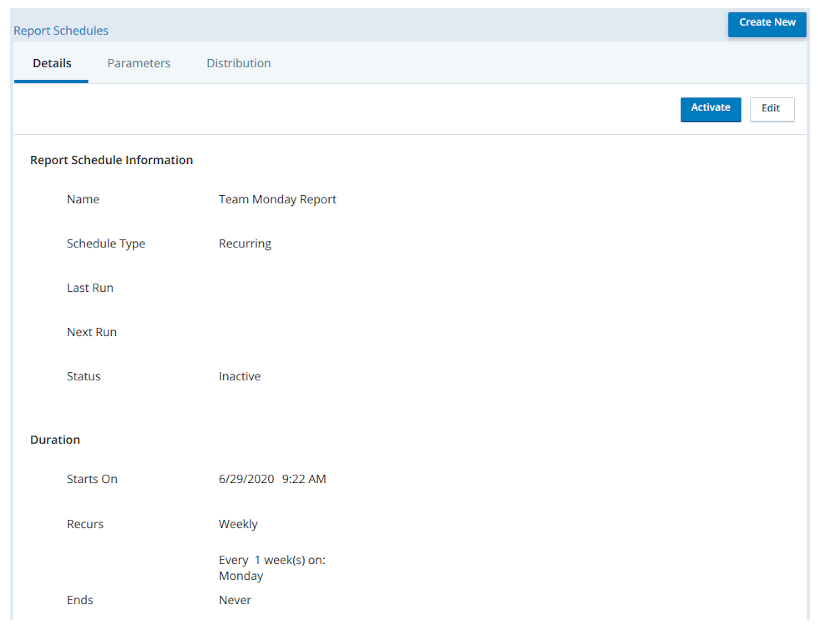
Activate the Data Download Report Schedule
When you create a new data download report schedule, you must activate it to begin generating reports. If you later decide that you want to stop a schedule from running the report, you can deactivate it. Additionally, you must deactivate a data download report schedule to modify it, then activate it to resume activity.
Deactivate any schedules that you no longer want to run. This prevents your system from slowing down by running too many reports unnecessarily.
- Click the app selector and select Reporting.
-
Go to Data Download > Report Schedules.
-
Locate the data download report schedule you want to activate. Click the schedule to open it.
- Click Activate.
If you want to deactivate the schedule at a later time, you can follow the same steps and select Deactivate.