

Form Manager makes working with forms quick and easy. A form is a collection of questions used to evaluate agent interactions.
Forms can be used for standard evaluations, self-assessments![]() An evaluation performed by the agent on their own interaction, using the evaluation form. Manager or supervisor can send one or more self assessments to agents. performed by the agents, and collaborative evaluations, performed by both an evaluator and the agent.
An evaluation performed by the agent on their own interaction, using the evaluation form. Manager or supervisor can send one or more self assessments to agents. performed by the agents, and collaborative evaluations, performed by both an evaluator and the agent.
As a QM Manager, you can use Form Manager to create new forms and manage your existing forms.
Create Forms
You can create a form by dragging and dropping elements into the form, and then defining questions and answers.
You can create a new form or clone an existing one and change the content.
In addition, you can assign scores to each question, make a dynamic form that changes based on different answers, and define critical questions that must be answered correctly or the evaluation will fail.
Remember, after creating a form, you'll still have to activate it before it can be used.
To create a new form:
- Click the app selector
 and select QM Analytics.
 -
Click Manage Forms.
-
Click New Form. A blank form opens.
-
In the Properties pane, enter the title and subtitle for the form header.
You can also define the background color of the form and change the default logo.
-
Define the header fields. These will be filled in when the evaluator opens the form.
-
Drag and drop a Section
 to your form and add elements to create questions/labels. Question options include: free-text, yes/no, radio, checkbox, dropdown, and date/time questions.
 Here are more details about these questions and form elements.
Element What does the QM Manager do? What will the evaluator do? Short Text Add a short/single-line text input field to your form
Type a short response. Free text.
Long Text Add a multi-line free text input field to your form
Type a long response.
Free text.
Yes/No Define a question with Yes/No options for an evaluator to choose. You can assign score values to the answers to this question.
Example question: Did the agent have a great opening?
-
Yes
-
No
-
N/A
In this example, a score value would be assigned to "Yes", and no score value would be assigned to "No".
If the evaluator selects N/A, the question will be removed from the score calculation.
Select Yes/No.
Radio Define a question with a list of options for an evaluator to choose. You can assign score values to the answers to this question.
Example question: Did the agent have a great opening?
-
Great opening, complete
-
Hit most components, not all
-
Missed all but key elements
-
Missed key elements
-
No
In this example, different score values would be assigned to each radio button. No score would be assigned to "No", and possibly to other radio buttons.
Leave the default or choose another option.
Checkbox Define a question with several options for evaluators to select. You can assign score values to the answers to this question.
Example question: Did the agent have a great opening?
-
Proper greeting
-
Used the caller's name immediately
-
Had a great tone
-
Correct branding
-
Acknowledged member through words and tone
In this example, different score values can be assigned to each checkbox. Each selection will add points to the total, and multiple checkboxes can be selected.
Select the responses that apply. Label Enter free text that can be used as a label. (Does not replace titles.) Drop-down Define a question with a list box with one or more possible options to choose from. Select one or more options from the list. Date/Time Define a question with a date/time picker for evaluators to select.
Define the date/time and the display format.
Hyperlink Add a link to the form Opens the hyperlink in a browser. Section Add a section to the form that contains groups of questions for specific needs. -
-
Define each element's properties in the Properties pane.
These are the common element properties.
Element Property Description Label Type your text for the form/selection/element. Question Type a question you want to ask. Instruction Text which provides instructions to the evaluator. This appears below the field. Hint Text that hints a question. The hint text appears inside a field before the user enters a value. Character Limit The number of characters that a user can enter. A counter appears below the response field. Required The question is marked as mandatory. If the evaluator leaves this field blank, a warning message is displayed and the evaluator will not be able to submit the form.
Default Value (choice) Default answer for the question. Use N/A N/A (not applicable) option to a question that is scorable. This option is added to the list of your responses is applicable when none of the other responses are relevant to the question. Please note that selecting the N/A option will exclude the response from score calculations.
-
If you want to add a critical question, select the Mark as Critical checkbox in the properties pane, and define the questions and the answers that will pass/fail the form.
What are critical questions?
A critical question is a question that can immediately fail an entire evaluation, based on a specific answer given to that question. You can use critical questions to address the most important agent activities.
For example, you define that agent greeting is critical in a call and you create a question "Did the agent greet the customer?" You then define that if the evaluator chooses No, the form will fail.
The evaluator will see a flag indicator
 if the form they opened contains a critical question.
 An agent that opens an evaluation with a Failed score understands that they failed a critical question.
-
Click Scoring
 to enable and define scoring or ranking on the form. For more information, see Enable Scoring and Ranking.
 -
Click Settings
 to define the evaluation flow for your form.What's an evaluation flow, and why do I need one?
If you want agents to be able to see their evaluation results, then you have to define an evaluation flow.
In the form settings, there are several options you can select for your evaluation flow. If you clear initial Agent Can Review checkbox, then agents will not be able to see the results of their evaluations.
These are the evaluation flow options:
Agent Can Review—agents will see the completed evaluation in their My Zone application and can review the completed form.
This option has several sub-options:
- Display Scores To Agents—an agent will be able to see the score/ranking of the evaluation.
- Agent Can Acknowledge—after an agent opens the form, they must acknowledge that they have reviewed their evaluation by clicking on the Acknowledge button.
- Agent Can Request Review—the agent will be allowed to request a review if they are dissatisfied with their score, by clicking the Request Review button. The agent can even add comments. The evaluation will be re-evaluated with the same form.
If Request Review is enabled, choose one of these options:- The assigned evaluator—the evaluation will be re-evaluated by the same evaluator.
- A specific person—select an evaluator from the drop-down list if you want to re-evaluation to be completed by someone else.
-
Click Test Form to preview and validate the completed form.
-
Click Save.
-
In the Save Form window, enter a name for your form and click Save. The form you created will appear in the Form Manager grid.
Remember, once you've created your form, you still have to activate it before it can be used.
Add Dynamic Rules
Dynamic forms change based on the evaluator's responses to questions. Depending on their answer to one question, a follow-up question/section may or may not appear.
For example, if the evaluator chooses Excellent on a question regarding agent handling, then a question related to agent improvement will not appear.
- Create dynamic rules for yes/no, radio, checkbox, drop-down, and date/time elements.
- Define several conditions for one rule.
- Choose AND to define that two or more conditions must be met to trigger the rule.
-
Choose OR to define that one condition or another can trigger the rule.
To add a dynamic rule:
-
Click Define Rules
 inside of the question you want to make dynamic.
Keep in mind, you cannot define the last question in a form as dynamic.
-
Define the condition that triggers the rule.
Here's an example:
The question is "Problem resolved in the first call?". The condition triggers a rule that hides the follow-up question when evaluator answers Yes to the dynamic question.
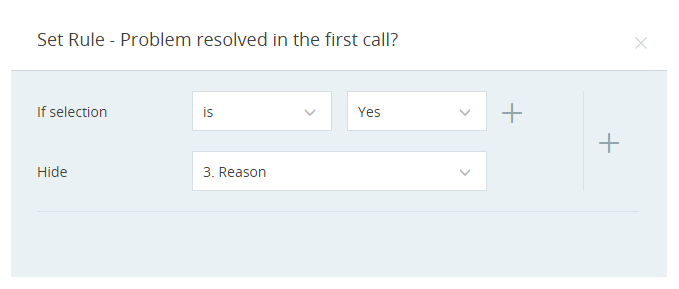
-
From the drop-down list, choose the question or section you want to hide when the condition is met.
-
To add more conditions to this element, click Plus
 next to the condition row.
 Once you have two or more conditions, you must also choose the relationship between them (and/or).
-
To add more rules, click Plus
next to the rule. -
Click Set. The color of Define rules
 for the question changes to green.
Enable Scoring and Ranking
When you enable scoring on a form, a score will be generated in real-time based on the evaluator's responses. A total score will appear at the top of the form, and a section score will appear at the top of each section on the form.
The score is displayed as a percentage. The form might only have a total of 27 available points, however, the score itself can go up to 100%.
- Add scoring to yes/no, radio, and checkbox questions.
- Remove scoring for specific questions by clearing the Scorable checkbox for that question.
- You can change the default scoring value from 1 to something else.
- For a Yes/No question, the No response is always set to zero. This cannot be changed.
- Only questions that are answered by the evaluator will be scored. (N/A does not count as a scorable answer.)
- In multiple-choice questions, each available response can have its own score. If several responses are selected, the question score will be the total score of the responses.
If you do not want agents to see the numerical score for their evaluations, then you can enable ranking. Ranking displays text (such as Excellent or Poor) in the evaluation instead of a score. Define a score range for each rank you want to display.
For example, you define the ranges for a form from 90% -100% as Excellent, from 70% - 89% as Very Good, and from 10% - 29% as Poor. If an agent scores 75% on an evaluation, their evaluation will be marked with Very Good.
Managers will still be able to see the actual score.
You can define up to five ranks, but make sure the score ranges do not overlap.
To define scoring:
-
Open the form and click Define Scoring
. -
In the Set Scoring tab, select the Enable scoring checkbox.
-
Select the Scorable checkbox for each question you want to score.
You will only be able to define scores for Yes/No, radio button, and checkbox question types.
-
Assign a number of points for each response.
At any point, you can restart your scoring from scratch by clicking Reset.
-
Click Save.
To define ranking:
-
Define scoring for the form.
-
In the Set Ranking tab, select the Enable Ranking checkbox.
-
Set the score range and text for each rank. This will appear when the agent opens the evaluation.
-
To add additional ranges, click +Add.
-
Click Save.
The Question Bank
If you have questions that get reused from form to form, the question bank is a useful tool.
The question bank is a collection of ready questions that can be dragged and dropped directly into your form. You can edit these questions after you've added them into your form.
Keep in mind, only questions and answers will be saved in the bank, not the design or logic added to them.
To use the question bank:
-
Click Save
 next to a question to add it to the bank.
 You can view the question in the Question Bank tab.
-
Drag and drop a question from the Question Bank tab into your form to use it.
-
Edit the question if necessary.
You can save the edited question as a new question in the bank. The original question will remain in the bank, unchanged.
Manage Forms
The Form Manager grid lets you keep track of forms at a glance. You can edit a form directly from the grid by clicking on it.
In addition to the form name and version, the following is also available in the grid:
|
Column |
Details |
|---|---|
| Status |
Possible form statuses:
|
| Actions |
These actions are available in the grid:
You can select several forms at once to delete, activate or deactivate. |
Add Auto-Response Rules
The auto-response rules option in a form is only available if you have the QM Advanced license and the View permission to use Analytics Category Manager. In CXone, go to Admin > Security > Roles and Permissions, the permission is under QM Tools > Category Manager.
Auto-response rules are simple rules the quality manager configures for questions by selecting categories or sentiments while setting up the form.
Based on your selection, the QM app automatically responds to the evaluation form questions matching the criteria associated with the interaction. This helps the evaluators to complete evaluations faster, as many of the questions in the form will already have answers filled in for them. Evaluators can review the responses and change them if needed.
What can I do with auto-response rules?
-
Create auto-response rules for scorable questions such as yes/no, radio, checkbox.
-
Define categories for the questions. You can filter the category in your preferred language.
-
Define sentiments.
To add the auto-response rules for categories:
-
Click Auto-Response Rules
 inside of the question you want to be automatically evaluated by the QM application.
 -
Select Categories as a rule type.
-
Select the language in which you want to define the categories. Only English, Spanish, and Brazilian Portuguese are the supported languages.
-
Define the categories that will help to triggers the rule. For each answer, you can select up to 10 categories.
For the yes/no and radio button questions, the categories selected for one answer will not be available for another one. For questions with a checkbox, all the categories will be available for all answers.
The form contains a Yes/No question: Did the agent greet the customer? If the answer is Yes, the QM manager sets the Welcome category. If the answer is No, the manager configures the Impolite category. When an interaction is evaluated, the QM app responds to the evaluation form questions matching the categories. If the agent welcomed the customer during the interaction, the QM app answers the question as Yes. Later, evaluators can review the responses and change them, if needed.
-
Click Save.
You can edit the question, language and categories set in the auto-response rule.
To add the auto-response rules for sentiments:
-
Click Auto-Response Rules
inside of the question you want to be automatically evaluated by the QM application. -
Select Sentiments as a rule type.
-
Define the sentiment for each answer choice.
For the yes/no and radio button questions, the answer choices must be distinct.
The form contains a Yes/No question: Was the agent polite to the customer? If the answer is Yes, the QM manager sets the sentiment as Positive and Agent side. If the answer is No, the manager configures the sentiment as Negative and Agent side.
-
Click Save.
You can edit the question and sentiments set in the auto-response rule.