

Content on this page is for a product or feature in controlled release (CR). If you are not part of the CR group and would like more information, contact your CXone Account Representative.
Slot Filling Methods
There are five methods to fill slots![]() Entity extracted from contact's message and saved for use in bot responses. Similar to a variable. in CXone Bot Builder:
Entity extracted from contact's message and saved for use in bot responses. Similar to a variable. in CXone Bot Builder:
- From System—When an interaction between contact and bot begins, CXone Bot Builder automatically creates two slots that can be used in that unique interaction: Last Customer Message and Customer ID. These slots are system-generated and cannot be edited.
- From Entity—These slots are extracted from interactions. When you create an entity
 Defined keyword or phrase, with or without variants, in an interaction or message, a slot is created automatically. You can use the slot value as a variable in the same interaction or in other areas of Digital First Omnichannel. If you delete the entity, the slot is also deleted and you can no longer use it anywhere. Entity-based slots can be any of the slot types.
 - From Intent—This method fills the slot with a defined value if the defined intent is recognized. Both value and intent can be defined in the slot configuration. Slots using this method are created manually and are currently only applicable to forms.
- From Message—This method uses the text of the next message to fill the slot. The recognized intent is ignored and the slot is filled with the message value, unless there is no intent restriction configured. Slots using this method are created manually and are currently only applicable to forms.
- Custom slots—Custom slots typically hold information based on business logic. An example would be data retrieved by an API call to your CRM or another third-party application. You manually create custom slots in the same way you create intents What the contact wants to communicate or accomplish. You can use the slot value as a variable in multiple interactions between bots Virtual agent designed to handle specific interactions and contacts, or in other areas of Digital First Omnichannel. Custom slots persist until they are manually deleted. They can be any of the slot types. These slots are created manually.
Create Slots
When you create an entity![]() Defined keyword or phrase, with or without variants, in an interaction or message, CXone Bot Builder automatically creates a slot
Defined keyword or phrase, with or without variants, in an interaction or message, CXone Bot Builder automatically creates a slot![]() Entity extracted from contact's message and saved for use in bot responses. Similar to a variable. for that entity. But if you want to use a slot for information from another source, you can create slots directly in CXone Bot Builder. For example, you might use a pre-chat form that asks for your contact's account number. You could then pull the contact's account status from another system, and design your stories so that the bot
Entity extracted from contact's message and saved for use in bot responses. Similar to a variable. for that entity. But if you want to use a slot for information from another source, you can create slots directly in CXone Bot Builder. For example, you might use a pre-chat form that asks for your contact's account number. You could then pull the contact's account status from another system, and design your stories so that the bot![]() Virtual agent designed to handle specific interactions always attempts to collect any past-due balance.
Virtual agent designed to handle specific interactions always attempts to collect any past-due balance.
Talk to your CXone Account Representative about how to set up an integration between CXone Bot Builder and the data source for a custom slot.
- In the Digital First Omnichannel portal, click Chatbot.
- Click the bot you want to work with.
- Click NLU
 in the left icon menu.
 - In the right pane, click Slots and then click New Slot.
- Enter a name for your new slot and press Enter. Click the slot name to edit it.
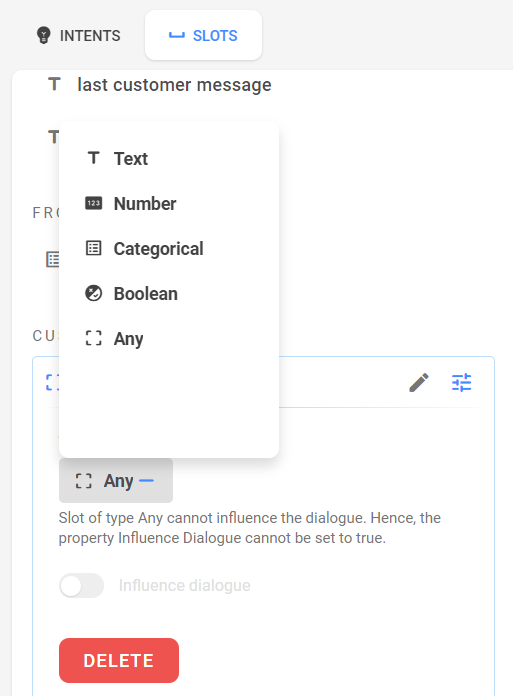
- Click Type and select from the drop-down menu. Learn the basics about slot types
You can also read a more detailed explanation of slots, with examples for each slot type.
Slot Type Details Text Select this type if you want the slot to hold text information.
If you set Influence Dialog to On, the bot only evaluates whether or not there is content in this slot. It does not consider the meaning of the content.
Number
Select this type if you want the slot to hold numbers with a minimum and maximum value.
If you set Influence Dialog to On, the bot's behavior can change depending on the value in the slot.
Categorical Select this type if you want the slot to hold one of several Values. Separate the specific values with commas.
If you set Influence Dialog to On, the bot's behavior can change depending on the value in the slot.
Boolean Select this type if you want the slot to hold true or false values.
If you set Influence Dialog to On, the bot's behavior can change depending on whether the slot is set to True, set to False, or is Empty.
Any Select this type if you want the slot to hold arbitrary values. Slots of this type cannot be used to influence the bot's behavior. - If you want the slot to influence the interaction and bot behavior, set the Influence Dialog slider to On.
Use Slots as Variables
Required permission: Chatbot (ACD > DFO > Roles > [choose one] > Core Modules)
You can personalize your stories, rules, fallback, and more by including variables: entities that come from slots. To use a variable, enclose the name of the entity in curly brackets.
- In the Digital First Omnichannel portal, click Chatbot.
- Click the bot you want to work with.
- Click Dialogues
 in the left icon menu.
 - Click New Folder, type a new name for the folder, and then press Enter.
- Under the new folder, click New Story.
- At the top of the story section, enter a name for your story.
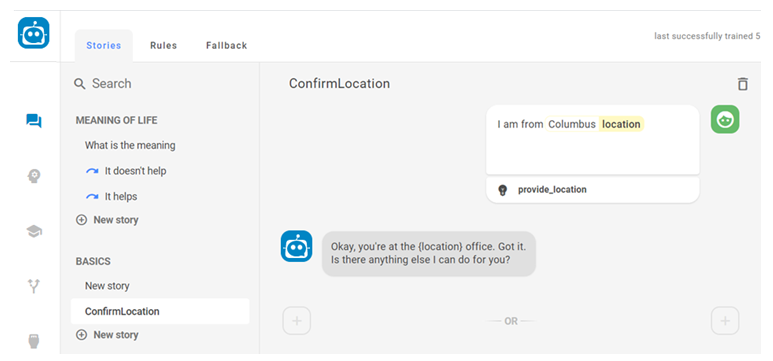
- In the Customer may say box, enter the customer message and then press Enter. CXone Bot Builder analyzes the message and offers a list of intents and confidence level.
- If CXone Bot Builder identified the correct intent, click Confirm. If not, expand the list of intents and select the correct intent, then click Confirm. In the preceding image, CXone Bot Builder correctly identified the intent as provide_location and stored Columbus as a location entity.
- Hover over the plus sign at the left of the rule builder until it changes to a bot icon, then click the action.
- Provide the information matching the action type you selected. For example, if you selected Message, enter the message with which the bot should respond.
In the example image, Akela has created a response message that includes a variable using the location entity. The message would appear to the contact as, "Okay, you're at the Columbus location. Got it."Learn more about all bot action types
Action type Details Message Enter the message for the bot. You can add Buttons or Quick Replies to the message or choose to leave it as regular text. To see a images and consider examples, see below.
Multimedia Upload a supported multimedia file:
- Images in PNG, JPG, GIF, or BMP format that are smaller than 5 MB
- Videos in AVI, MPEG-4, or WEBM format that are smaller than 200 MB
- Audio files in MP3 format that are smaller than 15 MB
- PDF or Microsoft Word, Excel, or Powerpoint files that are smaller than 15 MB
Multimedia is only supported by these channels:
- Chat
- Facebook Messenger
- Apple Business Chat
- Twitter Direct Messaging (images only)
Cards Cards can combine images, structured text, and buttons into one message. This keeps the interface cleaner than sending several responses back to back. You can add up to 10 cards to be sent at a time. The customer will be able to swipe back and forth to view them. You can use variables when configuring a card in the format {slot_name}. Handover Select this option when the customer message should trigger the handover Any contact message that should trigger transfer to a live agent rule.Slot Select from your existing slots. Checkpoint Select this option, then click the + icon and select the stories you want to link to. Checkpoints provide a simple way to connect different stories within the same dialogue. To see an image and consider examples, see below.
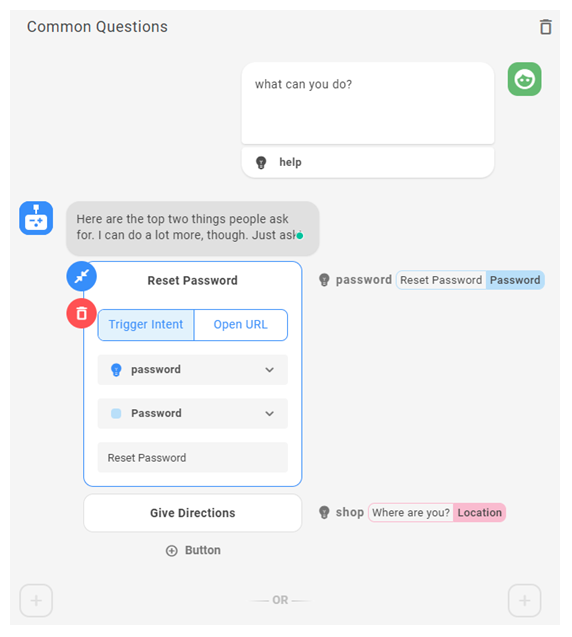
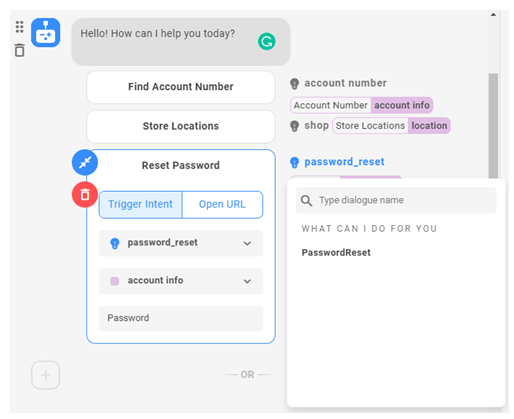
Learn more about Buttons and Quick RepliesButtons—Buttons help a customer communicate their need quickly without having to type. Buttons remain available for the customer to go back to even after they choose one. You can add up to three Buttons to a message. You can use variables when configuring a button in the format {slot_name}. A button can trigger an intent or open a URL.
- Trigger Intent allows you to configure the intent and optionally the entity as well. Once the customer taps the button, the bot will decide which story or rule to follow based on your configuration.
- Open URL opens a web page in a new tab. This can enrich the conversation by, for example, directing to a website to provide more details on a product than what the bot would provide in a conversation.
Quick Replies—Quick Replies are similar to buttons in improving customer experience. Once the customer chooses one, the rest of the options go away. You can add up to 12 quick replies to a message. You can use variables when configuring a quick reply in the format {slot_name}. A quick reply can trigger an intent or send a standard message.
- Trigger Intent allows you to configure the intent and optionally the entity as well. Once the customer chooses a quick reply, the bot will decide which story or rule to follow based on your configuration.
- Send Text takes the text of the quick reply and sends it back to the bot as a standard customer reply.
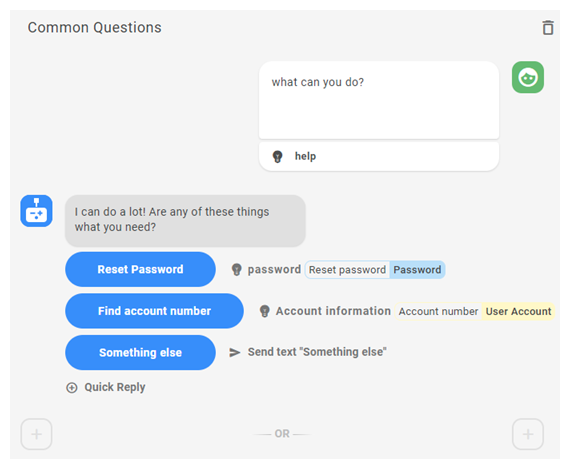
If a message has buttons or quick replies with an intent defined, these show up next to the message. You can click on them to see all stories and rules where they are used.
 Learn more about checkpoints
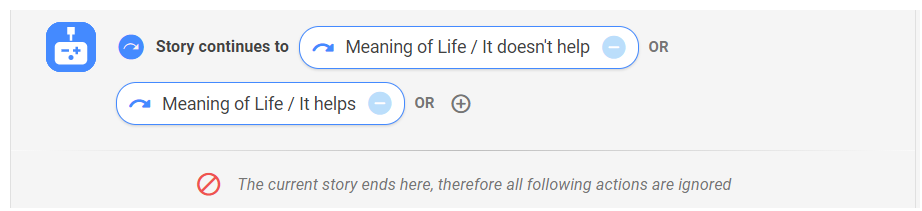
Checkpoints allow you to connect multiple stories based on the contact's message. For example, a customer might ask, "What are your hours and location?". Rather than create separate stories for hours, location, and hours plus location, you could use checkpoints to offer the hours and location stories in sequence.
You can also use checkpoints that are not based on customer messages. For example, your company might want to extend a special offer to all customer for a limited time. You could add the special offer messages and actions to each of your bot stories, and then remove that section from multiple stories when the offer expires. A simpler method would be to create a story just for the special offer, and then add a checkpoint to each story for the duration of the offer.
As shown in the image, a checkpoint always displays a small blue circle with a curved arrow at the beginning. This shows that it connects to one or more other stories. Checkpoints always end the story, even if you add actions after the checkpoint.
While checkpoints can be very useful, don't overuse them. Too many checkpoints can make the logic of your stories very hard to follow.
- Click Train and Stage to train your bot on the new story.
