

This page explains elements of the agent application while handling a contact, plus the various actions you can perform during an interaction. To learn about actions you can perform after handling a contact, such as tagging another user with an @Mention, see the Post-Contact Actions page.
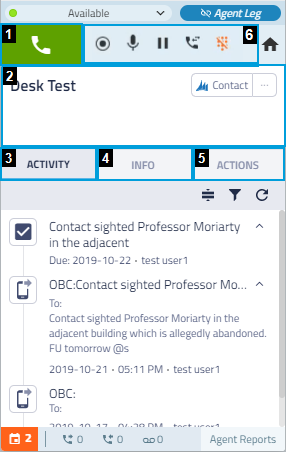
Contact Handling View
Several elements of this view are already described in the Agent for Zendesk overview, such as the status bar or the agent queue. The following table explains elements that are specific to the contact handling view.
| Field | Description |
|---|---|
| Call Button (1) | Click this button to call the number visible beside the button. If the button is red (during a call), click to end the call. |
| Contact Information (2) | Displays the name of the record. If you click the Contact button, the record information will open in the CRM. If you click the ellipsis, you can reassign the call. |
| Activity Tab (3) |
The activity tab displays a timeline of previous interactions with the contact. You can click on the action buttons to expand details for each interaction, to filter the interaction by type, or refresh the activity list. Clicking on an interaction icon opens the interaction details in your CRM interface. |
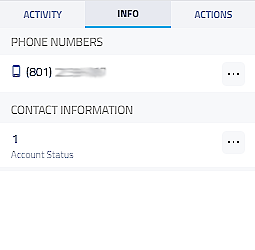
| Info Tab (4) |
The Info tab displays basic information for the contact, and offers you the ability to copy the number or information to your clipboard to paste it elsewhere. |
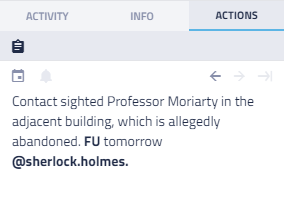
| Actions Tab (5) |
The Actions tab allows you to add notes to the interaction, which are further explained on the Post-Contact Actions page. |
| Call Buttons (6) | Allows you to perform the following basic actions when handling a voice contact:
|
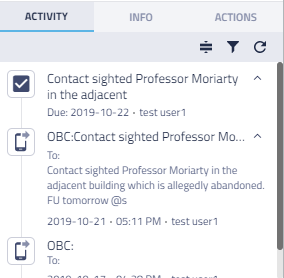
View Previous Interactions
While handling a contact, you might need to view previous interactions with the contact to verify data or view any relevant notes. In the Activity tab of an active contact's record, you can view past interactions. Clicking on an interaction's icon opens the interaction details in your CRM, making all information visible such as notes or relevant files attached to the record.
In the activity tab of the contact handling view, you can click on the activity icon to open the interaction details within your CRM.
Reassign Calls
If the number from an incoming call is connected with multiple records, that is a multi-match situation. Likewise, if the call is associated with 1 record (or no existing record), that is a single-match situation. Therefore, if a number is matched to multiple records, and one of those records is incorrect, you can reassign the number and all notes or actions included with the interaction to a different record.
Holmes Enterprises is working a case that involves three villains: Professor James Moriarty, Herr Von Herder, and Colonel Sebastian Moran. All three make calls from the same number, which was assigned earlier to Professor Moriarty.
To better track and report on each villain, Dr. Watson creates new records for von Verder and Moran. He then reassigns their calls to their new records.
- Click the ellipsis beside the Contact button in the contact information area.
- Click Reassign Call.
- Search for and select the user (or record) to which you want to reassign the call.
- Choose whether you want to view the selected record before reassigning, assign the interaction to the selected record, or assign the interaction and save the number that you are currently calling to the newly assigned record.