

Your Chrome browser must be configured with the CXone Agent extension. When adding the extension to your browser, you can customize certain features, such as determining on which webpages the agent interface will appear.
Contact your supervisor or NICE CXone technical representative for a list of compatible CRMs.
- In a Google Chrome web browser, navigate to the Chrome Webstore.
- Search for "CXone".
- Select NICE CXone Agent Chrome Extension and click Add to Chrome. The agent extension icon will appear in your extensions list, which is typically in the corner of your browser toolbar to the right of the browser search bar.
Note: your organization may require you to select a CRM-specific agent integration, such as CXone Agent for SugarCRM. Ask your supervisor if you are uncertain which extension to select. - Right-click the extension icon and select Manage extensions.
- Determine which sites you want the extension to appear on (and have click-to-dial access) in the Site Access section. You can select 1 of the following options:
- On click — the agent extension tab will not appear automatically on a new web page. You can "launch" the extension when the icon in your toolbar becomes white by left-clicking the icon and clicking Reload. The page will reload with the agent window accessible as a minimized tab on the side of your browser. The first time you reload a page, you will be prompted to Grant Permission. After this one-time prompt, the agent window will automatically be available on this site.
- On specific sites — the agent extension will only appear on sites that you specifically determine. Add website domains to make the extension automatically appear, such as https://www.google.com or https://help.nice-incontact.com.
- On all sites — the agent extension will be accessible on every site. Note: this setting also makes the extension accessible on pop-ups.
- You can close the extensions management window or click the back arrow to edit other extensions you may have.
- Enable notifications in Chrome's settings. See Google Chrome's instructions if necessary.
- Enable notifications for the Agent extension:
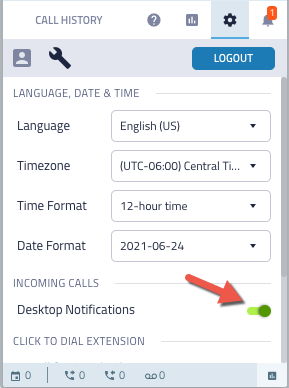
- Navigate to the Home view of the Agent interface.
- Click the Settings tab.
- Click the Desktop Notifications slider to enable notifications.
Any social media, social networking, and other technology sites, applications, or products referenced in this topic are the property of their respective owners.