

The click to call feature allows your agents to start a call directly from Dynamics by one-clicking a number on a contact record.
-
 Enable outbound communication for your desired phone fields:
Dynamics does not natively markup all numbers for click-to-dial. Rather, an administrator must enable outbound communication for selected phone fields on selected entities. Microsoft supports these up-to-date instructions; search the web for "Microsoft Dynamics enable outbound communication" to easily find the article.
- Navigate to your Home page in Microsoft Dynamics (click the down-carot beside Dynamics 365, then select Home).
- Click the ellipsis (3 dots) on the Customer Service Hub card. If you do not see the card under the Published Apps section, you can find it by searching.
- Click Open in App Designer.
-
Add Contact as an entity form.
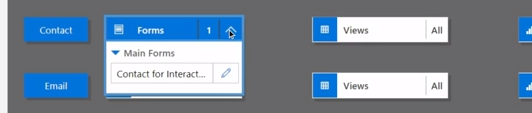
- Scroll down to the Contact row of your Entity View in the main section.
- Drop-down the Forms field in the Contact row and select the edit icon (indicated by a pencil) beside the Main Forms name. The form will open in a PowerApps window.
- Double-click the Mobile Phone field.
- Select the Controls tab in the Field Properties window and click Add Control.
- Select Channel Communication Control then click Add.
- Make sure that Web, Phone, and Tablet radio buttons are all selected.
- Click OK.
- Back in the main PowerApps window, click Save, then click Publish.
- Add Contact as an entity form.
- Select Contacts from the left side-menu of Dynamics.
- Select All Contacts.
- Find and select a contact that you know has telephone number.
- In the General Information section for the contact, find the contact's telephone number. The icon beside the number has slightly changed to look like the following:
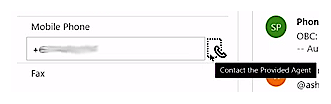
The icon moved outside of the mobile number field, and the hover message says Contact the Provided Agent. If you click the phone icon, the agent application will prompt you to select a skill with which to make an outbound call.