

Configure Presence, Service Channel, and Routing Settings
Presence configurations determine agent workload and Salesforce Omni-Channel behaviors. You can create multiple presence configurations for different groups of agents depending on what channels they support. You can create custom presence statuses that indicate an agent's availability and prevent the routing of work to an unavailable agent.
Routing configurations determine how work items![]() Customizable method of delivering contacts to an agent via Studio scripts. are routed to agents. Use them to prioritize the relative importance and size of work items from your queues. This ensures that the most important work items are handled accordingly, and work is evenly distributed to your agents. You can designate some channels
Customizable method of delivering contacts to an agent via Studio scripts. are routed to agents. Use them to prioritize the relative importance and size of work items from your queues. This ensures that the most important work items are handled accordingly, and work is evenly distributed to your agents. You can designate some channels![]() A way for contacts and agents to interact, such as voice, email, chat, social media, and so on., such as phone or email, to be routed by the NICE CXone platform, while simultaneously using the Salesforce Omni-Channel Live Agent for chat contacts.
A way for contacts and agents to interact, such as voice, email, chat, social media, and so on., such as phone or email, to be routed by the NICE CXone platform, while simultaneously using the Salesforce Omni-Channel Live Agent for chat contacts.
Service channels let you turn a case, lead, or even a custom object into a work record. Salesforce Omni-Channel then plucks these work items from their queues of agent productivity and routes them to your agents in real time. Service channels let you manage sources of work and their priority![]() Skill-based designation of the importance of contacts that determines delivery order. compared to other work items.
Skill-based designation of the importance of contacts that determines delivery order. compared to other work items.
-
Click Setup in the upper right corner.
-
In the Build menu located on the left, click Customize > Omni-Channel.
-
Click Presence Configurations, Presence Statuses, Service Channels, or Routing Configurations depending on what you are configuring.
-
Click New.
-
Specify your settings and click Save.
Grant User Access to Presence Statuses
You have to give agents access to presence statuses through profiles or through permission sets.
-
Click Setup in the upper right corner.
-
On the left side of the page, click Administer > Manage Users > Profiles.
-
Click the name of the profile to which you want to grant access to statuses.
-
Locate Enabled Service Presence Status Access towards the bottom of the page.
-
Click Edit.
-
In the Available Service Presence Statuses field, select the status you want to add to the profile's access.
-
Click Add > Save.
Map Omni-Channel Statuses
You can set up to 12 custom presence statuses that indicate an agent's availability and prevent the routing of work to an unavailable agent. You can designate either NICE CXone or Salesforce Omni-Channel as the master for availability settings. The master defines the state of availability when an agent’s state changes. The inContact Status options are configured using unavailable codes. The Salesforce OmniChannnel Status options are configured using presence configurations.
Map Omni-Channel Statuses with inContact as Master
-
Navigate to Salesforce Agent Settings.
- If you are using the Lightning Experience view, click App Launcher (indicated by a dot grid) and search for Salesforce Agent Settings.
- If you are using the Classic Experience view, click All Tabs (indicated by a gray plus sign).
-
Click Salesforce Agent Settings.
-
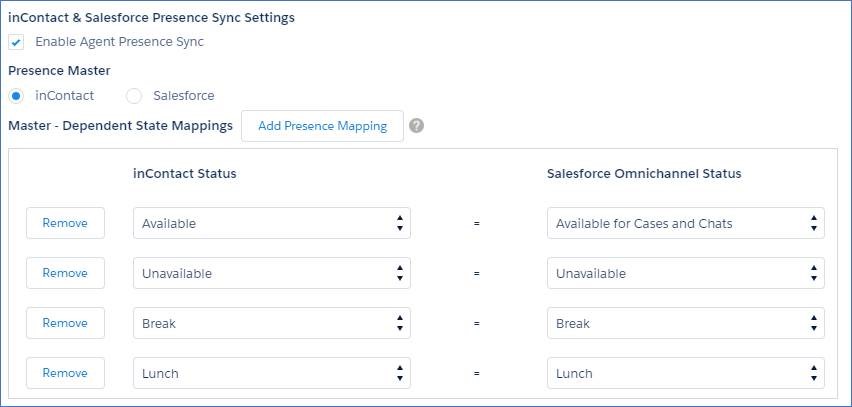
If it isn't already selected, select Enable Agent Presence Sync.
-
Select inContact as your Presence Master.
-
Click Add Presence Mapping to add a new mapping.
-
Click the drop-down menus to map an inContact Status to a Salesforce Omnichannel Status.
To configure the Salesforce Omnichannel status to sync with theAgent for Salesforce status, you must map the default unavailable code to a presence status in omnichannel. If the unavailable code is not mapped, the presence statuses will not sync.
- Click Save.
Map Omni-Channel Statuses with Salesforce as Master
-
Navigate to Salesforce Agent Settings.
- If you are using the Lightning Experience view, click App Launcher (indicated by a dot grid) and search for Salesforce Agent Settings.
- If you are using the Classic Experience view, click All Tabs (indicated by a gray plus sign).
-
Click Salesforce Agent Settings.
-
If it isn't already selected, select Enable Agent Presence Sync.
-
Select Salesforce as your Presence Master.
-
Click Add Presence Mapping to add a new mapping.
-
Click the drop-downs to map a Salesforce Omnichannel Status to an inContact Status.
-
Click Save.