

Agent for Salesforce supports the current version and the two previous versions of the agent.
Installing Agent for Salesforce requires several steps. After you complete the required steps, many optional configuration tasks are available. When you configure Agent for Salesforce, do not change the call center profile unless you have NICE WFO enabled.
Complete each of these tasks in the order given.
Install the Agent for Salesforce Package
Before you begin, Agent for Salesforce is supported by the following Salesforce editions:
- Professional
- Enterprise
- Unlimited
- Developer
- Performance
-
Confirm that you do not have a namespace defined in your Salesforce org. You typically define a namespace when you use a developer org to create a managed package for distribution. The Agent for Salesforce has its own namespace and will not run in an org that has already defined one. If you have one already defined, refer to Salesforce help.
-
Ensure you are installing and using Agent for Salesforce on a supported platform and in a supported browser.
-
If you already have a contact center definition named NICE CXone Contact Center, rename it before you install the application, because the installation will fail as it tries to create a new contact center definition.
-
Log in to the Salesforce org where you want to install the Agent for Salesforce.
-
Navigate to http://appexchange.salesforce.com and search for NICE CXone, or browse to http://appexchange.salesforce.com/results?keywords=cxone.
-
Hover over Best-in-Class Omni Channel CTI / IVR / ACD / Dialer / Contact Center and click More.
-
Click Get It Now.
-
Click Install in production. If prompted, log in first by clicking Log in to the AppExchange.
- Agree to the terms and conditions, and then click Confirm and Install.
- If prompted, select a user name and log in.
-
Choose whether to install for Admins Only, All Users, or Specific Profiles and click Install. If you choose Install for Specific Profiles..., you have the option to choose which profiles have access to the package. You can set a global policy by using the Set access level for all profiles to setting, and then modify profiles from there.
-
Grant access to api.incontact.com and click Continue.
- When the installation has completed, click Done.
Following this installation process installs the classic version of Agent for Salesforce.
Assign Users to Your License
Agent for Salesforce is a license-managed application. When you install a trial of the application, you have 25 licenses that expire after 30 days. You will need to talk to your NICE CXone account manager to create a work order to update to an active license with your desired number of seats based on your contract. If you are installing Agent for Salesforce into a sandbox![]() A copy of a production environment used for testing agent applications, no licenses are needed.
A copy of a production environment used for testing agent applications, no licenses are needed.
Once you install the application, you must assign users to a license or the application will not load when your users log in to Salesforce.

-
Click Setup in the upper right corner.
-
Use the Search box to search for Installed Packages, and then click the Installed Packages link.
-
Find the NICE inContact CXone Agent for Salesforce package and click Manage Licenses. If you are assigning users in the Salesforce sandbox, Manage Licenses will not exist and you can skip this step.
-
Click Add Users.
-
Search for and add users to your license.
Enable Agent for Salesforce in Lightning Experience
You must add Agent for Salesforce to the utility bar for each Lightning Experience app you want your agents to be able to view the Salesforce Agent in.
-
Click Setup (indicated by a gear in the top right corner).
-
Use the Search box to search for App Manager , then click the App Manager link.
-
Find the app in which you want to enable Agent for Salesforce. In the App Type column, verify that the app uses the lightning experience.
- Click Edit > Utility Items > Add Utility Item.
- Use the Search box to search for Open CTI Softphone, then click Open CTI Softphone.
- Click Save.
Set Permissions for Your Users
Configure Permission Sets For a Single User
-
Click Setup in your account menu located in the top right corner.
-
Use the Search box to search for Users, then click the Users link.
-
Find and click the non-administrator user you want to modify.
-
In the Permission Set Assignments section, click Edit Assignments.
- Select inContact Agent Permissions from the list of Available Permission Sets.
- Click Add.
- Click Save. The inContact Agent Permissions set will appear under the Permission Set Assignments section of the User Details page.
Configure Permission Sets For Multiple Users
-
Click Setup in your account menu located in the top right corner.
-
Use the Search box to search for Permission Sets, then click the Permission Sets link.
-
Find and click on the inContact Agent Permission you want to modify.
-
Click Manage Assignments and select the users you want assigned to the permission.
- Click Save. The inContact Agent Permissions set will appear under the Permission Set Assignments section of each agent's User Details page.
Assign Visibility Rights
-
Click Setup in your account menu located in the top right corner.
- Use the Search box to search for Profiles, and then click the Profiles link.
- Click on the Profile associated with the user you want to modify.
- In Find Settings, enter Agent Configuration Fields.
- Select Agent Configuration Fields.
- Locate the FieldType row and select Read Access to enable visibility.
- Click Save.
Configure Global Permissions
- Click Setup in your account menu located in the top right corner.
-
Use the Search box to search for User Interface, and then click the User Interface link that is a child of Customize.
-
Select the checkbox for Show Custom Sidebar Components on All Pages and click Save.
Assign Users to the Call Center Configuration
After modifying the call center definition, you must assign users to the call center. You can do so by modifying the call center or individual users. To do this, you'll need to know your call center profile:
|
Call Center Option |
Should I choose it? |
|---|---|
| NICE-inContact CXone - AU1 | Select if you are a CXone User Hub WEM customer in the Australia region. |
| NICE-inContact CXone - EU1 | Select if you are a CXone User Hub WEM customer in Europe, the Middle East, or Africa regions. |
|
NICE-inContact CXone - Central FedRAMP |
Select if you are a FedRAMP customer. |
| NICE-inContact CXone - NA1 |
Select if you are a CXone User Hub WEM customer located in North America. |
| NICE-inContact CXone - Central |
Select if you are a Central CXone customer and do not use CXone User Hub WEM. |
| NICE-inContact CXone | Select if you are a Central CXone customer and use CXone User Hub WEM v10.x or earlier. |
Modify the Call Center

-
Click Setup in the upper right corner.
-
Use the Search box to search for CallCenters, then click Call Centers.
-
If the Say Hello to Salesforce Call Center screen appears, click Continue.
-
Select your call center profile. Click the call center to modify it, do not click the Edit link.
-
Click Manage Call Center Users.
-
Search for and add users to the call center.
Modify Individual Users
-
Click Setup in the upper right corner.
-
Use the Search box to search for Manage Users, and then click Users.
-
Find the user you want to add to the call center and click the Edit link. Do not click the name.
-
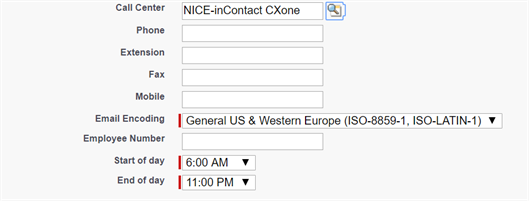
Enter the call center name in the Call Center field, or use the search button to search for configured call centers.
- Click Save.
Configure Softphone Layout
The softphone![]() A software program for making telephone calls over the Internet using a computer instead of a telephone. layout controls which action Agent for Salesforce takes when the console performs a query. You can perform default and custom queries. You can find more information about both types of queries in the Salesforce integration guides located in the Salesforce help site.
When you perform a default query, Salesforce searches the phone fields of selected object types for the caller's ANI
A software program for making telephone calls over the Internet using a computer instead of a telephone. layout controls which action Agent for Salesforce takes when the console performs a query. You can perform default and custom queries. You can find more information about both types of queries in the Salesforce integration guides located in the Salesforce help site.
When you perform a default query, Salesforce searches the phone fields of selected object types for the caller's ANI![]() Also known as caller ID. Listed phone number of an incoming voice call.. When you perform a default query, Salesforce searches the Phone fields of selected object types for the caller's ANI. After, it opens the object with matching numbers.
Also known as caller ID. Listed phone number of an incoming voice call.. When you perform a default query, Salesforce searches the Phone fields of selected object types for the caller's ANI. After, it opens the object with matching numbers.
-
Click Setup in the upper right corner.
-
Use the Search box to search for Softphone Layouts, and then click Softphone Layouts.
-
If the Introducing Salesforce CRM Contact Center screen appears, click Continue.
-
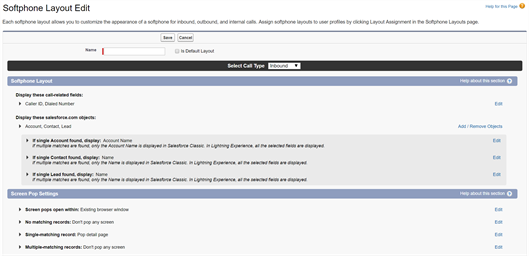
Click Edit next to an existing layout, or create a new one by clicking New.
Multiple softphone layouts are allowed. When you create or edit a layout, you can specify that layout to be the default used by profiles.
-
If you want to modify the list of objects to search, click Add / Remove Objects in the Softphone Layout section, under Display these salesforce.com objects.
-
If you want to edit the field list for an object type, click Edit in the Results panel of Agent for Salesforce. Be aware that you can select more than three fields, but the Results panel only displays the first three fields defined.
-
If you want to modify the browser that the screen pop opens within select Existing browser window or New browser window or tab.
-
If you want to specify the action Agent for Salesforce takes when you perform a default or custom query, modify the CTI 2.0 or Higher Settings.
 Click to see Agent for Salesforce actions based on search results.
Field
Details
Result: No matching records Action: Don’t pop any screen
Action: Open a “create new [object]” page – [object] is configurable
Action: Open a custom VisualForce page*
Action: Pop to flow - Salesforce flow is configurable
Result: Single match found
Action: Don’t pop any screen
Action: Open the “details” page of the object that was found
Action: Open a custom VisualForce page*
Action: Pop to flow - Salesforce flow is configurable
Result: Multiple matches found Action: Don’t pop any screen
Action: Open an advanced query results page containing the objects that were found
Action: Open a custom VisualForce page*
Action: Pop to flow - Salesforce flow is configurable
The screen pop opens the object type that was requested. No additional information is included from the ACD. If you would like to map data to the screen pop when it opens, such as ACD data or script variables, this requires custom scripting. If necessary, reach out to your CXone Account Representative for scripting assistance.
Assign Profiles to the Softphone Layout
-
Use the Search box to search for SoftPhone Layouts, and then click SoftPhone Layouts.
-
If the Say Hello to Salesforce Call Center screen appears, click Continue.
-
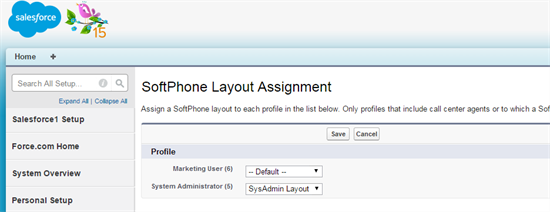
Click SoftPhone Layout Assignment.
-
Assign the appropriate softphone layout for each profile. Profiles assigned to -- Default -- use the layout you specified as the default when you configured the softphone layout. When done assigning layouts to profiles, click Save.
The only profiles that display here are ones assigned to users with an assigned contact center definition. Profiles that are not assigned to users, or are not assigned to users with an assigned contact center definition, are not displayed.
Upgrade Agent for Salesforce
To upgrade Agent for Salesforce, follow the installation steps given above. Make sure to verify that the license and assign users are correct.
Upgrading does not interrupt any contacts in progress. Agents will see the new version when they refresh or navigate away from their current page.
- Log in to the Salesforce org where you want to upgrade the Agent for Salesforce.
- Select AppExchange from the application drop-down.
- In the search bar, enter Agent for Salesforce.
- Select Best-in-Class Omni Channel CTI / IVR / ACD / Dialer / Contact Center.
- Click Get It Now.
- Select either Install in Production to install where your agents work or Install in Sandbox to install in a copy of a production org. If prompted, log in first by clicking Log in to the AppExchange.
- Agree to the terms and conditions, and then click Confirm and Install.
- If prompted, select a Username and log in.
-
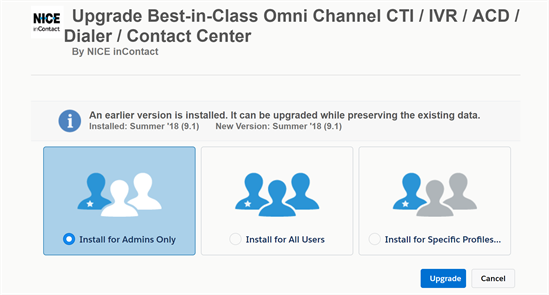
Choose whether to install for Admins Only, All Users, or Specific Profiles and click Install. If you choose Install for Specific Profiles..., you have the option to choose which profiles have access to the package. You can set a global policy by using the Set access level for all profiles to setting, and then modify profiles from there.
Selecting All Users does not interrupt call center assignments, profiles, or data mapping.
- Click Install.
-
Click Done.
- In the agent application, select Information.
- Verify the version.
Configure Remote Site Settings
If you have multiple business units on different clusters using the same Salesforce instance, these steps will need to be done for each cluster.
- Click Setup in your account menu located in the top right corner.
-
Use the Search box to search for Remote Site Settings.
-
-
Add the cluster number to the end of the Remote Site Name. For example, inContact_API_B2.
-
Add the cluster number after the API in the Remote site URL. For example, https://api-b2.incontact.com.
-
Click Save.