

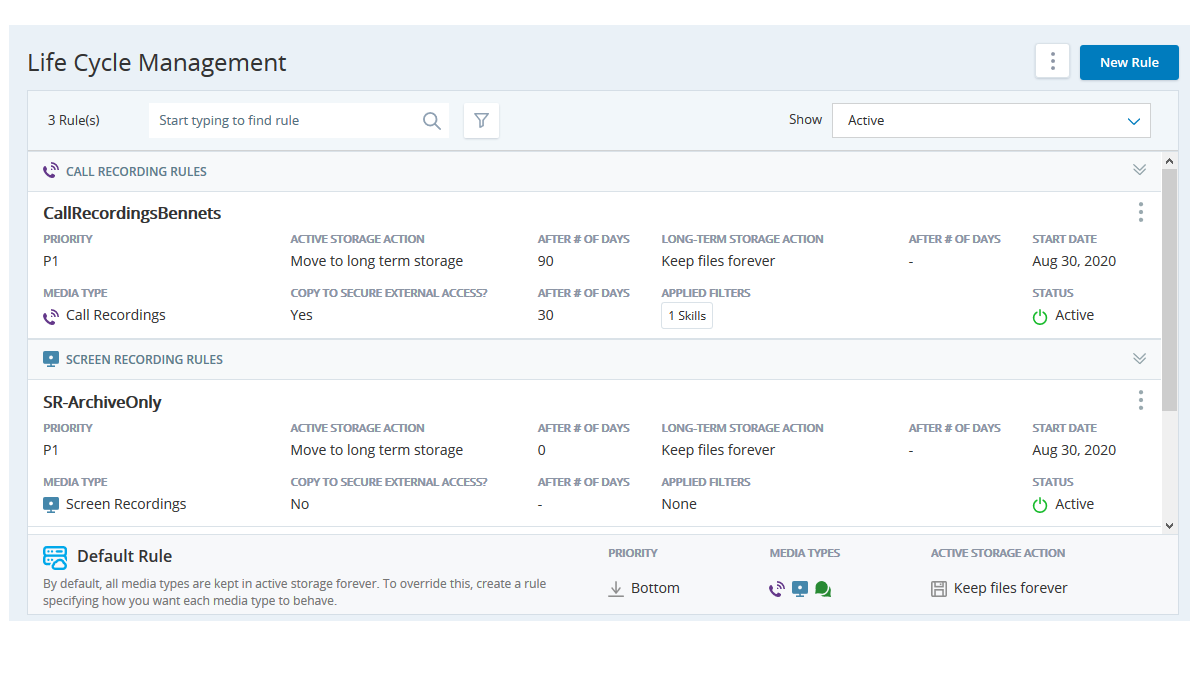
Life Cycle Management rules let you specify how long recordings remain in active storage, whether they have to be moved or copied to Long-term storage, and how long they remain in Long-term storage. If you use secure external access (SEA), you must configure any move or copy action to occur while the recording is still in active storage. For example, if you configure recordings to be kept in active storage for 30 days, you can't move or copy them to SEA on day 31.
![]() Used to automate delivery of interactions based on agent skills, abilities, and knowledge, teams, agents, and DNIS
Used to automate delivery of interactions based on agent skills, abilities, and knowledge, teams, agents, and DNIS![]() Identifies the number the contact dialed to reach you for inbound voice calls and the number the agent or system dialed on outbound voice calls. . For example, you can create a rule for call recordings for a particular team or a set of teams to be retained for a specific number of days and instantly delete call recordings for other teams. There is a default rule that manages all files that don't match any of your custom rules.
Identifies the number the contact dialed to reach you for inbound voice calls and the number the agent or system dialed on outbound voice calls. . For example, you can create a rule for call recordings for a particular team or a set of teams to be retained for a specific number of days and instantly delete call recordings for other teams. There is a default rule that manages all files that don't match any of your custom rules.
As per your license, the media types appear on the following screens: Create Life Cycle Management Rule, Long Term File Retrieval, and File Activity. If your license does not include any media types, CXone displays an error message that there are no media files on the cloud. If you have files on Cloud Storage for which you earlier had the license but currently do not have it, the file types still appear on the Long Term Retrieval page. If you created a life cycle rule based on such a file type, the life cycle rule still processes the files, but such rules are not editable.
If you have files on Cloud Storage for which you earlier had the license but currently do not have it, the files types will still appear on Long Term Retrieval. If Lifecycle rule was created based on such a file type, the lifecycle rule will still process the files but you will not be able to edit such a rule.
If you change After # of Days of a rule, the change is applied retroactively as long as the media file is still active storage. For example, if you configured recordings to archive after 60 days, and later change that to 30 days, CXone will archive all call recordings older than 30 days, including the call recordings that were created before the rule was changed. However, if you configured recordings to archive after 30 days, and later change that to 60 days, CXone will not apply this change to call recordings that are already in long-term storage.
Create Rules
- Click the app selector
 and select Admin.
 - Click Cloud Storage > Life Cycle Management.
- Click New Rule.
-
In Rule Details, specify a Rule Name and other details.
 Learn more about fields in this step
Field
Details
Name Enter a unique name for the rule that distinguishes itself from other rules. The name should help you easily recognize what the rule is created for and what it applies to. Examples: “Compliance regulation - 7 years” and “Team A, B, and C calls.” Start Date
Select the date on which the rule becomes active. This can be the current date or a future date.
Description Describe the rule, so that you or someone else could understand the context and the conditions in the rule. Media Type Select the type of media you will be storing based on the rule. The media types appear as per your license:
-
Call Recordings
-
Chat Transcripts
-
Digital
-
Email
-
Screen Recordings
Rule Priority Select a priority level for the rule. P1 is the highest priority. If multiple rules apply to the same files, the files are tagged with the rule with highest priority.
While creating a rule, you can assign it the lowest or any existing priority. When you select an existing priority, the existing rule with that priority and the ones with lower priority get reduced in priority by one level each. -
-
In Active Storage Requirements, select an Action Type from the drop-down. The default value is Keep. Set a value for After # of Days if it's available. If you want to copy the files to SEA in addition to the action you chose, select Move to Secure External Access and set a value for After # of Days.
Don't move chat transcripts to Archive. Archived chat transcripts currently lack the metadata required for retrieval.
Learn more about fields in this step
Field
Details
Keep Files Forever Stores the files in active storage indefinitely. When you select this option, the After (# of Days) field becomes view-only. Delete Deletes the files from active storage after the number of days you specify in After (# of Days). Move To Long Term Storage Moves the files to long term storage after the number of days you specify in After (# of Days). Move to Secure External Access Moves the files to SEA after the number of days you specify in After (# of Days). This action does not leave a copy in cloud storage and it disables the Copy to Secure External Access option. The files are automatically deleted from SEA after 30 days if you have not already moved them or deleted them manually. This copy is in addition to the actions you just configured. This option is disabled if you chose Move to Secure External Access as the action. After # of Days The number of days after the creation of the file that the selected action will occur. The minimum number of days for any action is 0 and the maximum number is 9999. Files are eligible for the action on the same day the value is reached, and are processed in batches at regular intervals. The system counts day one as the day the recording file was created. Therefore, a value of 0 will cause the action to be applied to the file on the same day it was created. This field becomes disabled when you select the Keep action. It may take few hours or up to 24 hours for file action to take place on the day the action is supposed to happen. The time taken to completion is determined by various factors including the number of files in the backlog and files created per day.
- Optionally, in Add Filter:
- Select up to 10 skills for which you want the rule to apply.
- Select either Teams or Agents and then select up to 10 teams or agents for which you want the rule to apply.
Type in DNIS numbers to which you want the rule to apply. Use commas to separate multiple DNIS numbers. DNIS number field is available only for Call Recording and Screen Recording media types.
The rule applies to the files that meet all the selected filter conditions. If you select skills as well as teams as filter conditions, the rule applies to the files for which the selected skills as well as the teams match.
- Click Create.
Deactivate a Rule
You can view and manage rules on the Life Cycle Management page. The Life Cycle Management page displays a list of the existing rules grouped as per the media type. The media types appear as per your license.
- Click the app selector and select Admin.
- Click Cloud Storage > Life Cycle Management.
-
Click the filter icon and use the following filters to display the relevant rules:
- Media Type
- Active Storage Action
- Long Term Storage Action
- Copy to SEA?
-
Click the three vertical dots relevant to a rule and select Deactivate.
- Click Done.
The files that are tagged with a rule are still processed with the rule. Even after deactivating the rule, the files that are already tagged with the rule continue to respect the rule. Files created after deactivation of the rule are not tagged with the rule. Deactivated rules cannot be reactivated.
Edit Rules
You can view and edit rules on the Life Cycle Management page. The Life Cycle Management page displays a list of the existing rules grouped as per the media type.
Once you edit a rule, the edited rule applies to the files created after the rule is edited. Once you use the retagging option, all the files in the default rule are eligible for any active rule for that time.
- Click the app selector and select Admin .
- Click Cloud Storage > Life Cycle Management.
-
Locate the rule you want to edit and click it.
- Optionally, you can view the change history of the rule.
-
Make the required changes in the rule.
Learn more about fields in this step
Field
Details
Name Enter a name for the rule. Start Date
Select the date on which the rule becomes active. This can be the current date or a future date.
Description Describe the rule, so that you or someone else could understand the context and the conditions in the rule. Rule Priority Select a priority level for the rule. P1 is the highest priority. If multiple rules apply to the same files, the files are tagged with the rule with highest priority.
While creating a rule, you can assign it the lowest or any existing priority. When you select an existing priority, the existing rule with that priority and the ones with lower priority get reduced in priority by one level each.Action Type * Select an Action Type from the drop-down. The default value is Keep. Set a value for After # of Days if it's available. If you want to copy the files to SEA in addition to the action you chose, select Move to Secure External Access and set a value for After # of Days.
After # of Days (Active storage) The number of days after the creation of the file that the selected action will occur. The minimum number of days for any action is 0 and the maximum number is 9999. Files are eligible for the action on the same day the value is reached, and are processed in batches at regular intervals. The system counts day one as the day the recording file was created. Therefore, a value of 0 will cause the action to be applied to the file on the same day it was created. This field becomes disabled when you select the Keep action.
After # of Days * (Long term storage) The number of days after the file is moved to long-term storage that the selected action will occur. The minimum number of days for any action is 0, and entering this value causes the associated action to occur immediately. The maximum number is 9999 days. The system counts day one as the day the file is moved to long-term storage . This field becomes disabled when you select the Keep action. Filter By DNS Allows you to retrieve files based on a specific DNIS. Filter By Skill Allows you to retrieve files based on a specific skills. You can add up to 10 skills. Filter By Teams/Agents Allows you to retrieve files related to specific teams/agents. Select Teams or Agents. You can add up to 10 agents or teams. - Click Update.
View Change History
When you edit a rule, you can view the change history of the rule on the Change History tab. Because the history table can become so large, you can use search and filter tools to limit the table's contents based on certain text or based on a specific period.
Default Rule, Rule Editing, and Rule Retagging
Cloud Storage Services has a default rule that applies to all files of any media type when they don't match any other rule. The default rule has no actions associated with it, so files that are managed by the default rule are not deleted or archived. They remain in active storage indefinitely.
You cannot modify the default rule, but you can change what happens to files currently managed by the default rule using the retagging feature. You can create new custom rules or modify existing rules to specify Life Cycle Management for the files that are currently managed by the default rule. When the rules are in place, you can have Cloud Storage Services reprocess the files currently managed by the default rule. Any files that now match a rule are retagged to follow that rule.
Retagging only works for files currently managed by the default rule. You can modify custom rules, but not all fields can be changed.
Retag Files
- Click the app selector and select Admin.
- Click Cloud Storage > Life Cycle Management.
- Click the three vertical dots at the upper-right corner of the screen and select Process Default System Rules Files.
-
In the pop-up message, select I Understand The Above Information and click Confirm.
Retagging begins for files that were tagged by the default system rule. Files already tagged by user-defined rules are not retagged. You can view the progress in the File Activity tab.