

Prior to setting up proactive SMS, your
Create/Edit an SMS Message Template
-
Click the app selector
 and select ACD.
 -
Go to Outbound > Message Templates.
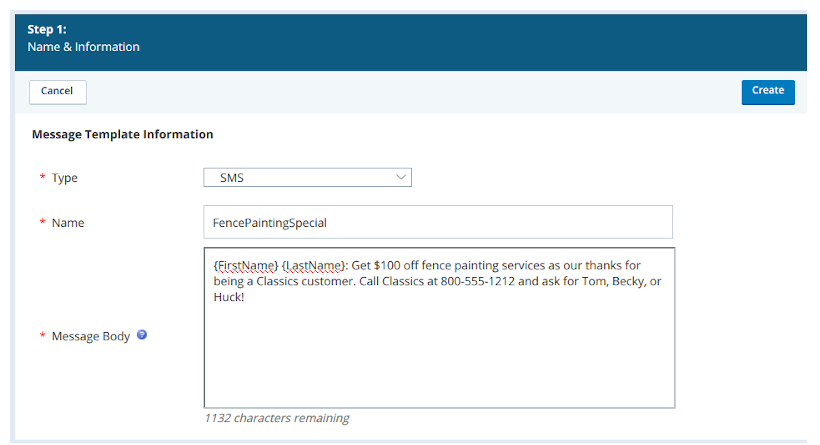
- Click Create New.
- Set the Type to SMS and enter a Name.
- Enter the message you want to send to your contacts in the Message Body field. To add variables to the message body, type the exact named of a mapped field in the calling list and enclose it in curly brackets. For example, {FirstName} would inject the contact's first name into the text message.
- Click Create.
Create a Campaign
If you haven't already done so, create a campaign.
- Click the app selector and select ACD.
- Go to Contact Settings > Campaigns.
- Click Create New.
- Enter a value in the Campaign Name field.
- Click Create Campaign.
Create a Proactive SMS Skill
|
Field |
Details |
|---|---|
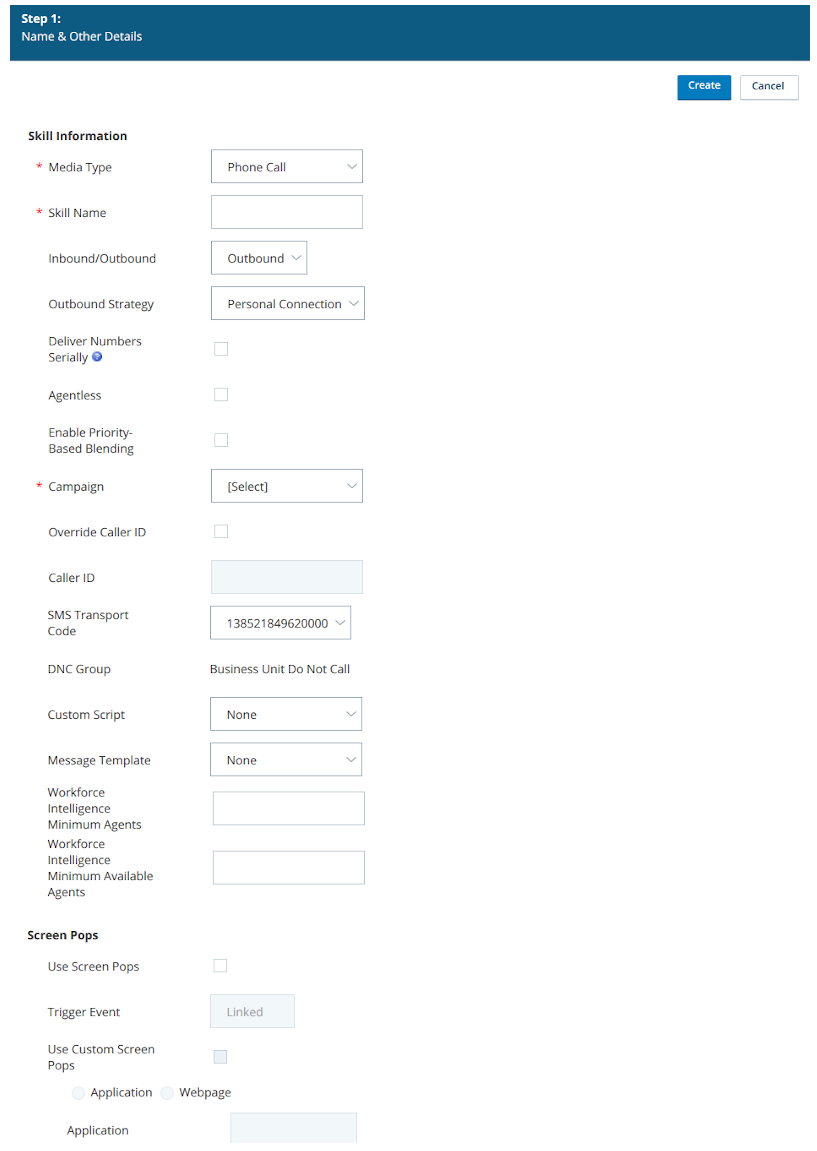
| Media Type | Provides a drop-down of channel types that are enabled for your system. Proactive SMS uses the Phone Call value. |
| Deliver Numbers Serially |
When you select this option, Personal Connection attempts all destinations associated with a record in the order specified in the skill cadence. This doesn't typically apply to Proactive SMS, but you could use it if Proactive SMS is only part of the contact strategy. You might also use it if contacts on your calling list have multiple cell phone numbers and you want to deliver text messages to them in a specific order. When you select Deliver Numbers Serially, you have the ability to enable either or both of two sub-options. Neither apply to Proactive SMS, so you should leave them cleared. When you select this option, the Agentless field is disabled. |
|
Agentless |
Indicates the sole purpose of the skill is to send a text message to each record. If you don't select Agentless, you can still set up the cadence of the skill to include SMS along with Personal Connection phone calls to the records configured with both voice and SMS destinations. PC sends these text messages without involving an agent but it requires that an agent be logged in for the message to be sent. |
| Override Caller ID | Enables you to control the caller ID number contacts see when they receive a Proactive SMS message. By default, the caller ID shows as the default value set for your |
| Caller ID | Allows you to enter the phone number that will show as the caller ID for this skill. |
| Custom Script | From the drop-down of available scripts, select the script that governs agentless delivery of SMS messages. |
| Workforce Intelligence Minimum Agents | This setting is not used with Proactive SMS. |
| Workforce Intelligence Minimum Available Agents | This setting is not used with Proactive SMS. |
| Screen Pops Section | These settings are not used with Proactive SMS. |
-
Click the app selector
and select ACD. -
Go to Contact Settings > ACD Skills.
-
Click Create New > Single Skill.
- Set the Media Type to Phone Call.
- Enter a Skill Name.
- Set Inbound/Outbound to Outbound and set the Outbound Strategy to Personal Connection.
- Select a Campaign from the drop-down of campaigns in your system.
- Select a Message Template from the drop-down of templates in your system.
- Select the SMS Transport Code you want to apply to this skill.
-
If you want to use this skill only for SMS campaigns that have no agent involvement, select Agentless.
- Click Create.
Create Custom Data Definitions
Custom data definitions are custom fields you create to map to your calling lists. Because they can be used for a wide variety of purposes, they're covered in another topic.
To use Proactive SMS, you must define a specific field in your calling lists (and a corresponding data definition) for the phone number used for SMS messages (referred to as the SMS Phone field). This section provides those specific instructions. You may also need to create custom fields for certain parameters of the SMS Phone field, like CallerID, Attempts, or others. Instructions for those fields can be found in the separate topic mentioned previously. However, this section does provide examples of how those fields can be used with an SMS Phone field.
If you want your Proactive SMS messages to use custom values for Caller ID, Attempts, or other fields, create those fields before you perform this task.
|
Field |
Details |
|---|---|
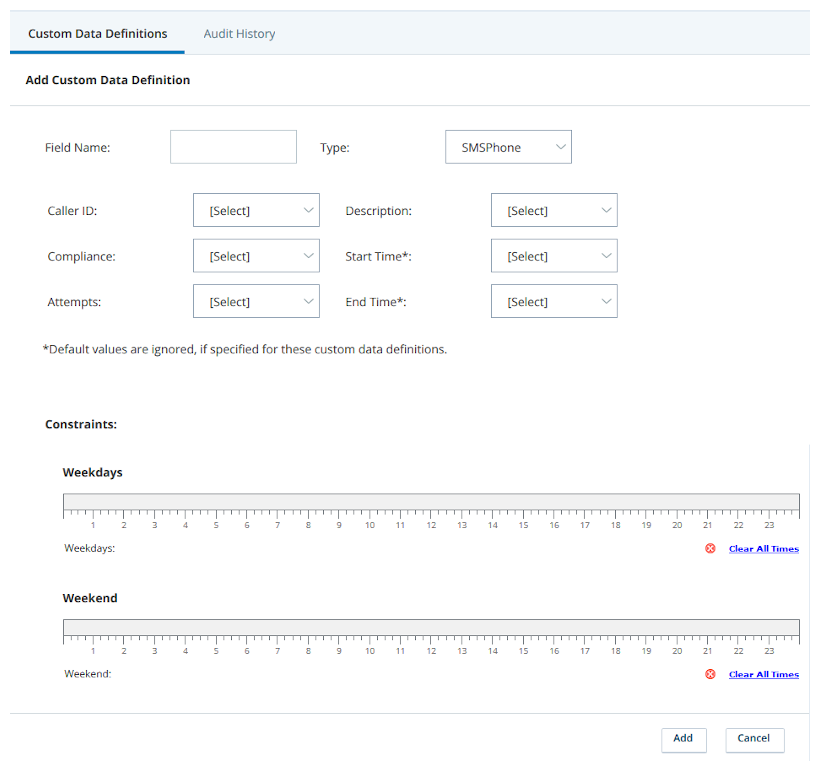
| Field Name | If you plan to make the field visible to agents, create a name that's easy to read. If you plan to use the field as a script variable, the Field Name value cannot contain spaces. However, you can use underscores to improve readability. If you want the field to be both a script variable and visible to agents, you can create two mappings to the same field. You cannot use any name that is already used as a system field name. |
| CallerID |
Allows you to specify another custom field as the caller ID for Proactive SMS messages. For example, Tom Sawyer's team at Classics wants the Caller ID to show as their direct department line, not the main Classics number. Tom creates a custom field with that phone number as a value. Then he associates that field with the SMS Phone number field. |
|
Description |
Allows you to specify the custom field you have mapped to a calling list column with a text description of the phone number field. For example, Tom Sawyer's team typically uses a list that has numbers for both the customer and the customer's spouse. This field is labeled "Owner" in the calling list. Tom creates a custom description field and links it to the "Owner" field in the calling list. Then he associates that field with the SMS Phone number field to show who the number belongs to. |
| Compliance | Allows you to either require compliance for every number in a Proactive SMS campaign, or to specify a custom Compliance field. For example, only a few of the numbers on Tom Sawyer's customer list require compliance. Rather than require compliance on all numbers, Tom creates a custom field and links it to the field in his calling list that shows a value of Yes for numbers requiring compliance. Tom then associates his custom field with the SMS Phone number field to identify those numbers for agents and for scripting. |
| Attempts | Allows you to specify the custom field you have mapped to a calling list column that contains the maximum number of times Proactive SMS should attempt to deliver the message to this SMS Phone number. Because text messages are delivered on the first attempt, Tom sets the default value in his custom attempts field to 1. |
| Start Time | Allows you to specify a custom field for a start time in the allowable contact time range for the SMS phone number. Tom knows that his campaign will be scheduled for 9:00 AM local time on a Thursday, but some of his customers have asked that they not be contacted before specific later times. Tom creates a custom field and links it the calling list field that contains the individual start time values. Then he associates this custom field with the SMS Phone number. |
| End Time | Allows you to specify a custom field for an end time in the allowable contact time range for the phone number. Some of Tom's customers have also asked not to be contacted after a specific earlier time, so Tom sets up this field in a similar way to the Start Time field. |
| Constraints |
Allows you to set a default allowable time range for sending Proactive SMS messages. You can create one or more different ranges for weekdays and weekends. If you set ranges here, Proactive SMS disregards any default values in the Start Time and End Time field. Tom uses this feature to set a different weekend time range for the SMS Phone number. Using Start Time, End Time, Constraints, or a combination of these, you can set allowable time ranges for an individual number (or destination). You can also set these ranges at the skill or record level. |
-
Click the app selector
and select ACD. -
Go to Lists > Custom Data Definitions.
- Enter a Field Name.
- Set the Type to SMSPhone.
- Configure the other fields with the custom fields you previously created.
- If you want to, configure Constraints by clicking the timeline at the point your calling hours should begin and dragging to the point where the range should end.
- Click Save.
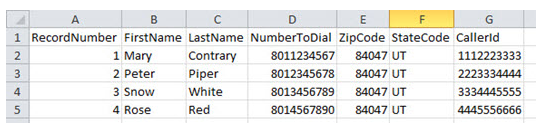
Create and Upload a Calling List
Calling lists provide the contact names and numbers for your Proactive SMS campaign. Because they can be used in multiple areas of your contact center, they're covered in their own section. Calling lists used for Proactive SMS must have a column for SMS phone numbers to be mapped to the SMSPhone custom data field you created in the previous task. If you've already uploaded one or more calling lists that meet this requirement, you can skip this task.
- Open Microsoft Excel or a text editor like Notepad.
- If you want to, use the first row to label your columns. If you're using a text editor, decide whether to separate the values with commas or tabs.
-
Create the columns and enter the data in them for your list. You must have at least a unique identifier column and an SMS phone number column. If you include a zip code, city, and state on the primary record, Personal Connection can do a better job of matching time zones for you.
- Save the file in one of the approved formats shown in the following images.
File format: XL or XLS.
File format: comma-delimited TXT or CSV
File format: tab-delimited TXT or CSV
-
Click the app selector
and select ACD. -
Go to Lists > Calling.
-
Click Select File.
-
Read the compliance agreement and click Accept to continue.
-
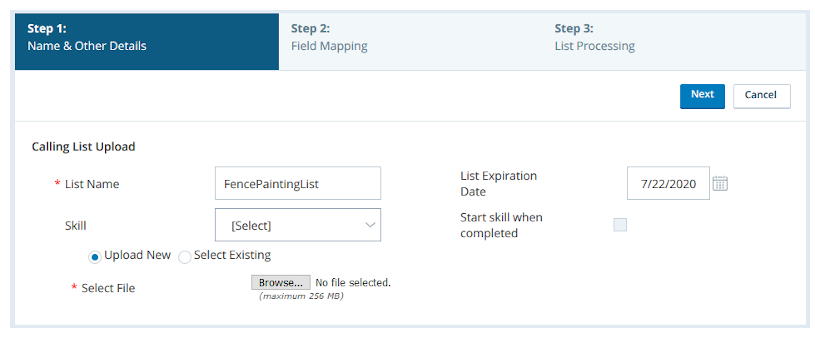
Configure the fields in the Details section (some of the fields are read-only).
 Learn more about fields in this task
Field
Details
Skill If you want to assign the calling list to a specific Used to automate delivery of interactions based on agent skills, abilities, and knowledge, select one from the Skill drop-down. You cannot upload the list to a Proactive SMS skill if there is no message template assigned to the skill.Start skill when completed When selected, causes the Proactive SMS campaign to start as soon as the list is uploaded.
-
Select the Upload New radio button if you want to select a new list from your computer, or Select Existing if you want to modify a list you already uploaded.
-
If you selected Upload New, click Choose File.
-
Browse to and select the calling list. Click Next.
-
Review the automatic mapping done by PC, map any unmapped fields, and configure time zone handling and an expiration date..
Learn more about fields in this task
Field
Details
No time zone found? If your list has no time zone field and PC is unable to determine a time zone based on other information in the record, you can tell PC to reject the record, or you can select a time zone for PC to apply to the record from the drop-down of supported time zones.
If you didn't include time zones in your calling list, PC determines the time zone first by zip code. If the record has no zip code, PC looks for a city and state. If those don't appear in the record, PC checks the area code of the primary phone number.
If you live outside of North America, or if you don't think the automatic time zone mapping will work, you should include a supported time zone for each record on your list.
Batch expiration date Once the contact expires, PC no longer attempts to reach that contact. You can specify expiration dates for the individual records in the calling list by including an expiration date column in the calling list itself and then mapping the column to the Expiration Date field.
-
When the file uploads, PC displays the progress and the number of records that loaded successfully and unsuccessfully. If the calling list contains invalid records, use the following steps to fix the errors.
Click Download Link in the warning box that appears.
Open the file to view the problems with the upload. In this example, the record in row 6 doesn't have a phone number:
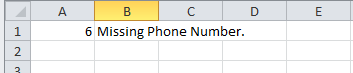
- Fix the problem in the calling list and save it.
- Upload the updated file.


Start the Proactive SMS Skill Manually
-
Click the app selector
and select ACD. -
Go to Contact Settings > ACD Skills.
-
Locate and click the
Used to automate delivery of interactions based on agent skills, abilities, and knowledge you want to start. -
Click Start. You can follow these same general steps to stop a skill that is running.