

A do not call (DNC) list is a list of contacts that your outbound ![]() Used to automate delivery of interactions based on agent skills, abilities, and knowledge is restricted from contacting, usually at the contact's request. This is a more permanent restriction than call suppression or calling list filtering, which are meant to be short-term. DNC lists belong to DNC groups. In a DNC group, you can specify which
Used to automate delivery of interactions based on agent skills, abilities, and knowledge is restricted from contacting, usually at the contact's request. This is a more permanent restriction than call suppression or calling list filtering, which are meant to be short-term. DNC lists belong to DNC groups. In a DNC group, you can specify which ![]() Skills listed under the Contributing tab of a DNC group help to generate the DNC list of that group. When the dialer places a call for that skill and the contact requests to be added to the DNC list, the record is added to that DNC group. Any skills in the Scrubbed tab of that DNC group cannot place calls to that record. to its DNC list and which are restricted by it—or scrub
Skills listed under the Contributing tab of a DNC group help to generate the DNC list of that group. When the dialer places a call for that skill and the contact requests to be added to the DNC list, the record is added to that DNC group. Any skills in the Scrubbed tab of that DNC group cannot place calls to that record. to its DNC list and which are restricted by it—or scrub![]() Skills listed under the Scrubbed tab of a DNC group honor the DNC list of that group. Before you or Personal Connection place a call for that skill, CXone checks that DNC group for conflicts and does not dial records that are on that list. against the DNC list. You can specify as many or as few
Skills listed under the Scrubbed tab of a DNC group honor the DNC list of that group. Before you or Personal Connection place a call for that skill, CXone checks that DNC group for conflicts and does not dial records that are on that list. against the DNC list. You can specify as many or as few
You're required by law to comply with federal, state, and industry DNC lists. You can't manually upload the entire national or state DNC lists to your environment due to the size of the files involved. Instead, you must scrub against these lists prior to uploading your calling lists or check at dial time through call suppression![]() Temporarily skips a contact when using the outbound dialer. using a third party service such as Gryphon. Gryphon offers several advantages, including continual updates against the latest national DNC list; consideration of state and federal limitations on calling including appropriate hours of operation; and indemnification against infringement losses.
Temporarily skips a contact when using the outbound dialer. using a third party service such as Gryphon. Gryphon offers several advantages, including continual updates against the latest national DNC list; consideration of state and federal limitations on calling including appropriate hours of operation; and indemnification against infringement losses.
DNC, call suppression, and calling list filtering are similar tools that should be used for different situations:
- Use DNC to permanently stop outbound
- Use call suppression to suppress calls to calling list entries based on unique criteria, but not specifically a phone number. Call suppression records include a start and end date for suppressing calls and is intended to restrict dialing for the duration or a campaign, or even longer. For example, if Big Bad Wolf, Inc. lost licensing for the state of New York, it could suppress calls to New York until it re-establishes its licensure. Big Bad Wolf, Inc. could disposition outbound calls missed due to the call suppression record with a new "NYLicenseLapse" disposition.
- Use calling list filtering to restrict contacting calling list entries within the scope of a campaign. For example, if Big Bad Wolf, Inc. wanted to hit a monthly quota early in a campaign, it could temporarily filter out low-probability prospects to focus on high-probability prospects. Big Bad Wolf, Inc. still intends to contact the low-probability prospects later. Calling list filtering is also useful for restricting dialing for severe weather impacts, such as tornadoes or hurricanes.
Complete each of these tasks in the order given.
Create DNC Groups
-
Click the app selector
 and select ACD.
 -
Go to Lists > DNC.
-
Click Create New.
-
Give the group a DNC Group Name and, if you want, a Description.
-
Click Save.
Add Skills to DNC Groups
-
Click the app selector
and select ACD. -
Go to Lists > DNC.
-
Click the DNC group you want to modify.
-
If you want to specify which
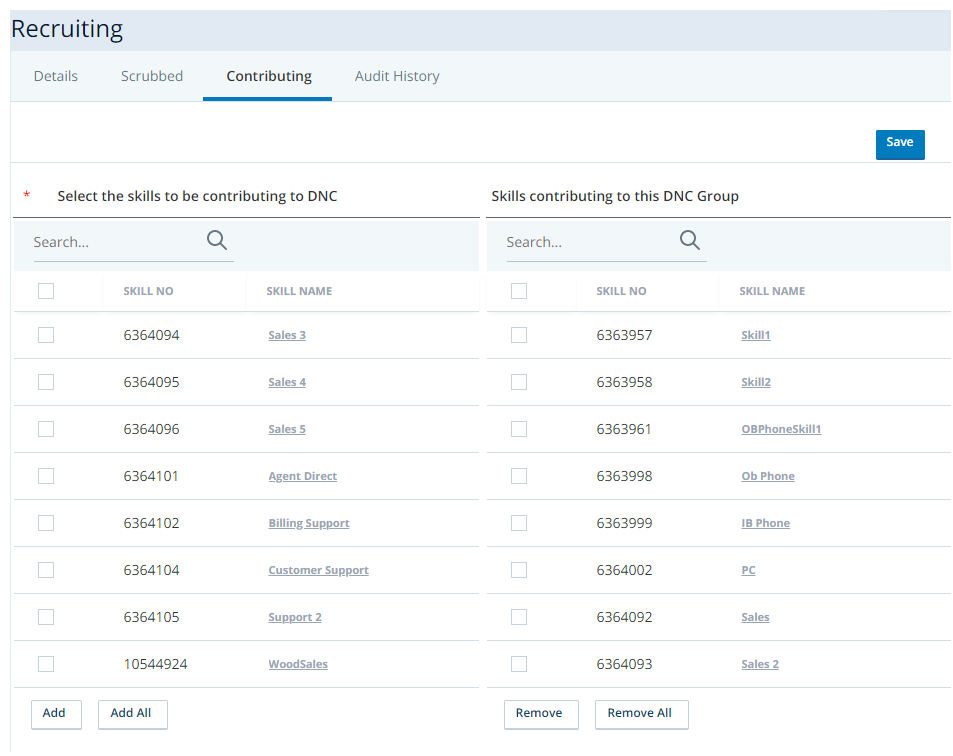
- Click Contributing.
- In the Select the skills to be contributing to DNC table, select the checkbox of the
- Click Add.
- Click Save.
-
If you want to specify which outbound
- Click Scrubbed.
- In the Select the skills to be added to DNC table, select the checkboxes of the
- Click Add.
- Click Save.
Create DNC Lists
You have two main options for creating DNC lists: agents generating the list through dispositions![]() Result that the agent or system assigns to the contact when the interaction ends. or you creating and uploading the list manually. A third possible option is to create custom scripting in Studio - contact your CXone Account Representative to employ the Expert Services team for assistance. The following two sections explain your main two options for creating DNC lists.
Result that the agent or system assigns to the contact when the interaction ends. or you creating and uploading the list manually. A third possible option is to create custom scripting in Studio - contact your CXone Account Representative to employ the Expert Services team for assistance. The following two sections explain your main two options for creating DNC lists.
Set Up List Generation with Dispositions
If you want to create your DNC list manually, you can skip this step.
You can configure dispositions to add contacts to your DNC list. When an agent dispositions a contact with the designated disposition, CXone automatically adds the contact to the correlating DNC list.
Create the Disposition
-
Click the app selector
and select ACD. -
Go to Contact Settings > Dispositions.
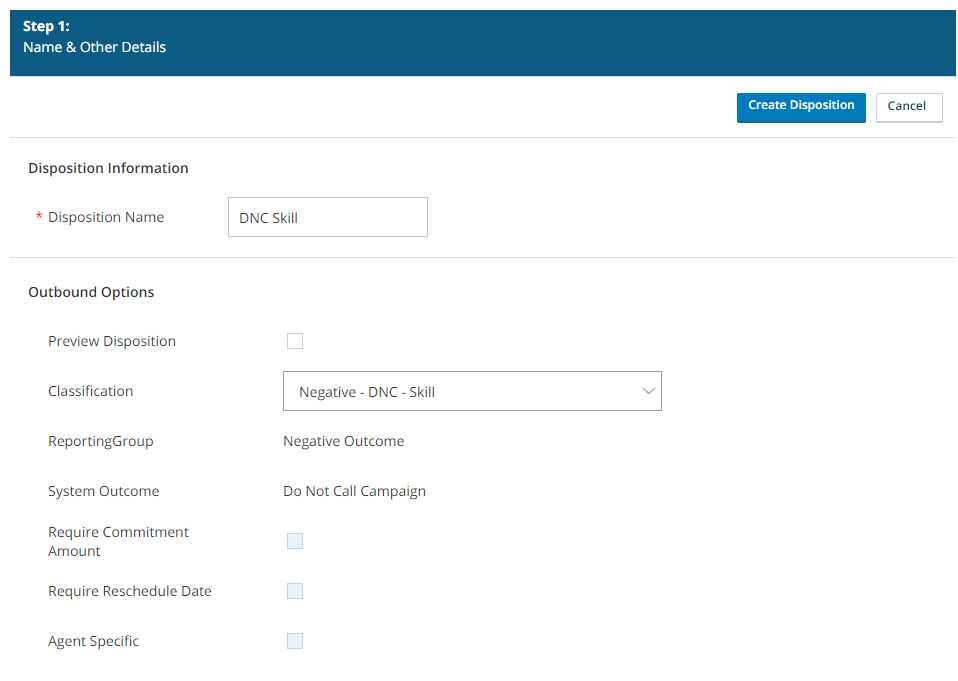
- Click Create New.
- Enter a descriptive Disposition Name.
- In the Classification field, select Negative - DNC - Skill or Negative - DNC - BU, depending on whether you want contacts marked with this disposition to be added to the
- Click Create Disposition.
- If you want to create another disposition for the other DNC Classification, click Create New and repeat the previous steps for the remaining DNC Classification.
-
 If you haven't already done so, create an unavailable code to be agents' state as they apply dispositions:
- Click the app selector and select ACD.
- Go to ACD Settings > Unavailable Codes.
- Click Create New.
- Enter the name of the code in the Unavailable Code Name field.
- Select Post Contact.
- If you want to change the default period of time (120 minutes) an agent can spend in an unavailable state before it automatically changes, enter the number of minutes in Agent Timeout (Min).
- Click Create Unavailable Code.
- Click the app selector
Apply the Disposition to the Necessary Skills
Repeat the following steps for each skill that you want to be able to use dispositions to create a DNC list.
-
Click the app selector
and select ACD. -
Go to Contact Settings > ACD Skills.
-
Click the
-
Click the Post Contact tab.
-
Set Post Contact Setup to Disposition.
-
Set the State to the unavailable state you want your agent to be in during the application of the disposition.
-
Set a Max Time Limit, which determines the number of seconds allotted to the agent before CXone automatically designates the contact as No Disposition. You must also select a Timeout State, which is the state that the agent automatically changes to if they do not select a disposition in the allotted time.
Alternatively, you can select Required to obligate the agent to disposition contacts handled through this skill.
-
In the Select Dispositions to Use with This Skill table, select your created disposition that adds contacts to the DNC list. Click Add.
-
Click Save.
Create DNC Lists Manually
You can skip this step if you set up user-generated dispositions to generate the DNC list.
The following file formats are accepted: CSV, tab-delimited TXT, XLS, or XLSX. You can also upload multiple DNC lists in a zipped (ZIP) file.
- Open a spreadsheet editor or a text editor.
- If you want to, use the first row to label your columns. If you're using a text editor, decide whether to separate the values with commas or tabs.
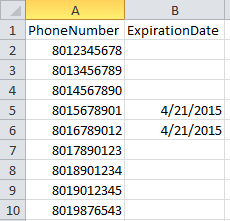
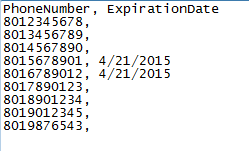
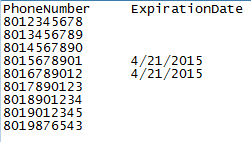
- Create a column to contain phone numbers. Other information is helpful but not required. For example, you may want to include a column for expiration date; that is, the date when Personal Connection (PC) automatically ignores the number's presence on the DNC list. The DNC list in this example contains a phone number and an expiration date.
When you add a phone number to a DNC list, CXone strips it of its formatting and stores the number in a universal format. This enables numbers to pass between do not call lists and calling lists without conflict.
- Save the file as TXT, CSV, XLS, or XLSX.
- If you want to upload many lists at the same time, repeat the preceding steps for each DNC list . Add all the files to a ZIP file.
Upload DNC Lists
If you created dispositions to generate DNC lists, you can skip this step.
If you chose to manually create DNC lists, you must upload your DNC lists to CXone.
You can't manually upload the entire national or state DNC lists to your system due to the size of the files involved. Instead, you should scrub against these lists prior to uploading your calling lists or check at dial time through call suppression![]() Temporarily skips a contact when using the outbound dialer. using a third party service such as Gryphon. Gryphon offers several advantages, including continual updates against the latest national DNC list; consideration of state and federal limitations on calling including appropriate hours of operation; and indemnification against infringement losses.
Temporarily skips a contact when using the outbound dialer. using a third party service such as Gryphon. Gryphon offers several advantages, including continual updates against the latest national DNC list; consideration of state and federal limitations on calling including appropriate hours of operation; and indemnification against infringement losses.
-
Click the app selector
and select ACD. -
Go to Lists > DNC.
-
Click the DNC group where you want to upload a DNC list.
-
Click the Select File button.
-
If you want the records in your DNC list to exist only in this DNC group, select Consolidate Groups.
-
Select Upload New or Select Existing, depending on whether you want to upload a new list from your computer or if you want to use a previously uploaded list.
-
Select the file you want to use and click Open or OK.
- Click Next.
-
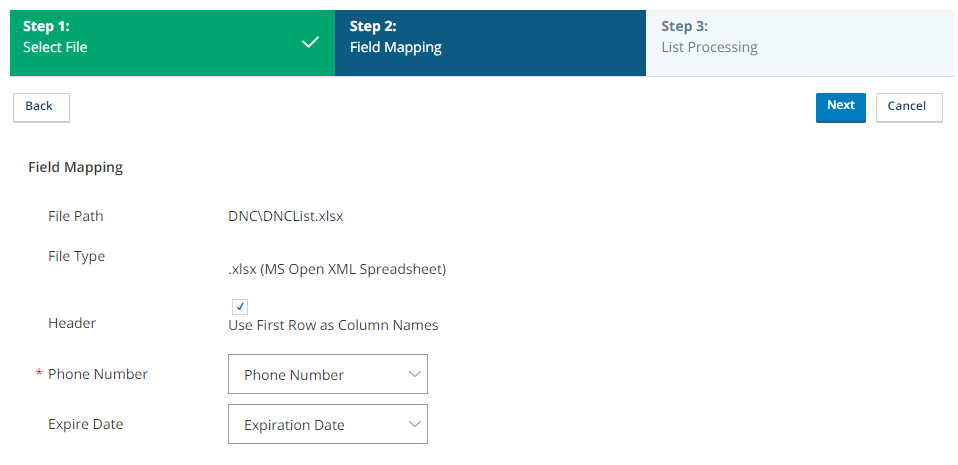
If you uploaded a DNC list with a header row, select the Header checkbox. Verify that the Phone Number and optional Expire Date fields are correctly mapped to your DNC list.
-
Click Next.
-
Click Done.